How to use the TaxiDex admin portal and dispatch console, screen by screen. Every screenshot comes from a running copy of the portal, and every step was clicked through before it was written down.
Sign in, find your way around the two halves of the portal, and know what every part of the top bar does.
1.1 Sign in
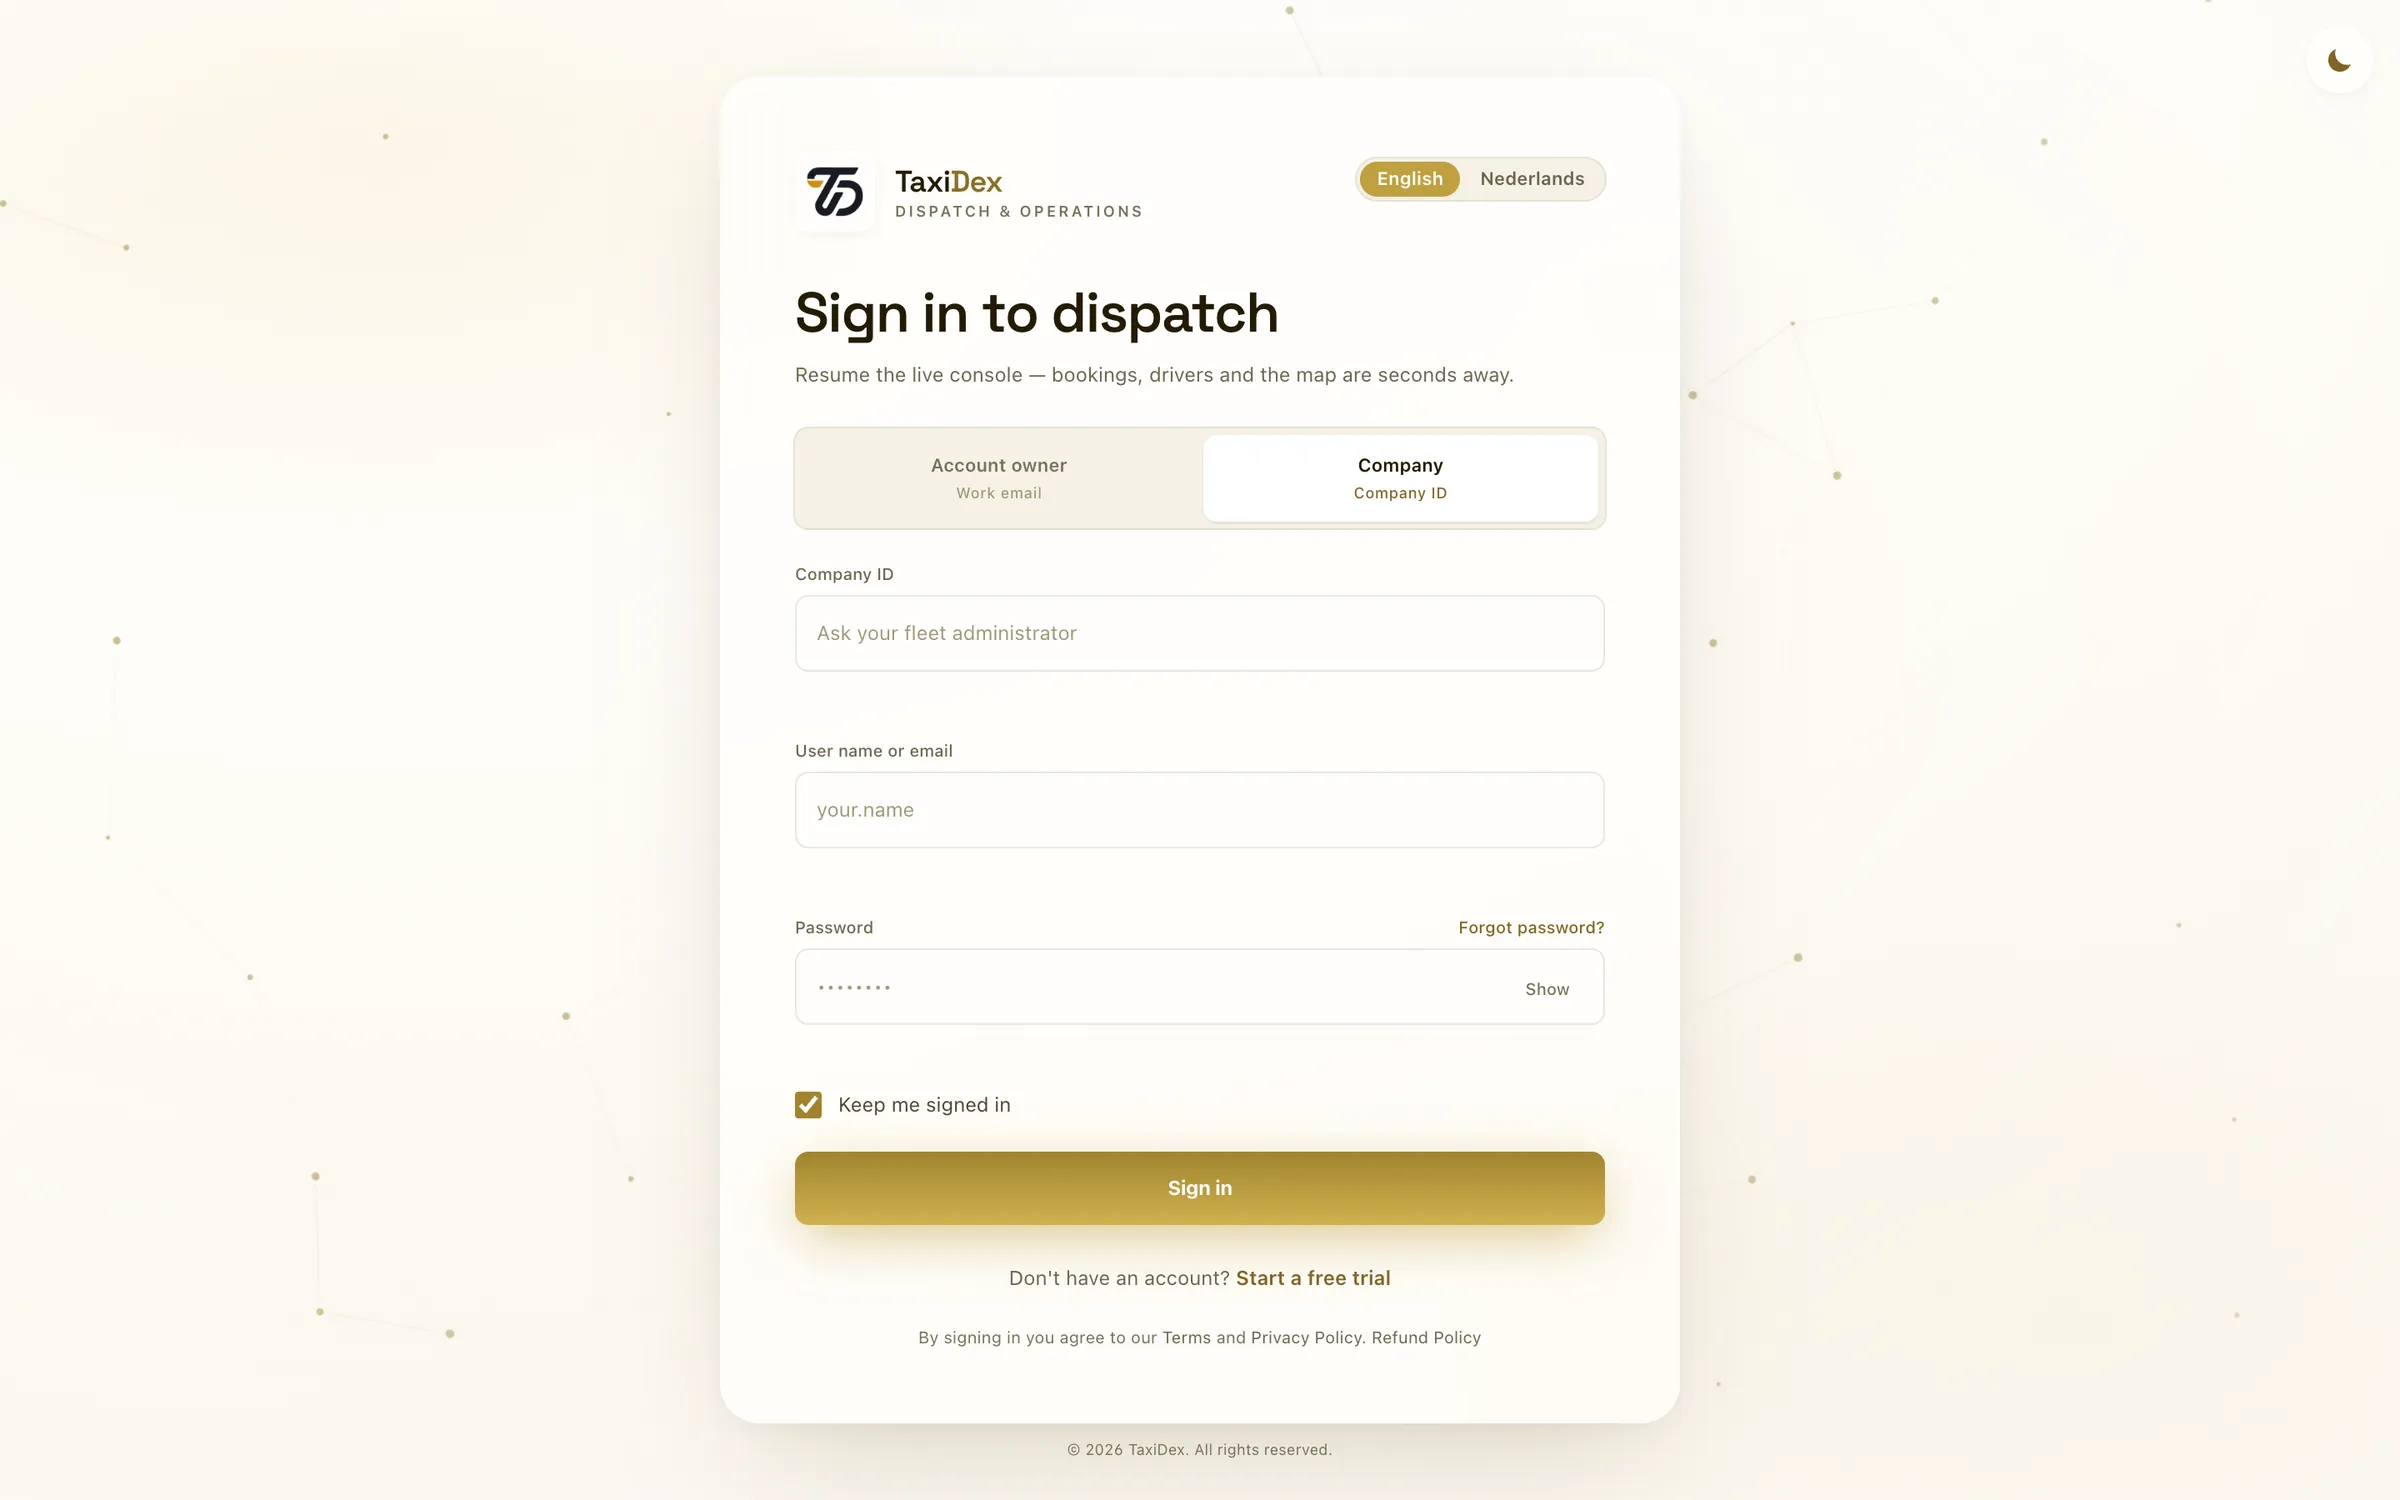
The sign-in page has two doors. Office staff use Company: the fleet's Company ID plus their own user name or e-mail. The account owner can also use Account owner with their work e-mail. Drivers do not sign in here; they use the TaxiDex driver app with their e-mail and password.
The sign-in page, Company tab.
Click a number or a line to spotlight it
1Language Switch this page between English and Nederlands (Dutch).
2Account owner door For the person who opened the TaxiDex account. Signs in with a work e-mail and password.
3Company door For office staff. This door opens by default.
4Company ID Your fleet's short ID (4 to 12 letters, digits or dashes), for example ABT6. It is shown on ADMIN ▸ Dashboard and under Settings ▸ General.
5User name or email The user name or e-mail set for you under Settings ▸ Users.
6Password Your own password. An admin can set a new one but never sees the old one.
7Show / Hide Shows what you typed, so you can check it.
8Forgot password? Opens the password-reset page.
9Keep me signed in Stay signed in on this computer. Leave it unticked on a shared PC.
10Sign in Opens the dispatch console.
11Start a free trial Sign-up for a brand-new fleet.
12Dark theme Switches the sign-in page to the dark look.
How to
Sign in as a dispatcher
Open the portal and click Company (it is already selected the first time).
Type the Company ID your administrator gave you, for example ABT6.
Type your user name or e-mail and your password.
Tick Keep me signed in only on your own computer.
Click Sign in. The dispatch console opens.
Good to knowForgot the Company ID? The owner sees it on ADMIN ▸ Dashboard and under Settings ▸ General.
1.2 The guided tour
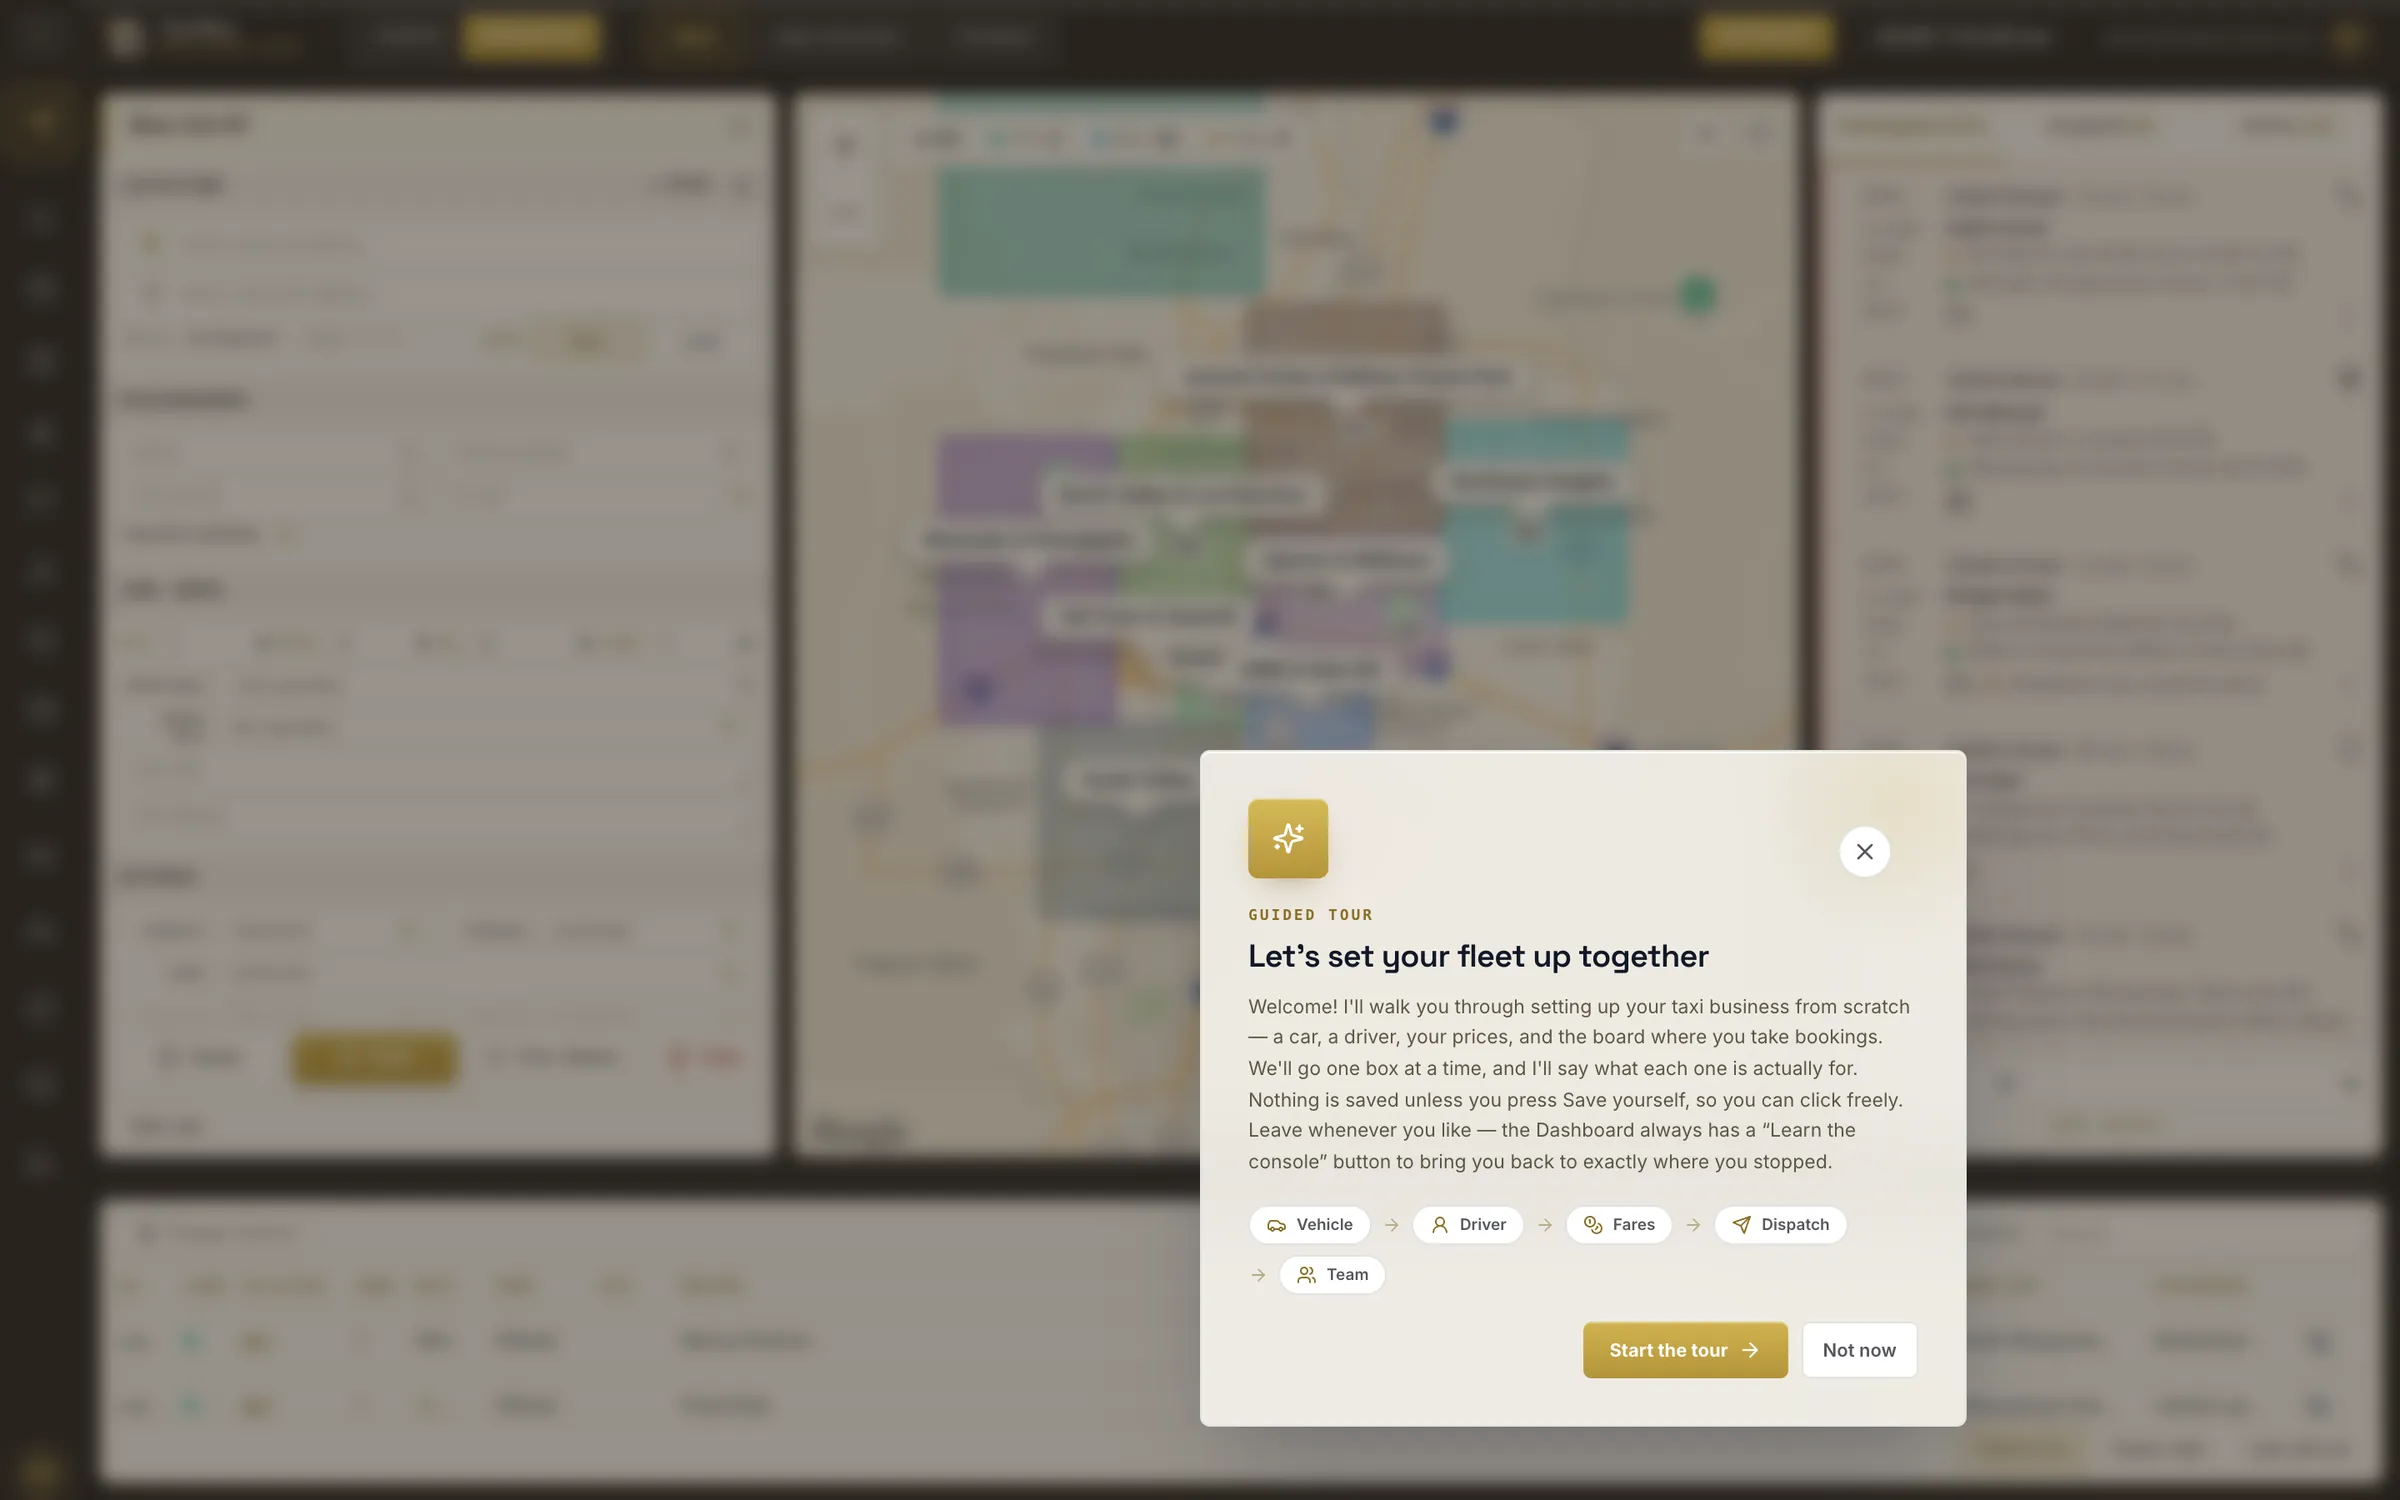
The first time an owner signs in, TaxiDex offers a guided tour that sets up a vehicle, a driver, fares, dispatch and the team, one box at a time.
Shown the first time an owner signs in.
Click a number or a line to spotlight it
1What the tour covers Vehicle → Driver → Fares → Dispatch → Team: the five things the tour sets up with you.
2Start the tour Walks you through one box at a time. Nothing is saved unless you press Save yourself.
3Not now Closes the tour. Start it again any time from ADMIN ▸ Dashboard ▸ Start the guided tour.
4Close Same as Not now.
1.3 The header and the ADMIN | DISPATCH switch
The bar across the top is the same on every page. The gold switch moves you between DISPATCH (the live console, where jobs are taken and given to drivers) and ADMIN (Settings, History, Account and Booking apps).
In ADMIN the header shows SETTINGS · HISTORY · ACCOUNT · BOOKING APPS instead of the console views, plus a Search… ⌘K box that finds any page or setting.
The header in DISPATCH, with the account menu open.
Click a number or a line to spotlight it
1Expand menu Opens the left rail with labels and a Jump to… search.
2Logo and fleet name Your fleet's name under the TaxiDex logo.
3ADMIN | DISPATCH switch The two halves of the portal. DISPATCH is the live console; ADMIN holds Settings, History, Account and Booking apps.
4Console views The three console views: Main, Jobs Overview and Timeline.
5SUPPORT Opens TaxiDex support.
6Fleet clock Date and time where your fleet is. Job times on the board follow this clock (here Mountain Time, 12-hour).
7Account menu Your e-mail and initials. Click to open the menu below.
8Profile Your own profile.
9Settings Jumps to ADMIN ▸ Settings.
10Language English or Nederlands for the whole portal.
11Log out Signs you out of this browser.
02
Chapter 2 · 28 screens · 10 how-tos
Dispatch console: Main
WhereDISPATCH ▸ Main
Main is where the day's work happens: take a call, check the price, book it, and see that a car takes it.
2.1 The console at a glance
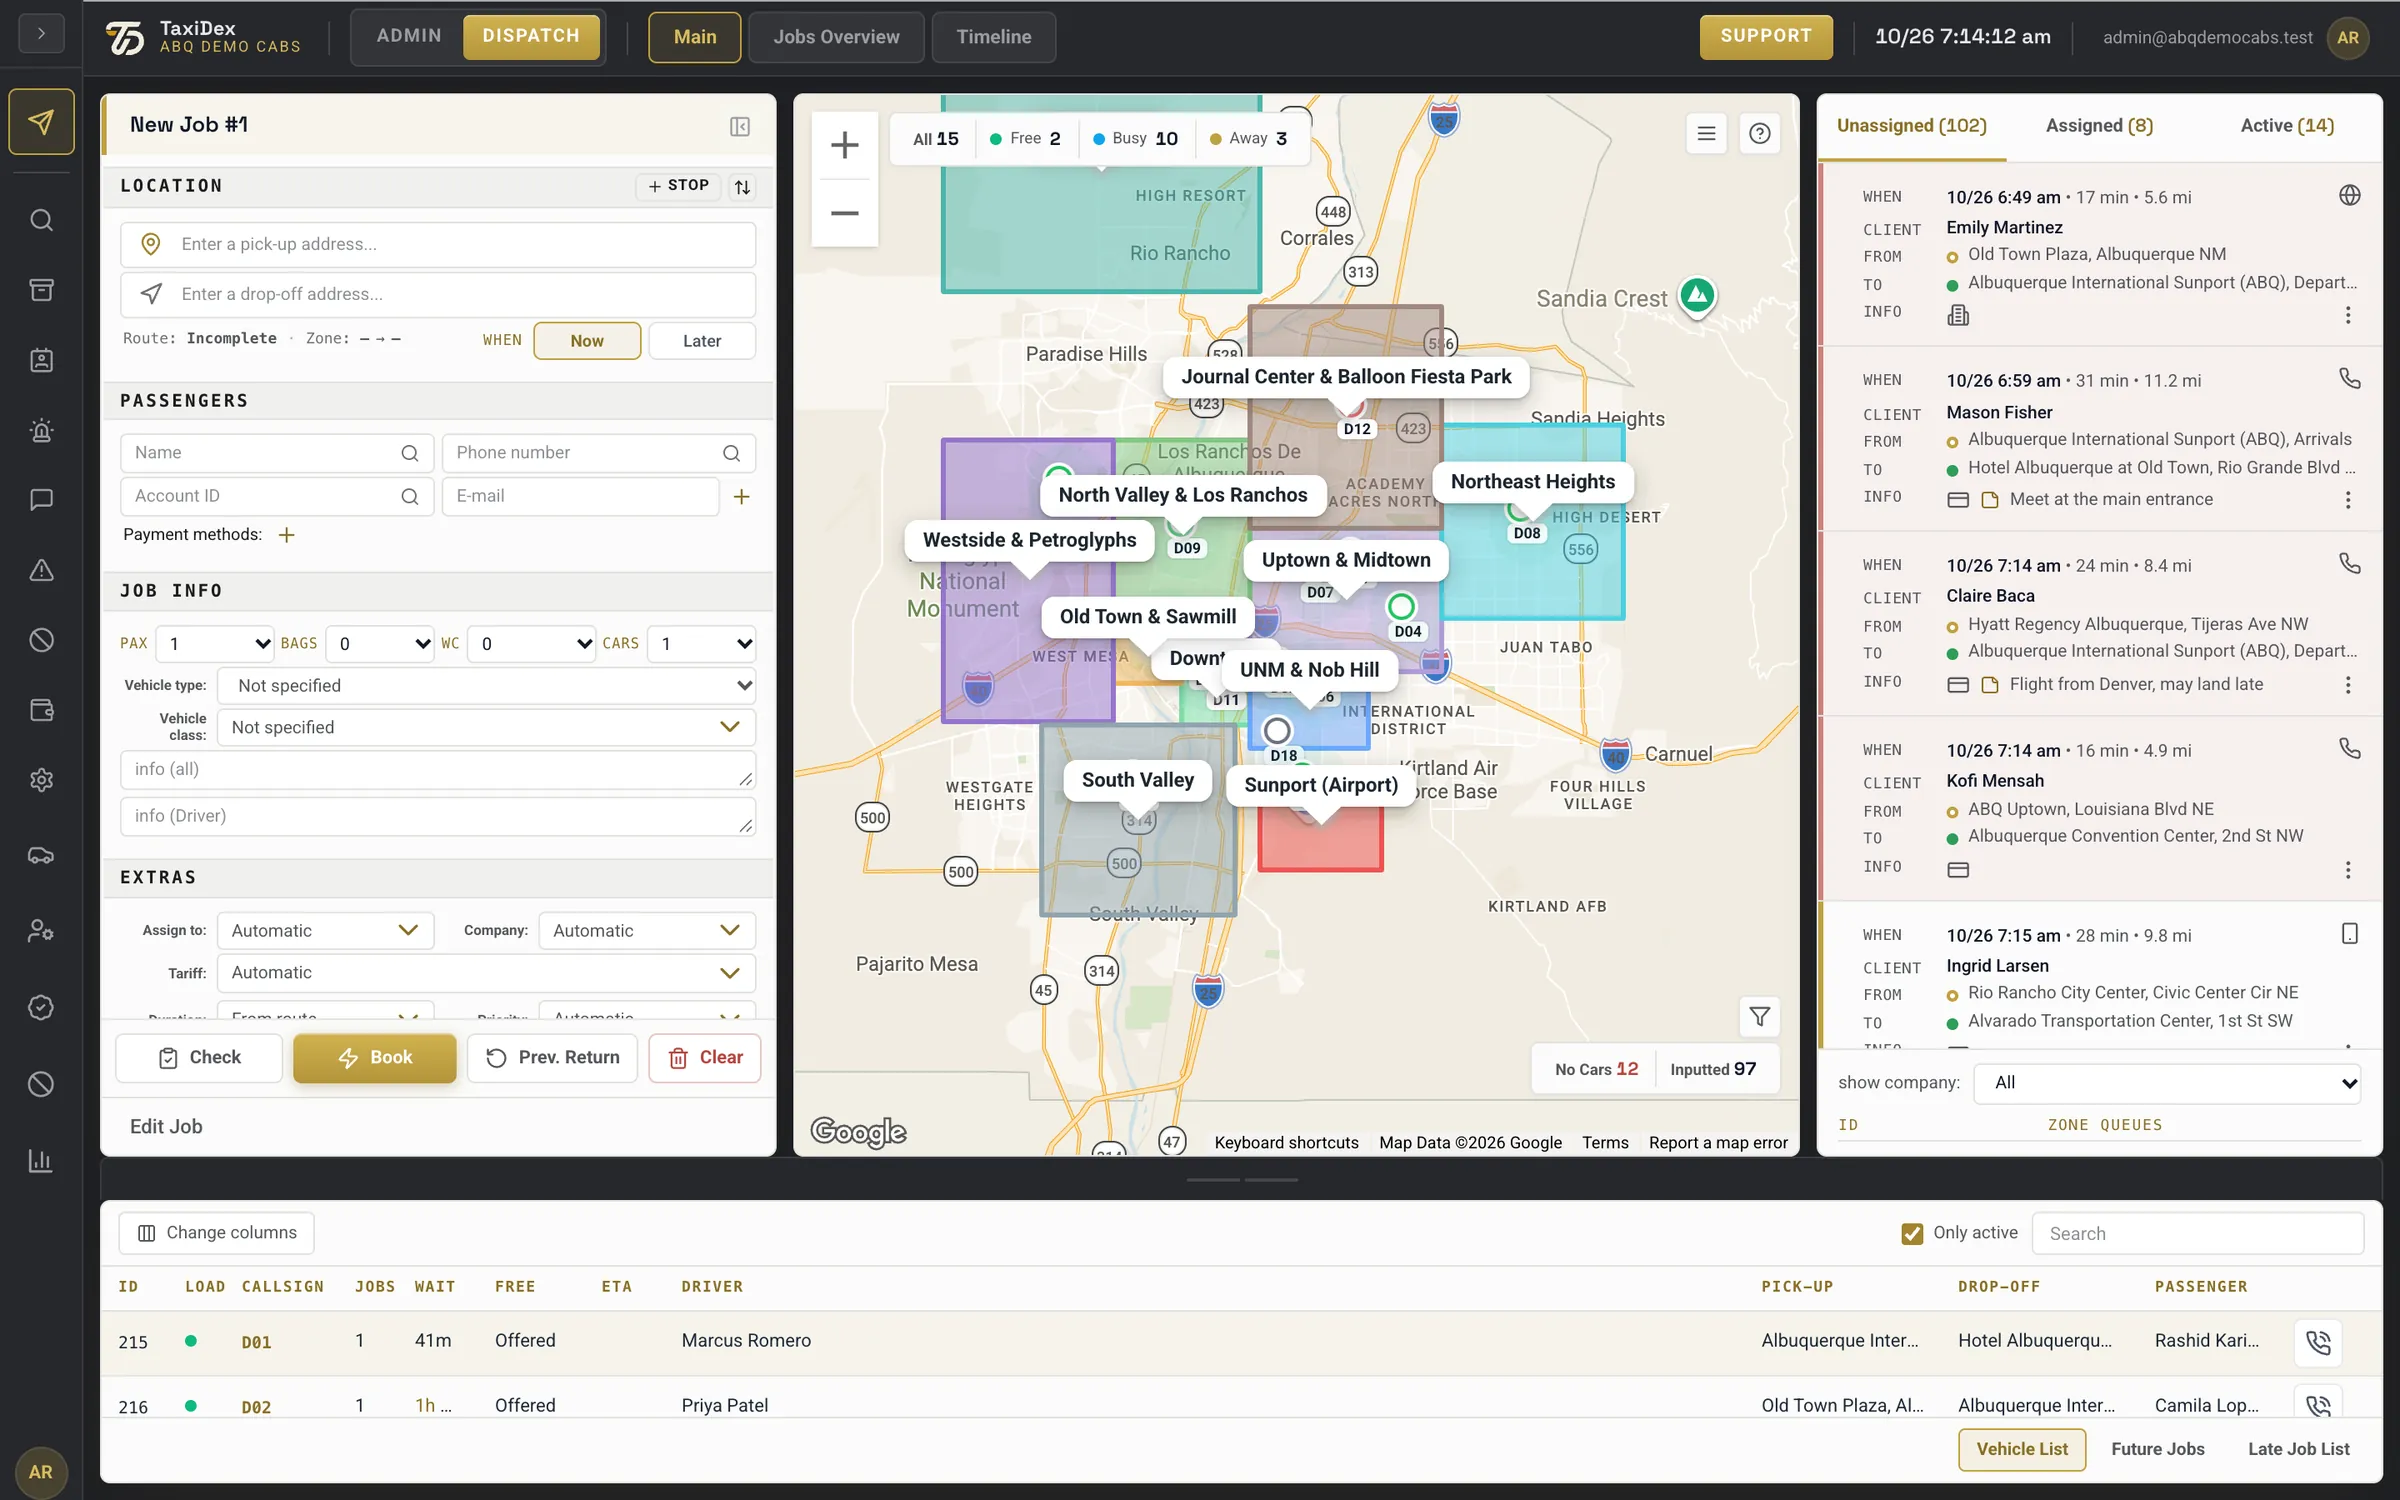
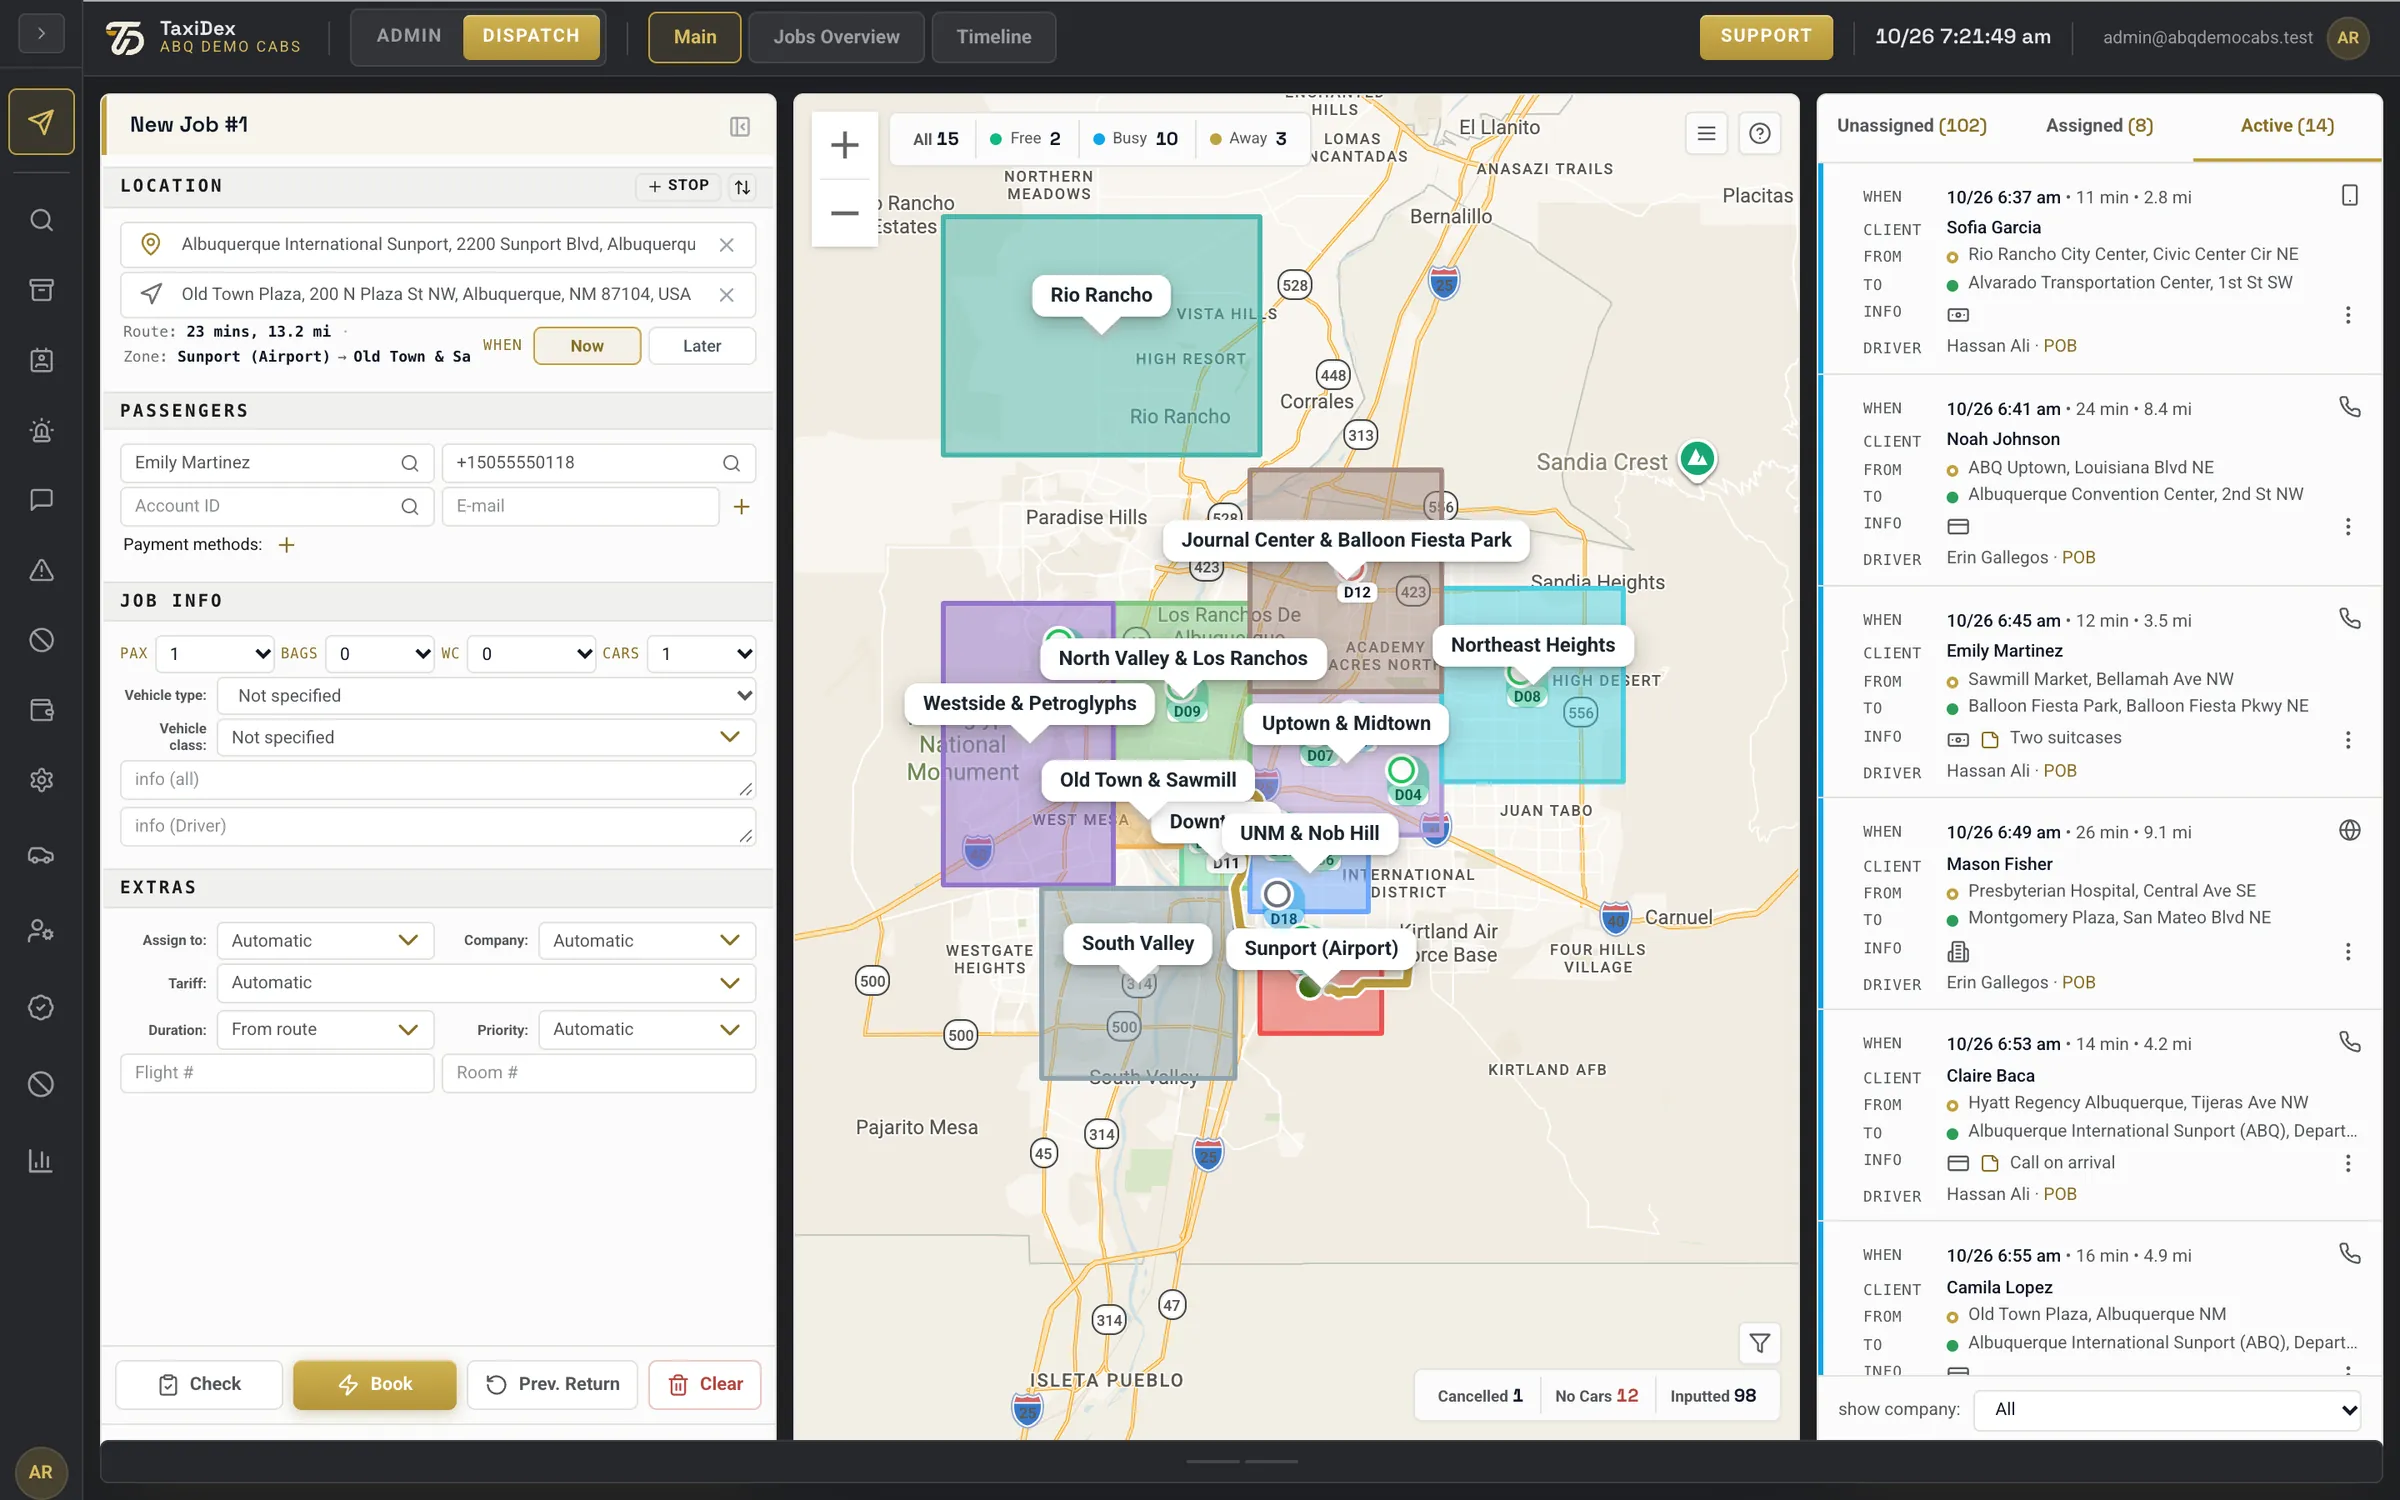
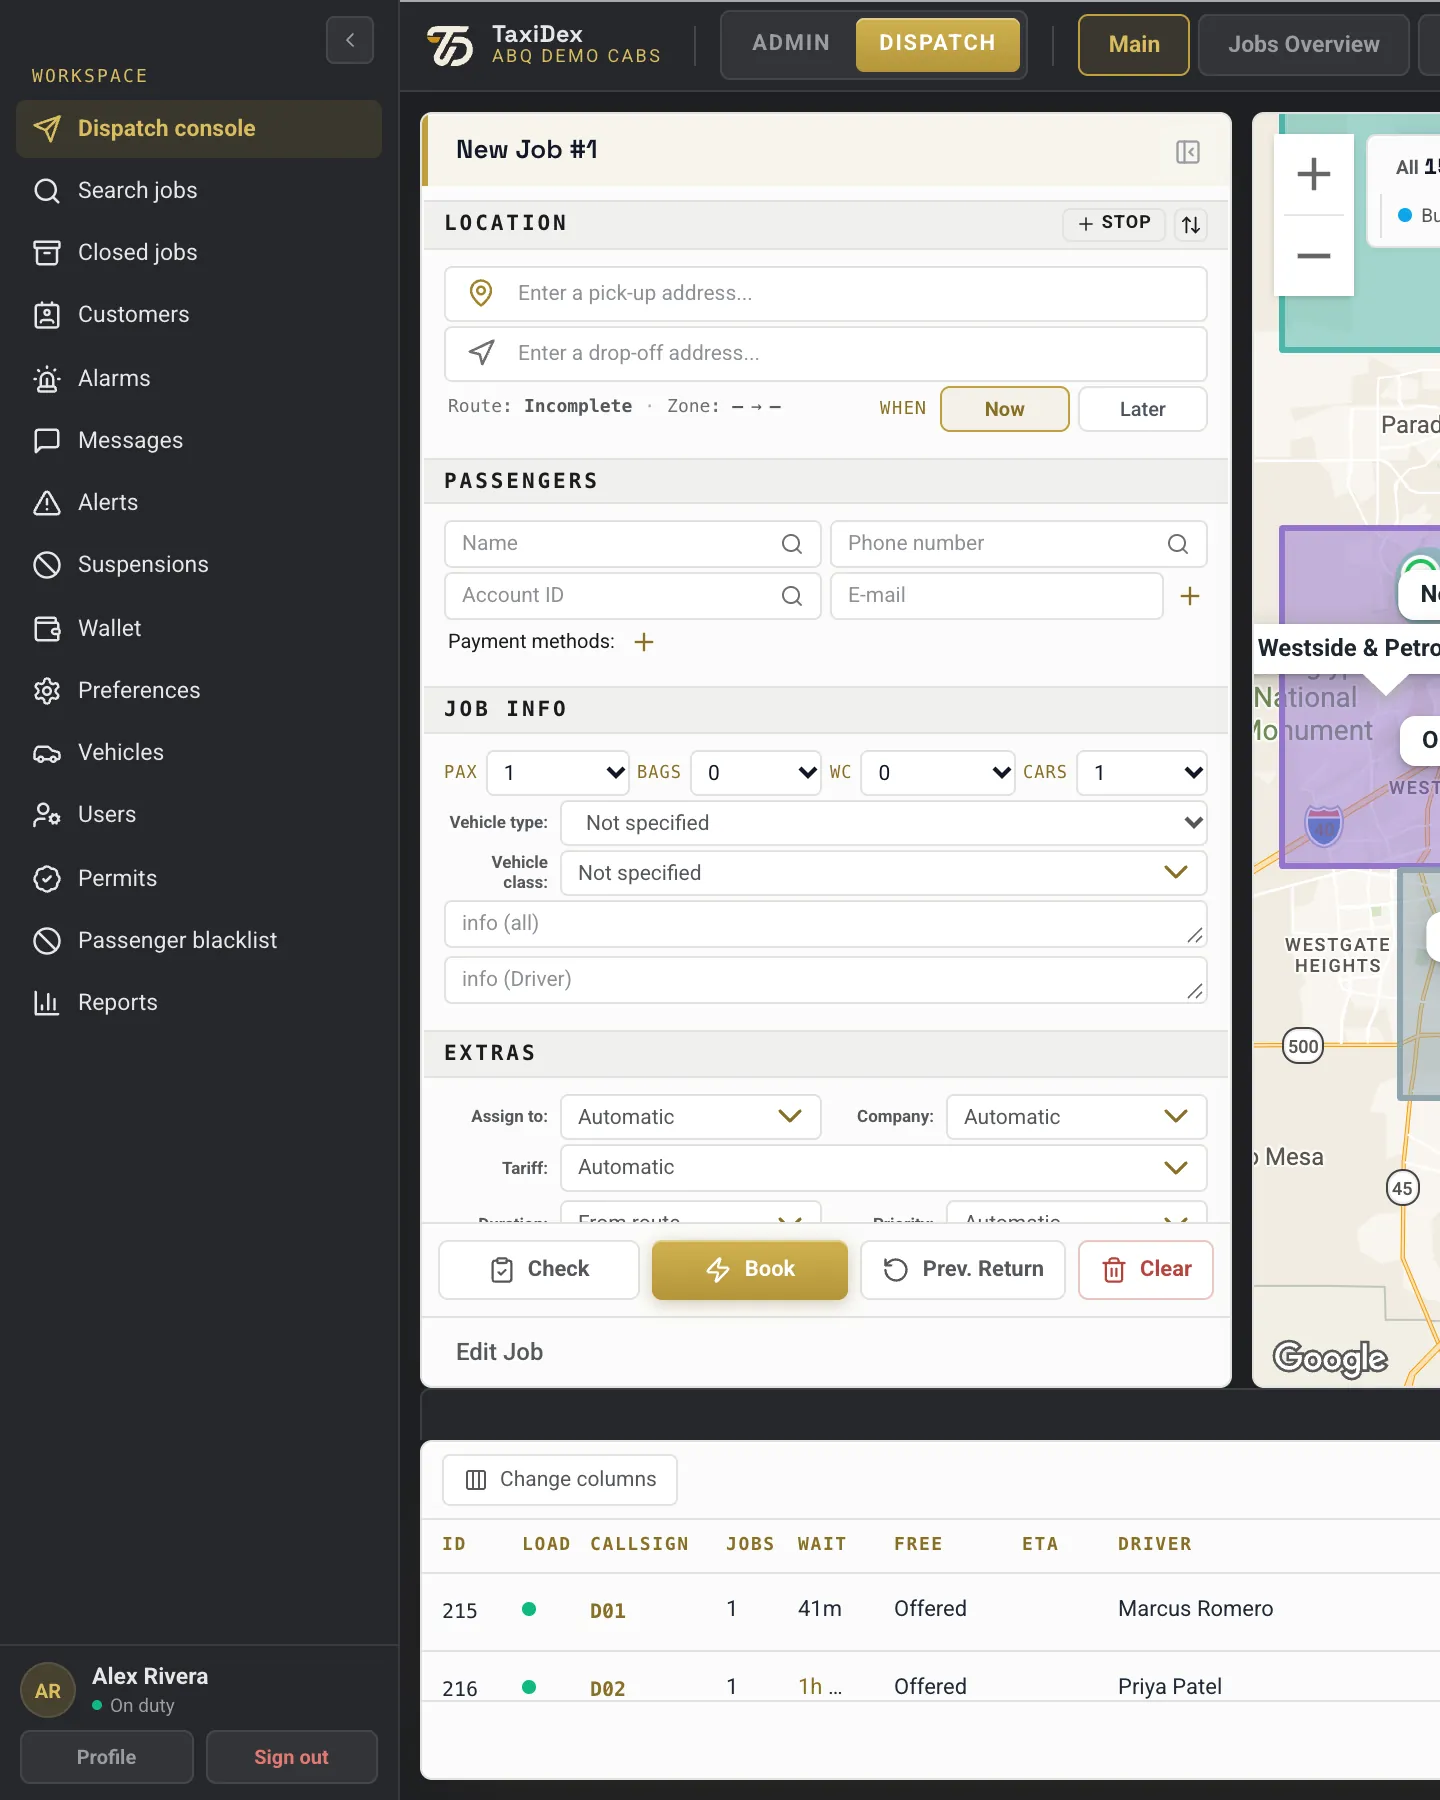
Main has three columns. On the left the New Job form takes a booking. In the middle the map shows your zones and cars. On the right are the three job queues. Below them the fleet list shows every car. Counters along the map's edges tell you how the day is going.
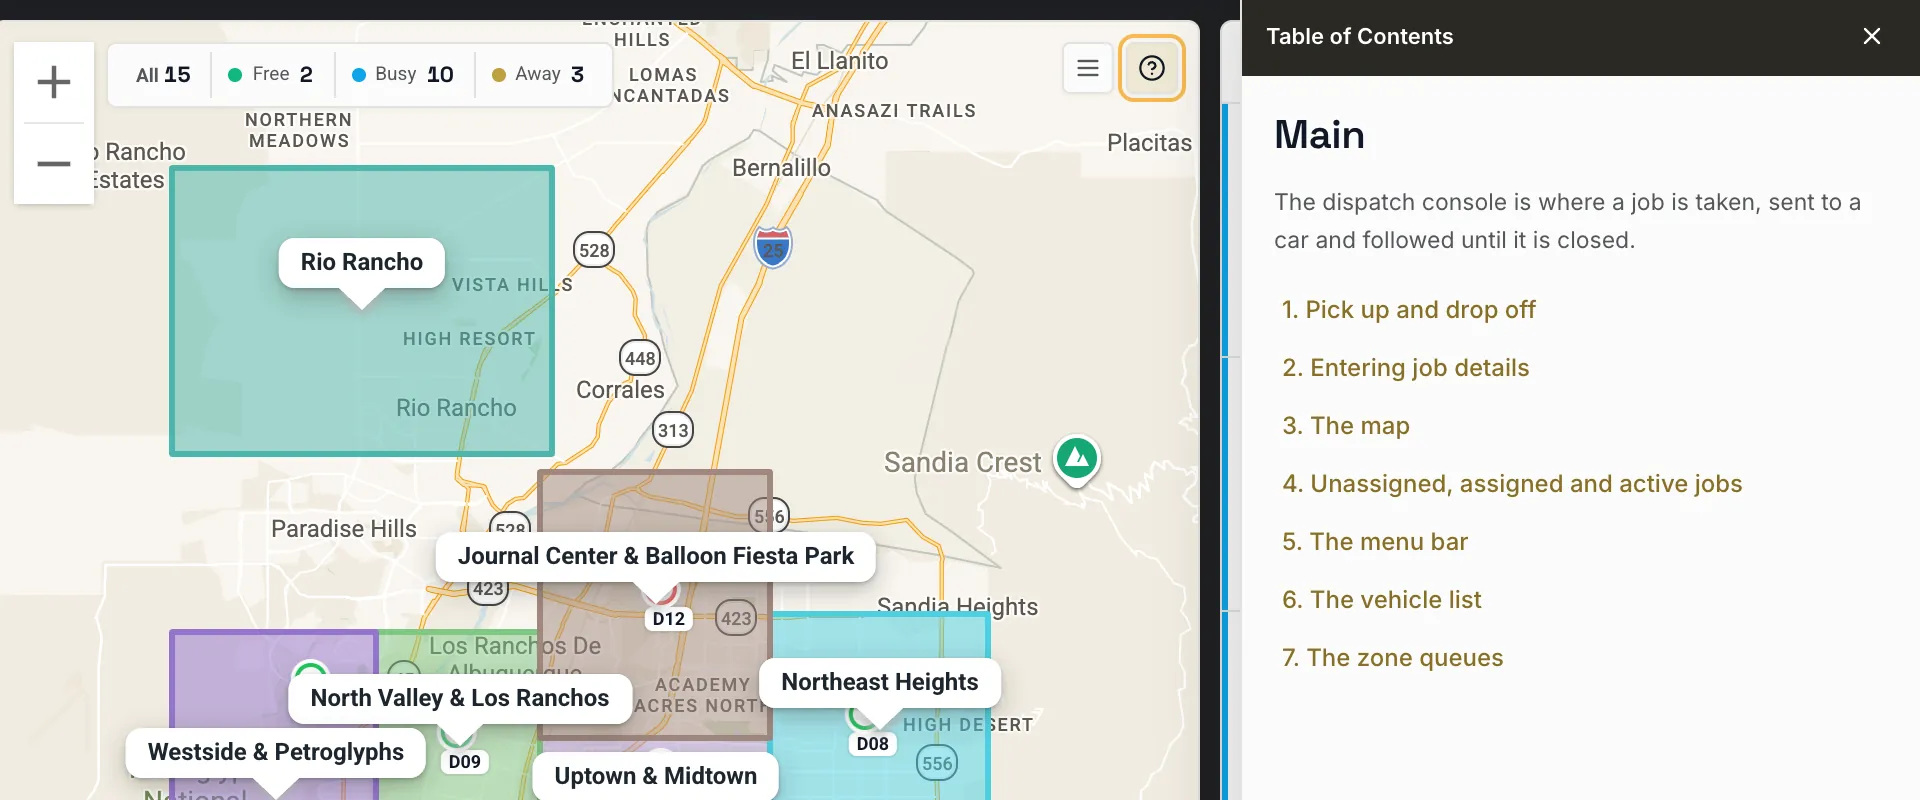
Stuck? The ? at the top right of the map opens help for this screen.
Main: New Job form on the left, map in the middle, job queues on the right, fleet list below.
Click a number or a line to spotlight it
1Icon rail Shortcuts to search, closed jobs, customers, alarms, messages and more (see The left icon rail).
2Job editor Where you take a booking: the New Job form.
3Collapse the job panel Folds the form away to give the map more room.
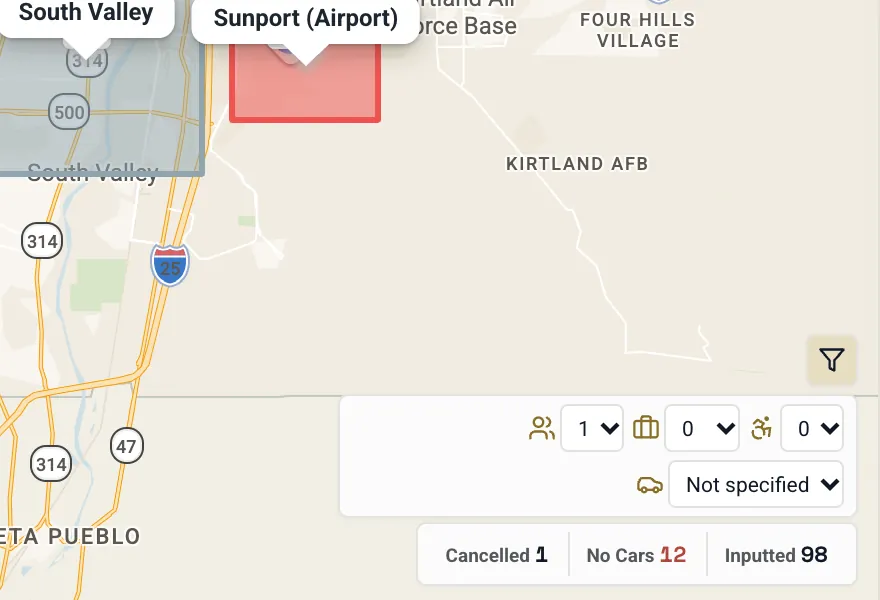
4Fleet counter How many cars are in each state right now: All, Free (green), Busy (blue), Away (amber).
5Zoom Zoom the map in and out.
6Map options Map layers and the vehicle filter (see Map controls).
7Help Opens the built-in help for this screen.
8Car with callsign Each car shows its callsign. The ring colour is its state; green means free.
9Zone label Your zones from Settings ▸ Zones, drawn on the map with their names.
10Filter vehicles Hides cars that cannot take the job you are about to book.
11No Cars · Inputted Today's counts: jobs that found no car to offer them to, and jobs typed in.
12Unassigned · Assigned · Active The three job queues. The number is how many jobs each holds.
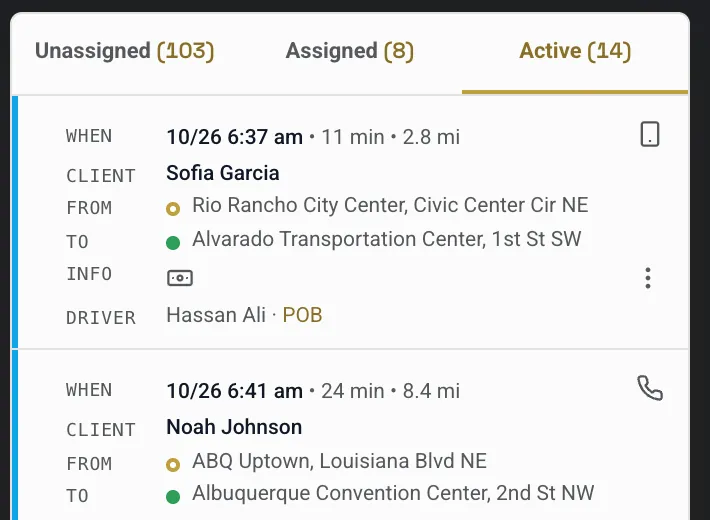
13Job card One job: when, how long and how far, client, from, to, info, and icons for payment and source.
14Show company Show the board for all companies or one of them.
15Zone queues Which free car waits in which zone, by callsign. It is not the order they will be offered work.
16Fleet list (drag the bar to resize) The fleet list. Drag the bar above it up or down to make it bigger or smaller (see The fleet drawer).
17SUPPORT Opens TaxiDex support.
The help panel opened from the map's ? button.
Click a number or a line to spotlight it
1Help (?) The ? on the map opens help for the screen you are on.
2What this screen is for One line on what the screen is for.
3Topics: click one to read it Click a topic to read it: addresses, job details, the map, the queues, the menu bar, the vehicle list and the zone queues.
4Close Closes the help.
2.2 The New Job form
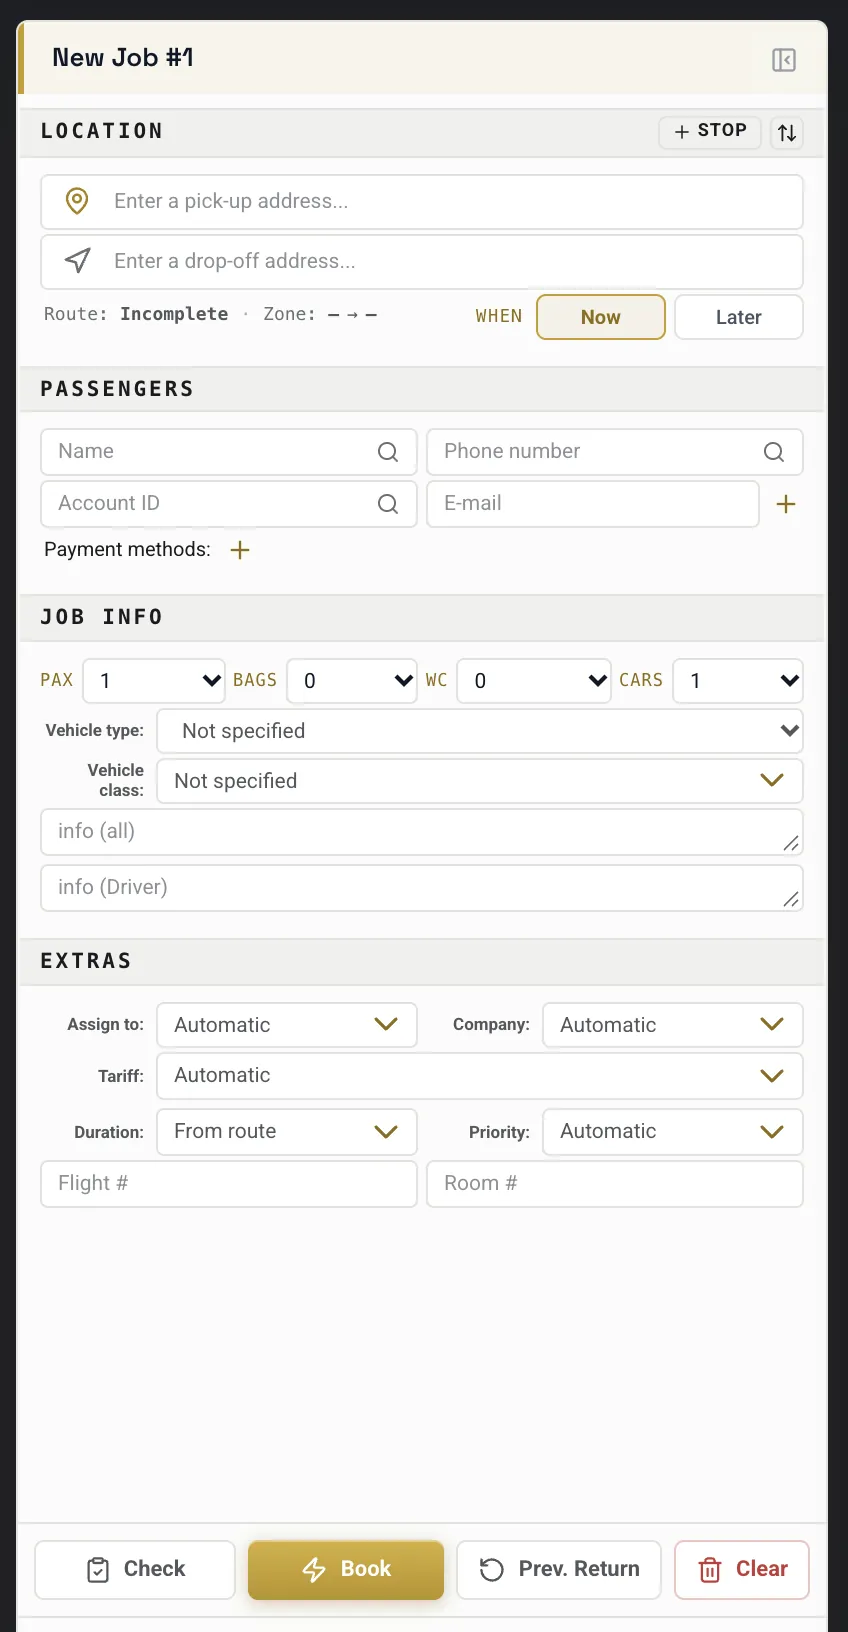
The form is split into Location, Passengers, Job info and Extras. Only pick-up and drop-off are required to book; everything else is optional.
An empty New Job form.
Click a number or a line to spotlight it
1Job tab The form you are filling in. Opening an existing job adds an Edit Job tab below this one.
2Collapse the job panel Folds the form away.
3+ Stop Adds a stop between pick-up and drop-off.
4Swap pick-up and drop-off Swaps pick-up and drop-off.
5Pick-up address Type part of the address and pick it from the list.
6Drop-off address Same for the destination.
7Route and zone readout After both addresses: travel time, distance in miles and the zones the trip runs between.
8When: Now / Later Now for an immediate job; Later opens date and time.
9Passenger name The magnifier finds a returning customer by name.
10Phone number Any format. The magnifier looks the customer up by phone.
11Account ID Bill the ride to a business account.
12E-mail Where the booking confirmation and receipt are sent.
13Add another passenger Another passenger on the same job.
14Payment methods (+ to add) Cash, Card or Account: the methods your fleet allows (Settings ▸ General ▸ Payments).
15PAX · Bags · WC · Cars Passengers, bags, wheelchairs and how many cars.
16Vehicle type Not specified, or one of your types such as Sedan, SUV or Minibus.
17Vehicle class Not specified, or one of your vehicle classes.
18info (all) A note shown to dispatchers and the driver.
19info (Driver) A note only the driver sees, never the passenger.
20Assign to Automatic lets dispatch pick the driver, or choose a named driver.
21Company Automatic, or one of your companies.
22Tariff Automatic, or a specific tariff such as Night (10 pm – 5 am).
23Duration From route, or a custom duration.
24Priority Automatic, or 1 to 5.
25Flight / Room number Extra details for airport and hotel jobs.
26Check Works out the route, the price and the nearest free car without booking anything.
27Book Sends the job. It needs a pick-up and a drop-off first.
28Prev. Return Builds the return trip of this passenger's previous job. Enter their phone or name first.
29Clear Empties the form straight away.
2.3 Book a ride
A booking takes three presses: pick the addresses, Check, then Book. These screenshots follow one test booking from Old Town Plaza to the Albuquerque Sunport. Check showed the nearest car and the price, USD ~28, which is the flat Old Town ↔ Sunport price set under Tariffs.
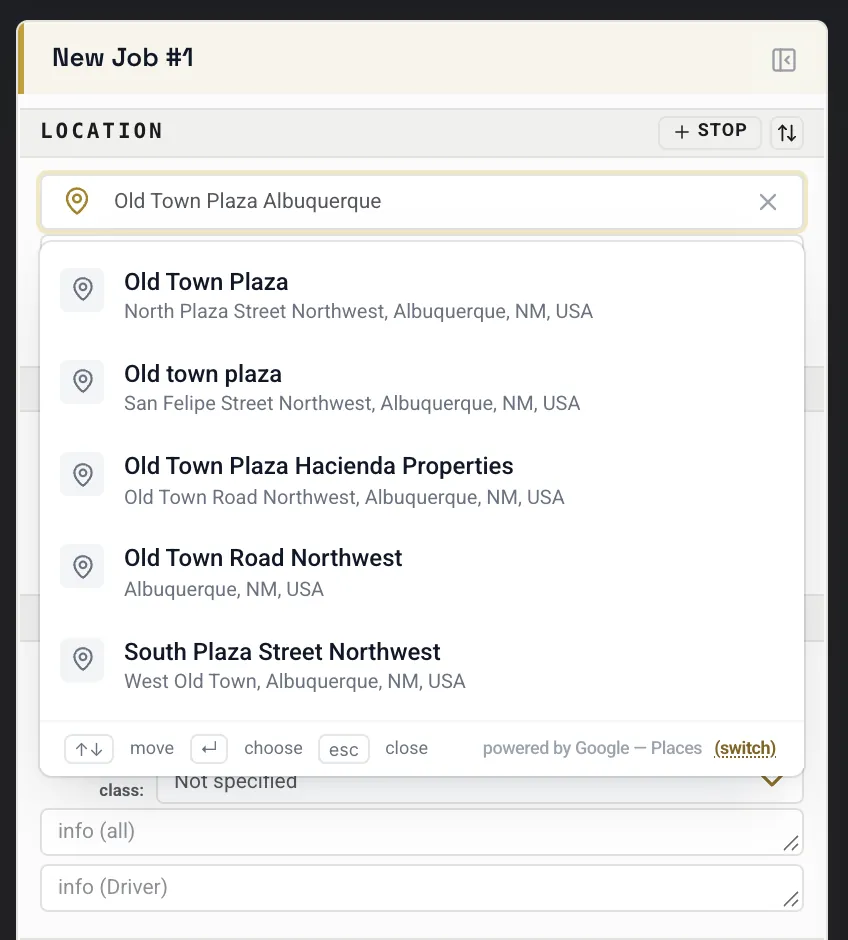
Typing a pick-up address.
Click a number or a line to spotlight it
1Type part of the address Type a few letters of the place or street.
2Pick a suggestion Pick the right line. The list comes from Google Places.
3Keyboard: ↑↓ move · ↵ choose · esc close Arrow keys move, Enter chooses, Esc closes the list.
How to
Book a ride now (ASAP)
Click into Pick-up address, type a few letters and choose the right line from the list.
Do the same in Drop-off address. The line underneath now shows the travel time, the distance in miles and the zones.
Type the passenger's name and phone. The magnifier finds a returning customer.
Choose Payment and, if needed, passengers, bags, vehicle type and a note.
Press Check. A box shows the estimated pick-up time, the nearest free car and the price in dollars.
Press Book (in the box or under the form). A message confirms it, the job appears in Unassigned and the form empties for the next call.
How to
Book a ride for later
Fill in the addresses and passenger as above.
Press Later next to WHEN and set the date and time.
Press Check, then Book. The job shows in Unassigned with its date and time, and under Future Jobs in the fleet drawer.
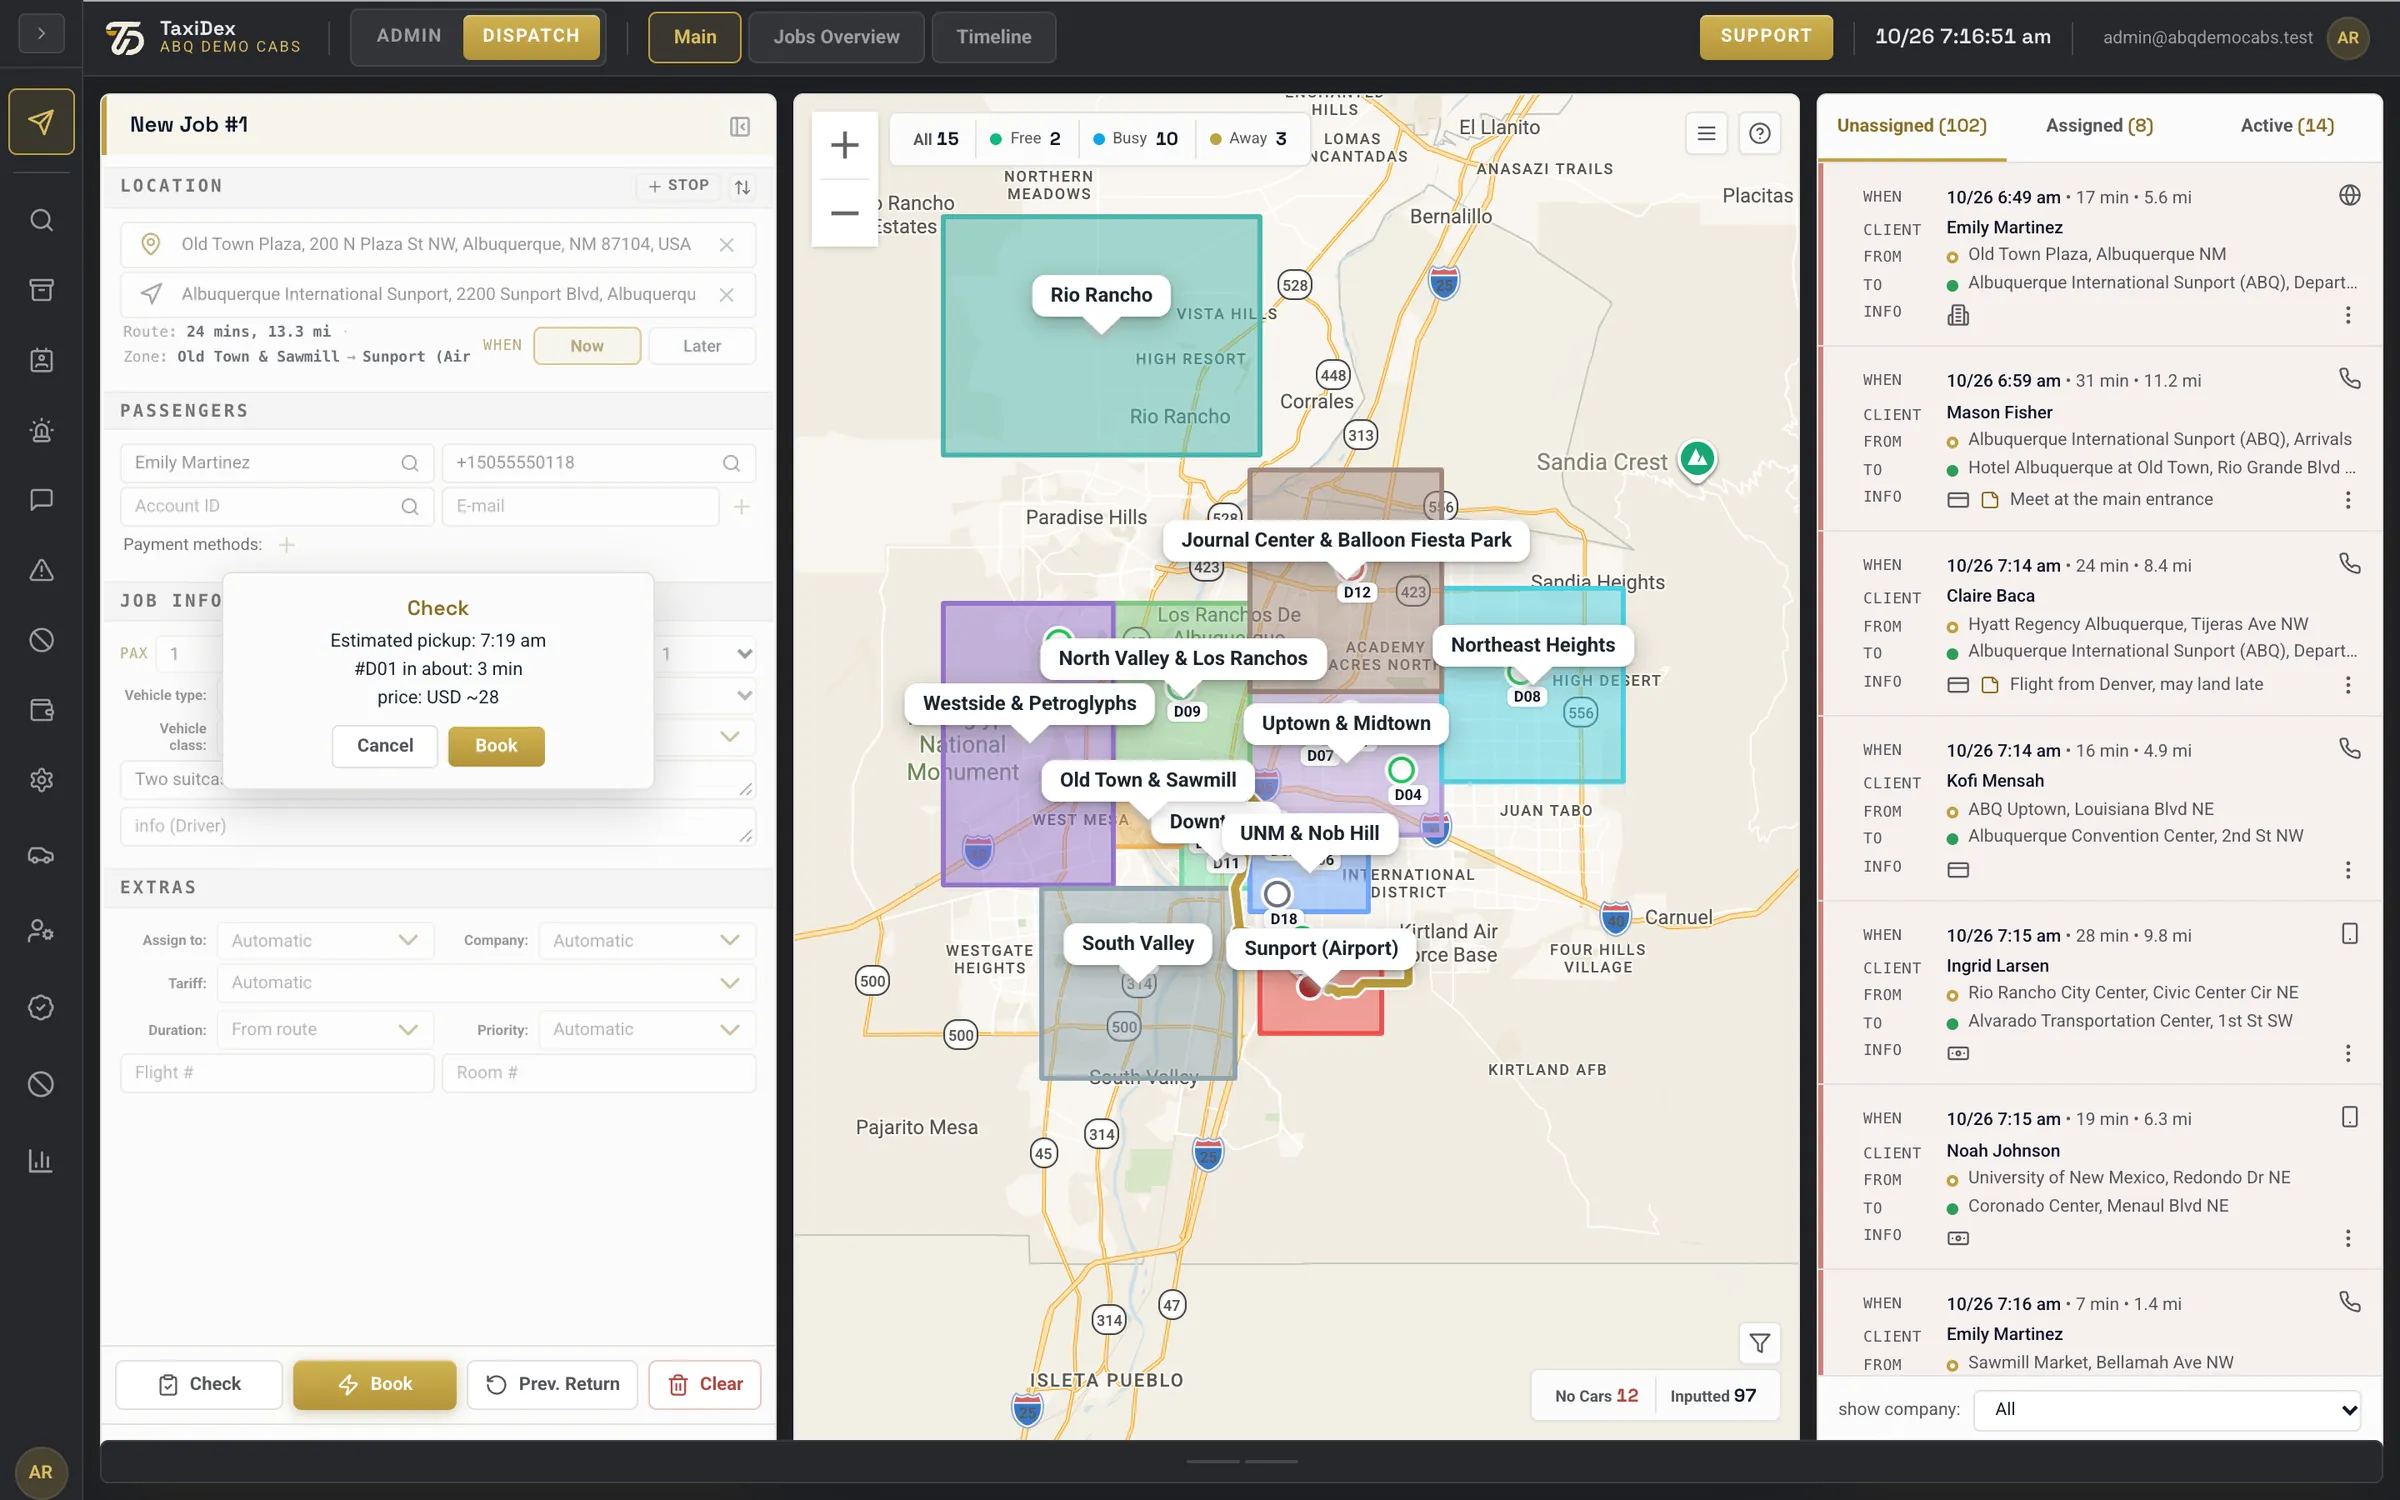
After pressing Check.
Click a number or a line to spotlight it
1Pick-up and drop-off filled in Old Town Plaza to the Albuquerque Sunport, both picked from the list.
2Route time, distance and zones 24 mins and 13.3 mi, from the Old Town & Sawmill zone to Sunport (Airport).
3Returning passenger: name and phone A returning passenger, found with the magnifier.
4Check result What Check worked out. Nothing is booked yet.
5Estimated pick-up time When the car should be at the pick-up: 7:19 am.
6Nearest car and how far away The nearest free car (D01) and how far away it is: about 3 minutes.
7Price estimate in US dollars USD ~28: the flat Old Town ↔ Sunport price from your tariffs.
8Cancel · Book Cancel closes the box; Book sends the job.
9Route on the map The planned route, drawn on the map.
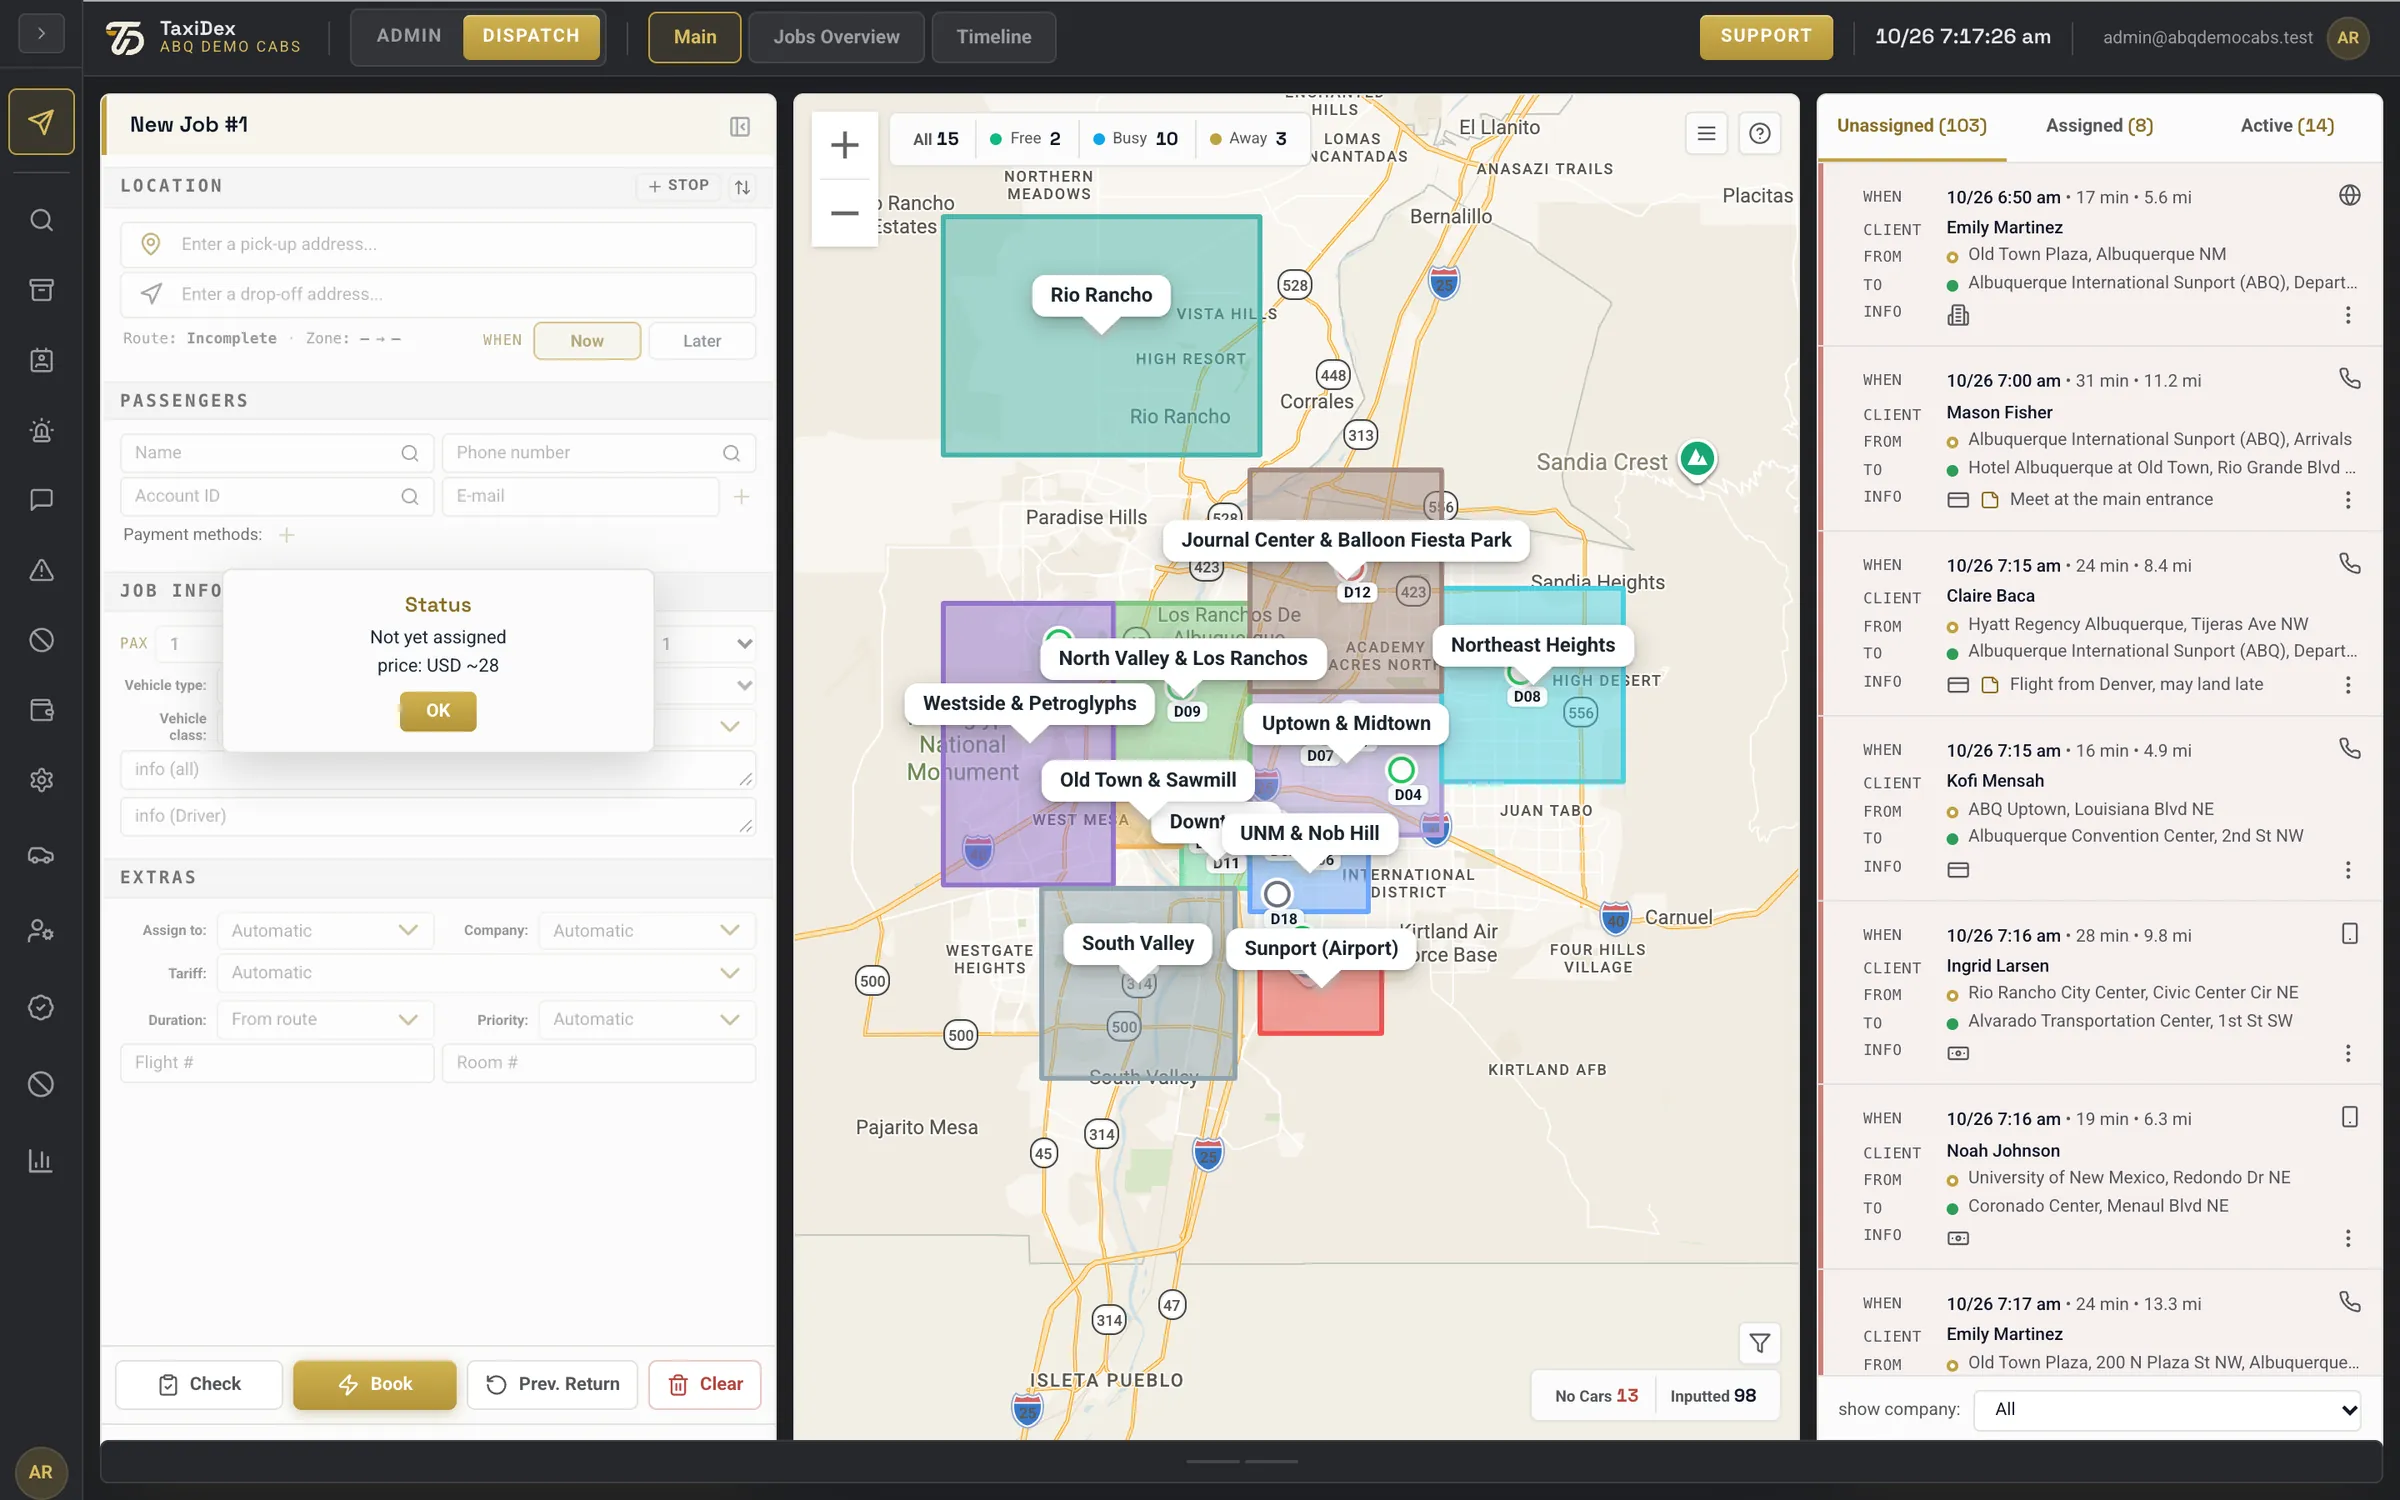
Straight after pressing Book.
Click a number or a line to spotlight it
1Status: not yet assigned, price The job is in the queue, not yet assigned, with its price: USD ~28.
2OK Closes the message.
3Unassigned count went up Unassigned went from 102 to 103.
4The new job in the list Today 7:17 am, Emily Martinez, Old Town Plaza to the Sunport, 24 min, 13.3 mi.
5Inputted counts it Inputted went from 97 to 98.
6Form is cleared for the next call Ready for the next call.
Good to knowThe price on a new job is an estimate. A flat zone price stays as it is; a taximeter fare is worked out from the measured route.
2.4 Assign a driver
With automatic dispatching on, TaxiDex offers each job to drivers by itself (Settings ▸ General ▸ Assignment). You can always step in and give a job to a driver yourself.
A job you give to a driver is offered to them first. It stays in Unassigned until they accept, moves to Assigned when they have it, and to Active once they are on the way.
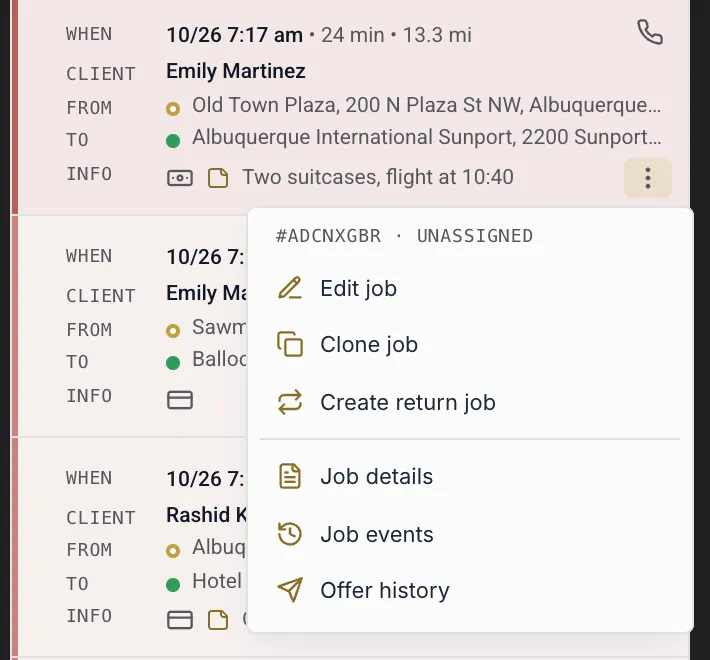
The ⋮ menu of a job card.
Click a number or a line to spotlight it
1Payment method (hover to read) Hover it to read it, for example Payment: Cash.
2Where the job came from (hover to read) Hover it to read it. A phone means it was taken by phone, a globe that it came from the booking website, a mobile that it came from the passenger app.
3More actions (⋮) Also opens with a right-click on the card.
4Edit job Opens the job in its own Edit Job tab, where you can change, assign or cancel it.
5Clone job Starts a new job with the same details.
6Create return job Builds the return leg.
7Job details Opens the job's full record.
8Job events Everything that happened to the job, in order.
9Offer history Which drivers were offered the job and what they answered.
How to
Assign a driver to a job
Find the job in Unassigned and click its ⋮ (or right-click the card).
Choose Edit job. The job opens in an Edit Job tab under New Job #1.
Under Extras, open Assign to and choose the driver (callsigns are shown next to names).
Press Re-assign. The driver gets the offer in the app.
How to
Assign by dragging
Drag the job card from the queue.
Drop it on a car on the map, or on a driver in the fleet list.
How to
Move a job to another driver
Open the job with Edit job.
Pick the new driver in Assign to and press Re-assign.
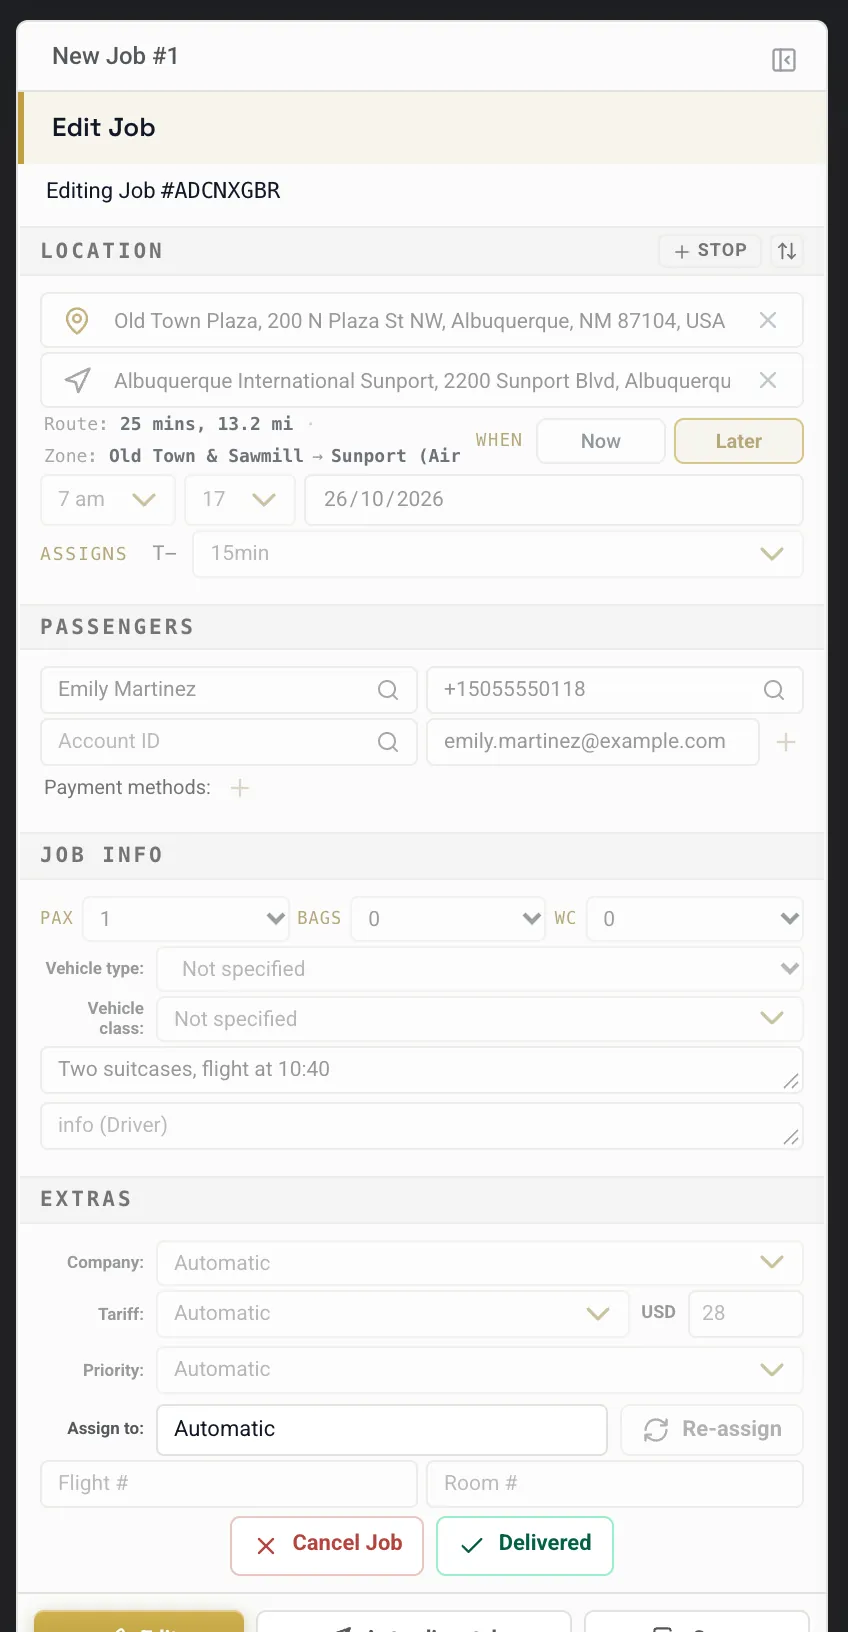
A job opened with Edit job. Date boxes follow the computer's own date format.
Click a number or a line to spotlight it
1Editing tab (New Job #1 stays above) The job you opened (#ADCNXGBR). New Job #1 stays above it, ready for the next call.
2Pick-up time: hour, minute, date Hour, minute and date of the pick-up.
3T- (how early to dispatch a pre-booking) How long before the pick-up a pre-booking is sent to drivers.
4Passenger, filled from the customer record Name, phone, account and e-mail, filled from the customer record.
5Tariff and the price in USD Automatic, or a named tariff. The box on the right is the price in USD.
6Assign to (driver picker) Automatic (dispatch decides) or a named driver with callsign.
7Re-assign Gives the job to the driver picked in Assign to.
8Cancel Job Asks for a reason, then cancels the job.
9Delivered Closes the job as done, for when the driver cannot.
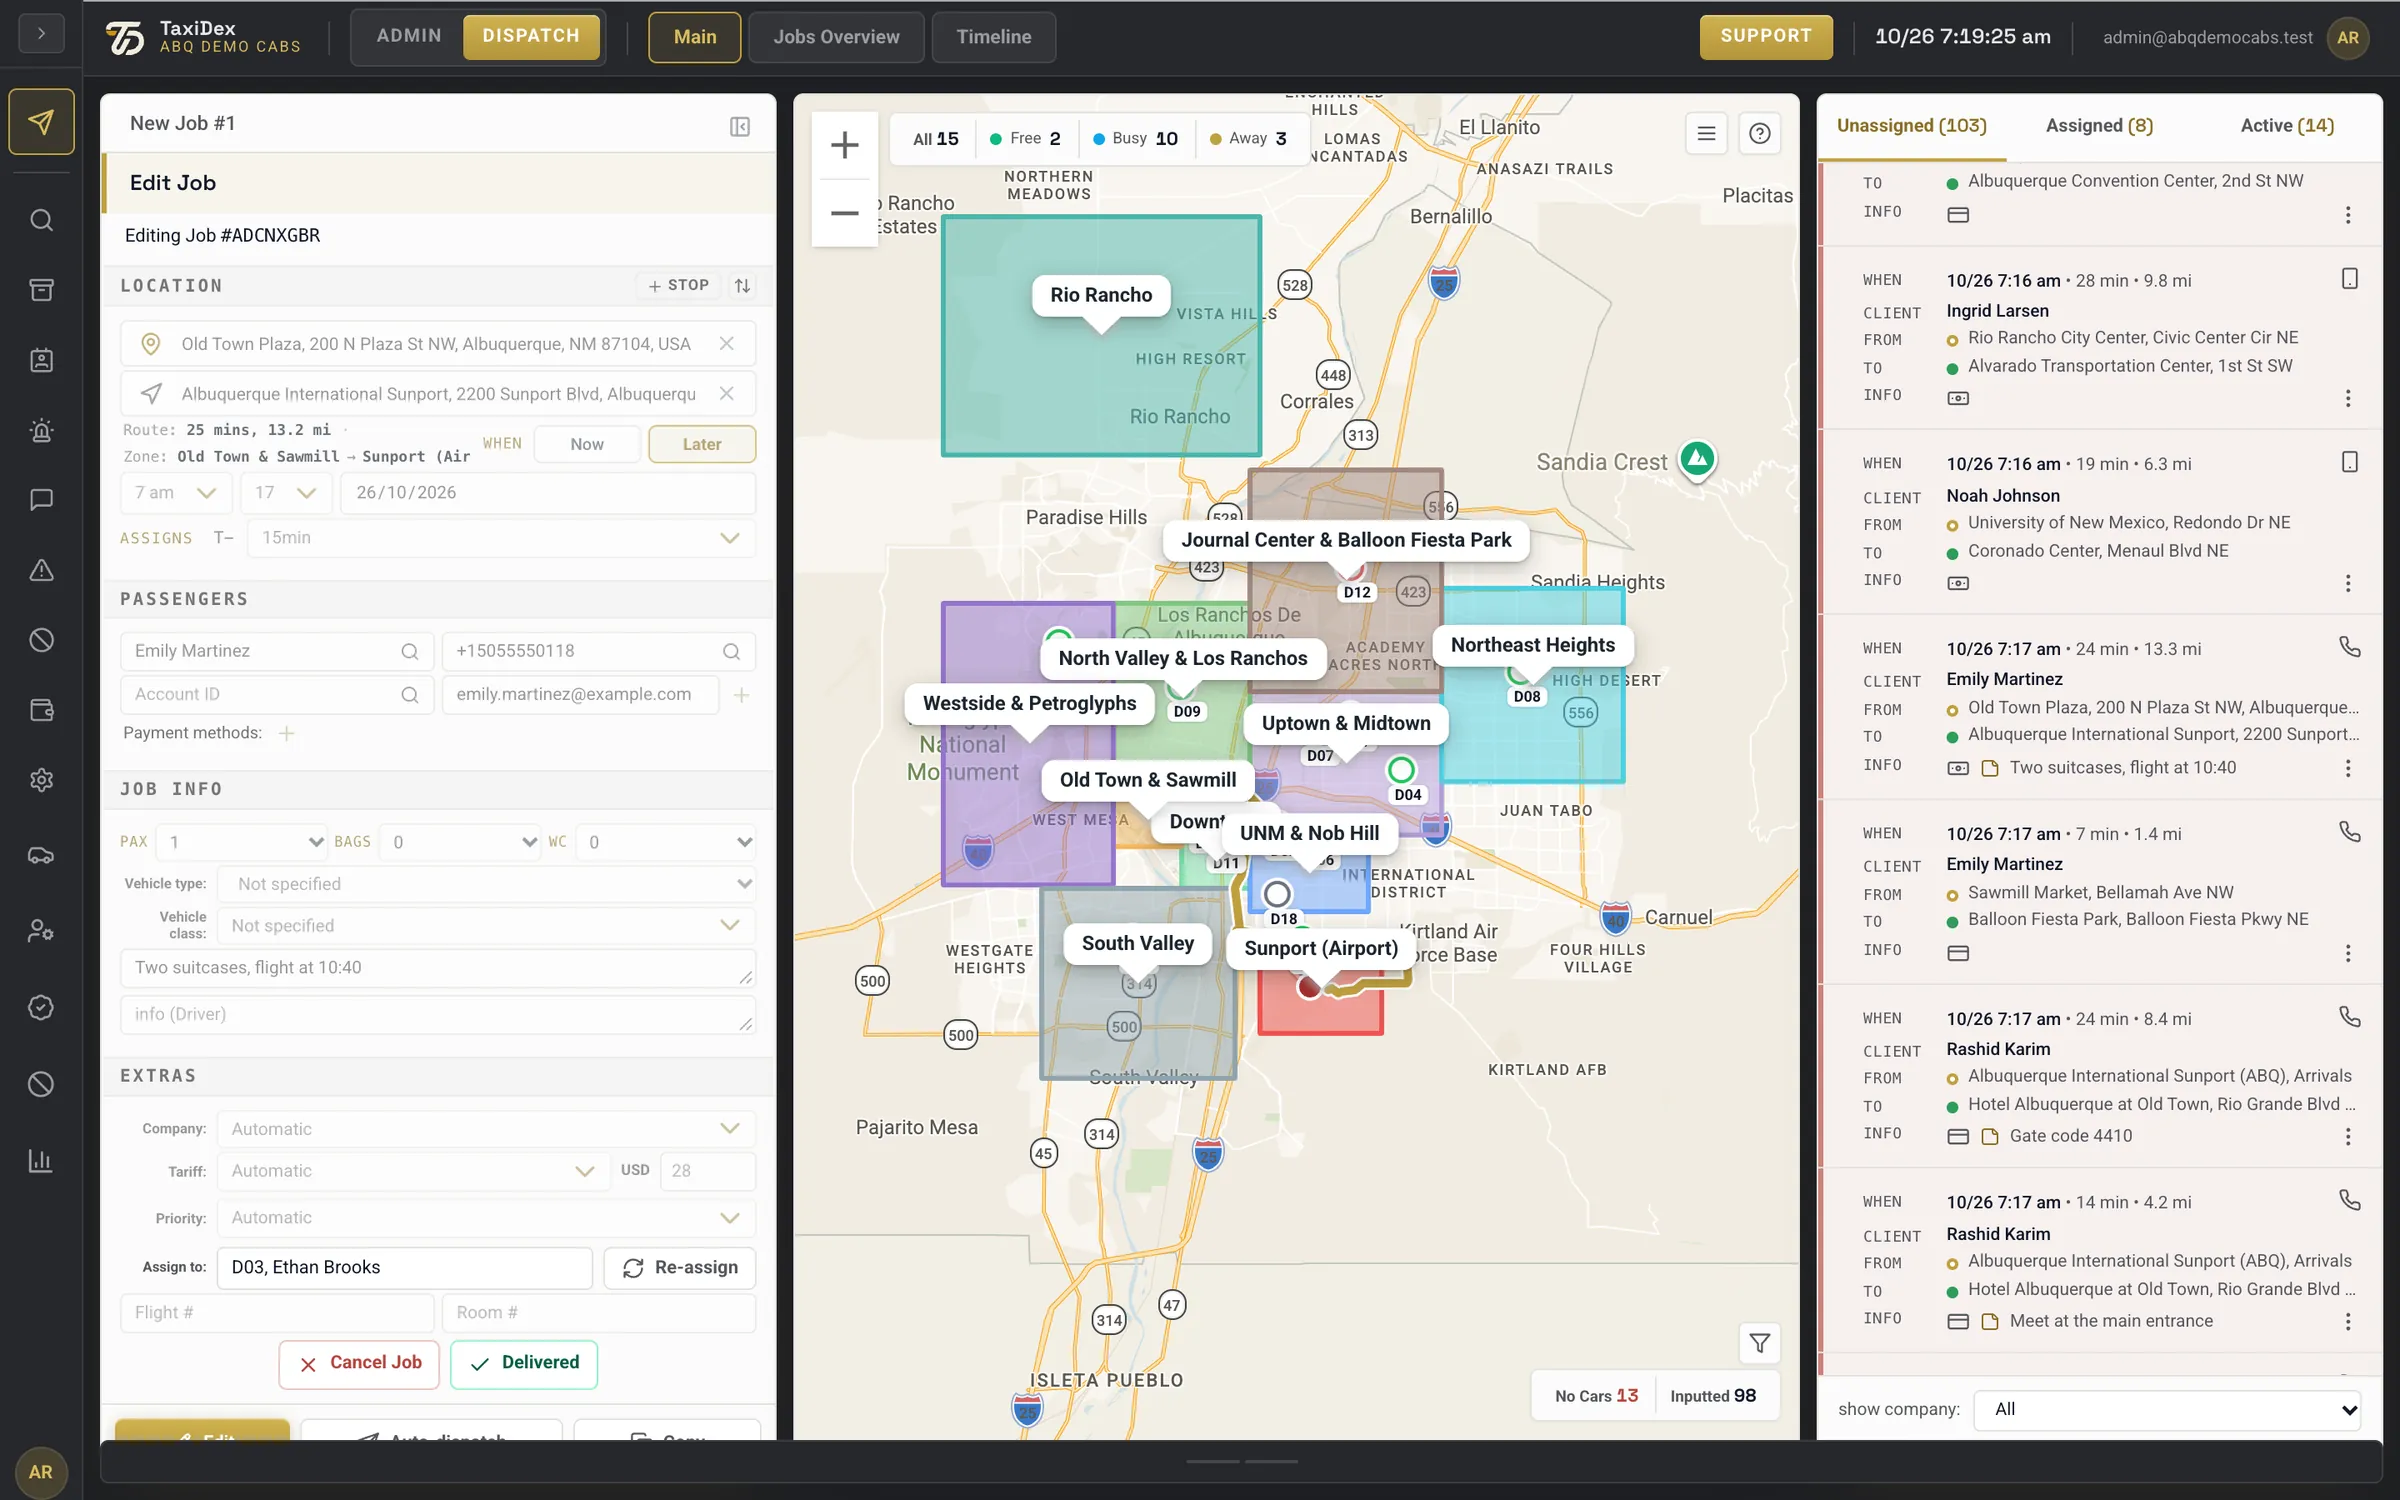
After picking a driver and pressing Re-assign.
Click a number or a line to spotlight it
1The driver you picked D03, Ethan Brooks: the driver the job was given to.
2Re-assign (pick another driver) Pick someone else in Assign to and press it again to move the job.
3Cancel Job Asks for a reason, then cancels the job.
4Delivered (close it as done) Closes the job as done, for when the driver cannot.
5The job stays in Unassigned until accepted The job stays in Unassigned until the driver accepts the offer; then it moves to Assigned.
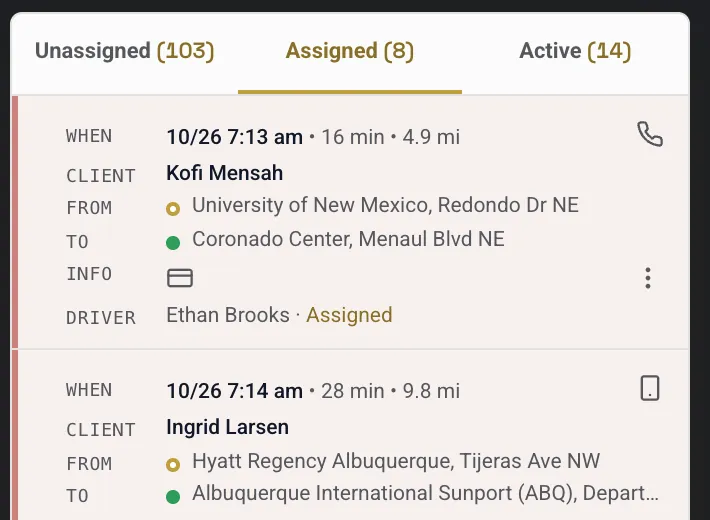
The Assigned tab.
Click a number or a line to spotlight it
1Assigned tab Jobs that have a driver who has not set off yet.
2Job card: when, client, from, to, info When, client, from, to and info.
3Driver and job status The driver and the job's state.
4Active tab (jobs under way) Jobs happening now: on the way, at the pick-up or with the passenger on board.
The Active tab.
Click a number or a line to spotlight it
1Active tab Jobs happening now. The number is how many.
2A job under way When it was booked for, how long and how far, the client and the route.
3Driver and state: POB = passenger on board Hassan Ali has the passenger in the car: POB means passenger on board.
Good to knowWhen a driver cannot press the buttons in their app, open the job and press Delivered to close it as done.
2.5 Cancel a job
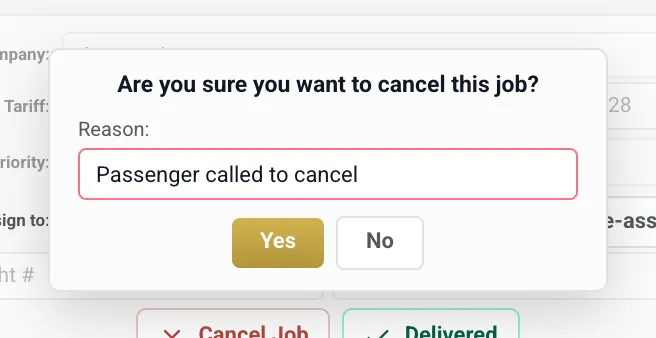
Cancel Job (in the job's Edit Job tab) always asks for a reason first. The reason stays on the job and shows under Closed jobs.
Cancel Job asks for a reason.
Click a number or a line to spotlight it
1Are you sure you want to cancel this job? Check that it is the right job before you confirm.
2Reason (required) Say why, for example "Passenger called to cancel". The reason stays on the job and shows under Closed jobs.
3Yes: cancel the job Cancels the job. It counts in your cancellation figures.
4No: keep it Closes the box and changes nothing.
How to
Cancel a job
Open the job with ⋮ → Edit job.
Press Cancel Job.
Type the reason, for example "Passenger called to cancel".
Press Yes. The job leaves the queues.
Good to knowA cancellation counts in your cancellation figures.
2.6 Prev. Return and Clear
Prev. Return saves typing for the trip home: it takes the passenger's previous job and fills in the reverse route. Clear empties the whole form at once, without asking.
Prev. Return after entering the passenger's phone.
Click a number or a line to spotlight it
1Enter the passenger’s phone (or name) first Prev. Return looks up the passenger's last job, so it needs the phone or name first.
2Prev. Return Press it after the phone or name is in.
3Route filled in reverse: last drop-off becomes the pick-up Their last drop-off (the Sunport) becomes the pick-up and the old pick-up (Old Town Plaza) becomes the drop-off.
4New route time, distance and zones 23 mins and 13.2 mi back to Old Town & Sawmill.
5Set the time, then Check and Book Set the time, then Check and Book as usual.
How to
Book the return trip
Type the passenger's phone (or name) in the New Job form.
Press Prev. Return. Pick-up and drop-off are filled in reverse.
Set the time with Now or Later, press Check, then Book.
2.7 The job queues and job cards
Unassigned is waiting for a car, Assigned has a driver who has not set off, and Active is happening now. A job leaves the queues when it is delivered or cancelled.
Each card shows when, how long and how far, the client, the route and a note. The icon at the top right says where the job came from (phone, website or passenger app). A red card means the pick-up time has passed and the job has not started.
2.8 Map controls
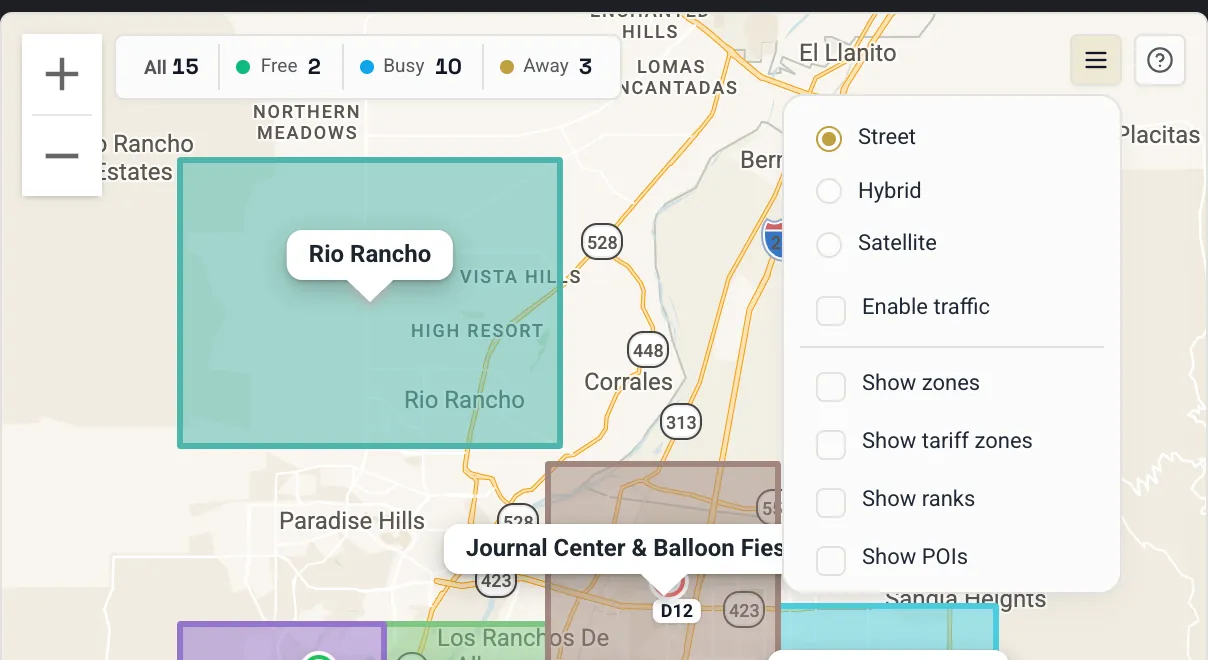
The buttons at the map's top right control what the map shows. The menu button picks the base map and overlays, the funnel at the bottom right hides cars that cannot take the job you are booking, and ? opens the help.
The map options menu.
Click a number or a line to spotlight it
1Map options Opens the map options.
2Base map: Street · Hybrid · Satellite Street, Hybrid or Satellite.
3Live traffic Google's live traffic layer.
4Show zones The areas drawn under Settings ▸ Zones.
5Show tariff zones The zones used for prices under Tariffs.
6Show ranks Taxi ranks.
7Show POIs Your saved places (POIs).
The vehicle filter.
Click a number or a line to spotlight it
1Filter vehicles Hides cars that cannot take the job you are about to book.
2Minimum seats (passengers) Only cars with at least this many seats.
3Minimum luggage Only cars with at least this much luggage space.
4Wheelchair places Any, or 1 to 6 wheelchair places.
5Vehicle type Any, or one vehicle type.
2.9 The fleet drawer: Vehicle List, Future Jobs, Late Job List
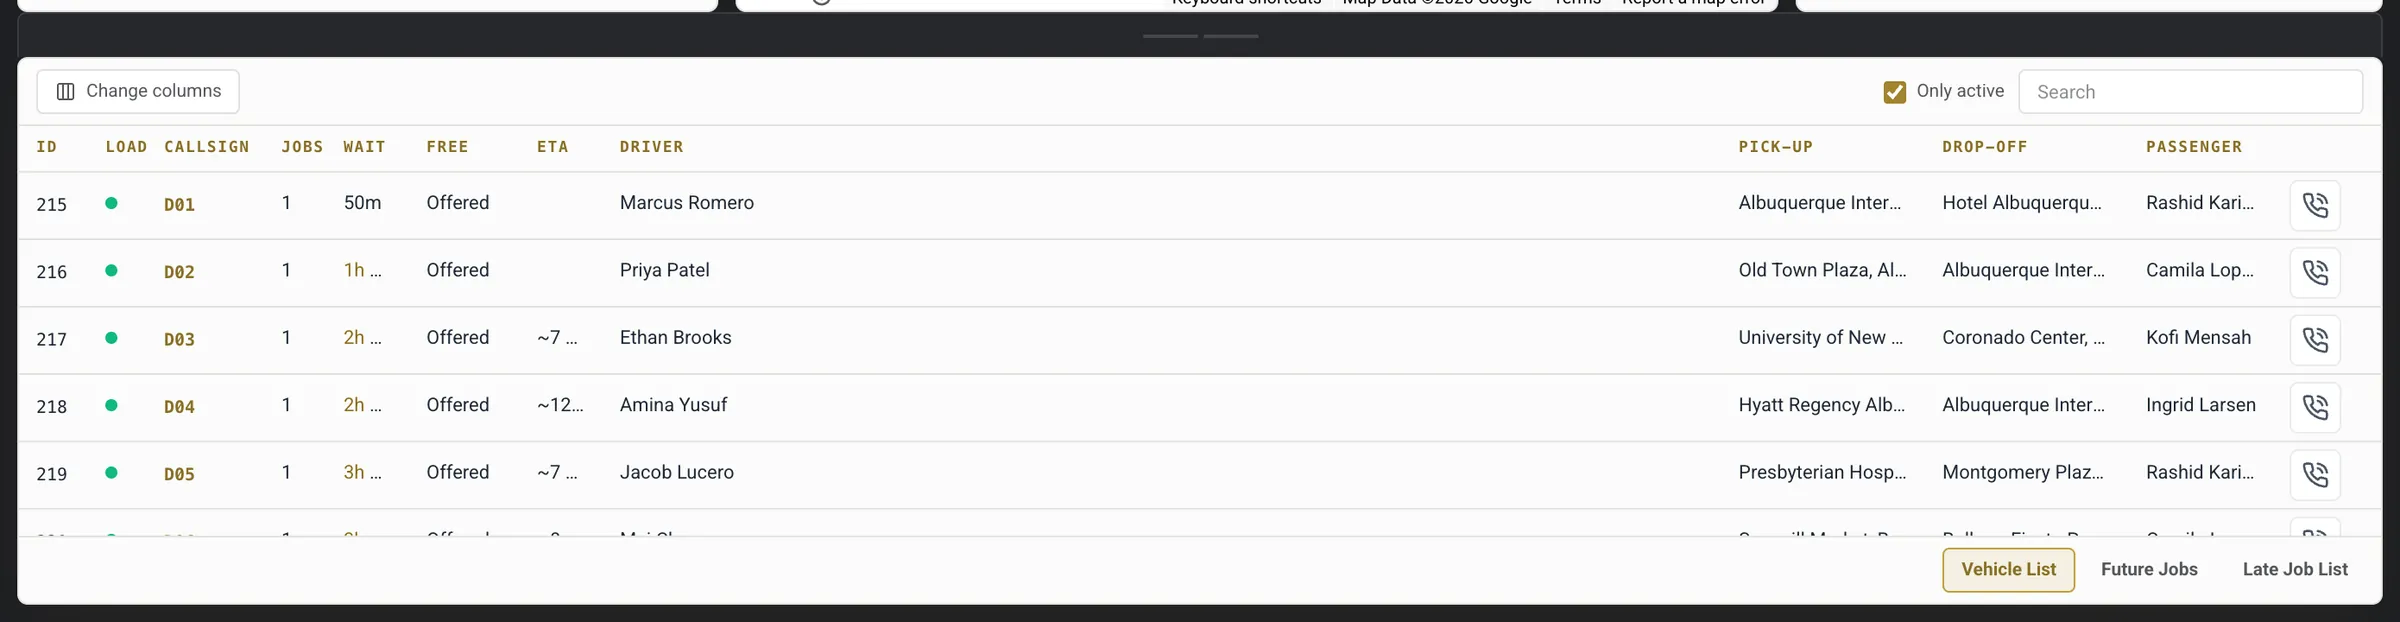
The fleet list under the map and queues is a drawer. Drag its top edge up to see more cars, the jobs booked for later and the jobs that are running late.
The fleet drawer, Vehicle List tab.
Click a number or a line to spotlight it
1Drag bar: pull up or push down Drag it up to open the fleet list, and back down to close it.
2Change columns Choose which columns the list shows.
3Only active Show active cars only.
4Search the fleet Driver, callsign, phone, type or status.
6A car with its job: pick-up, drop-off, passenger D01, Marcus Romero, with the job he was offered: pick-up, drop-off and passenger.
7Call options In-app call (voice over the internet, in the browser) or a phone call that keeps both numbers private.
8Vehicle List Every car, as a list.
9Future Jobs Pre-booked jobs still to come.
10Late Job List Jobs whose pick-up time has passed and that have not started.
How to
Open the fleet list
Point at the bar between the map and the fleet list.
Drag it upwards as far as you like.
Use the tabs at its bottom right to switch between Vehicle List, Future Jobs and Late Job List. Drag the bar back down to make it small again.
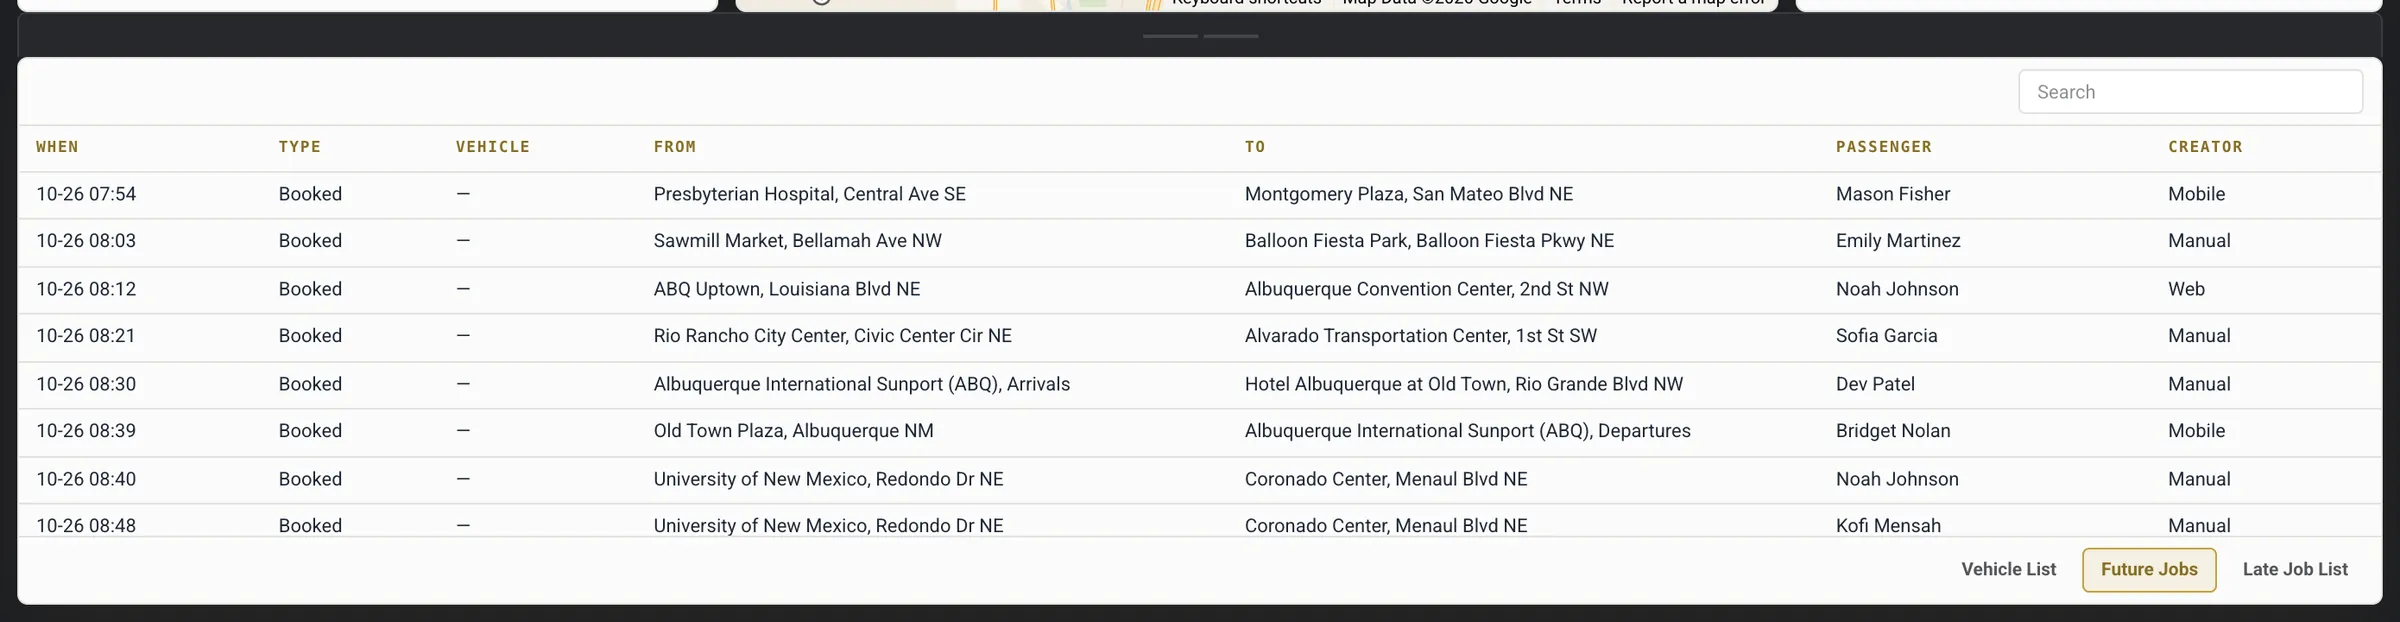
Future Jobs tab.
Click a number or a line to spotlight it
1Search future jobs Filter the list.
2When · type · vehicle Pick-up time, job type and the car, once one is planned.
3From · to · passenger · who created it Route, passenger, and who created it: Web, Mobile or Manual.
4Future Jobs tab The tab you are on.
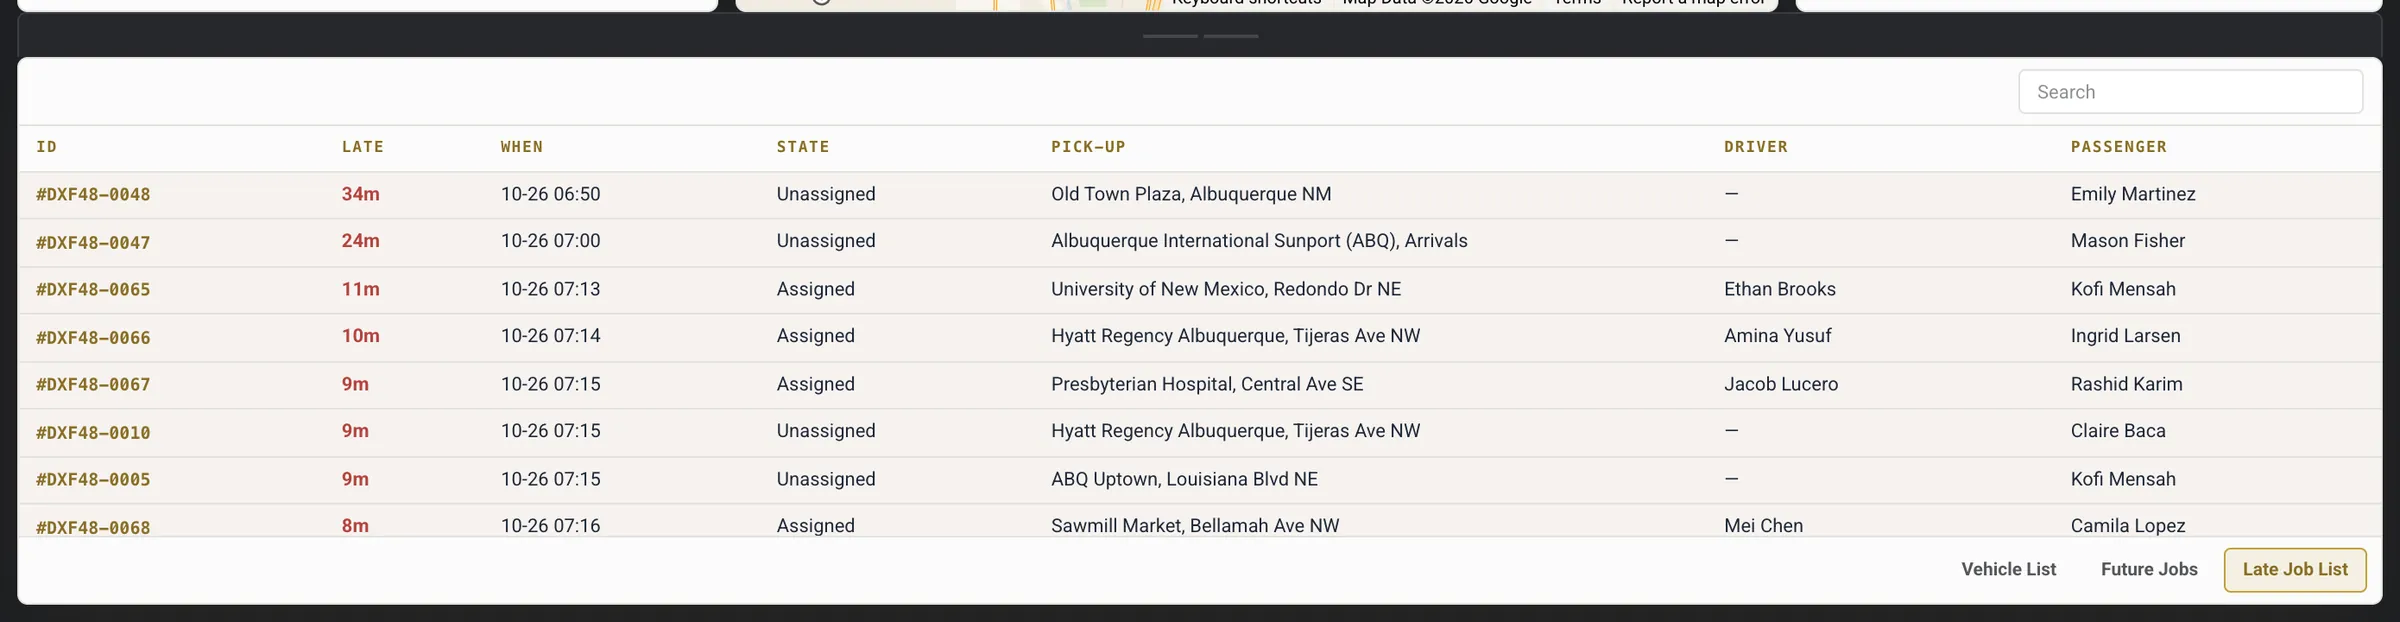
Late Job List tab.
Click a number or a line to spotlight it
1Job number Click it to find the job.
2How late it is How many minutes past the booked pick-up time.
3Booked time and state The promised time and where the job is now.
4Pick-up, driver and passenger Where to go, who has it and whom to call.
5Late Job List tab The tab you are on.
2.10 The left icon rail
The narrow rail on the left of the console gives one-click access to everything a dispatcher needs besides the board. Hover an icon to read its name, or click › at the top left to show the labels. The first ones open a panel over the board; Vehicles, Users, Permits, Passenger blacklist and Reports open their pages in ADMIN.
The left rail, expanded with its labels.
Click a number or a line to spotlight it
1Dispatch console Back to the board.
2Search jobs Find any job by passenger, phone, address, status, account, vehicle or date.
3Closed jobs Finished and cancelled jobs, with the reason.
4Customers Your passengers and their past jobs.
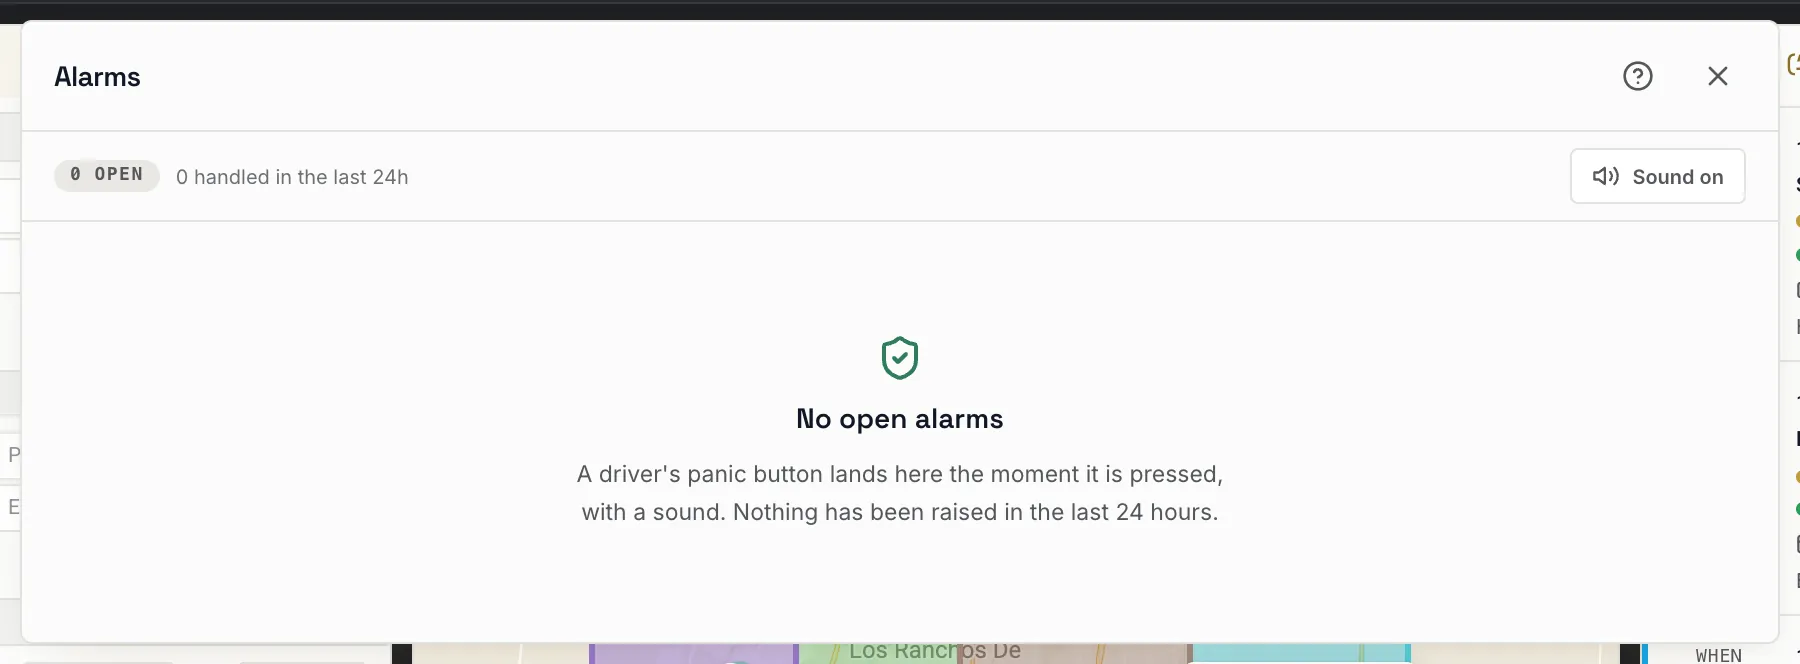
5Alarms Panic alarms raised from the driver app, with a sound.
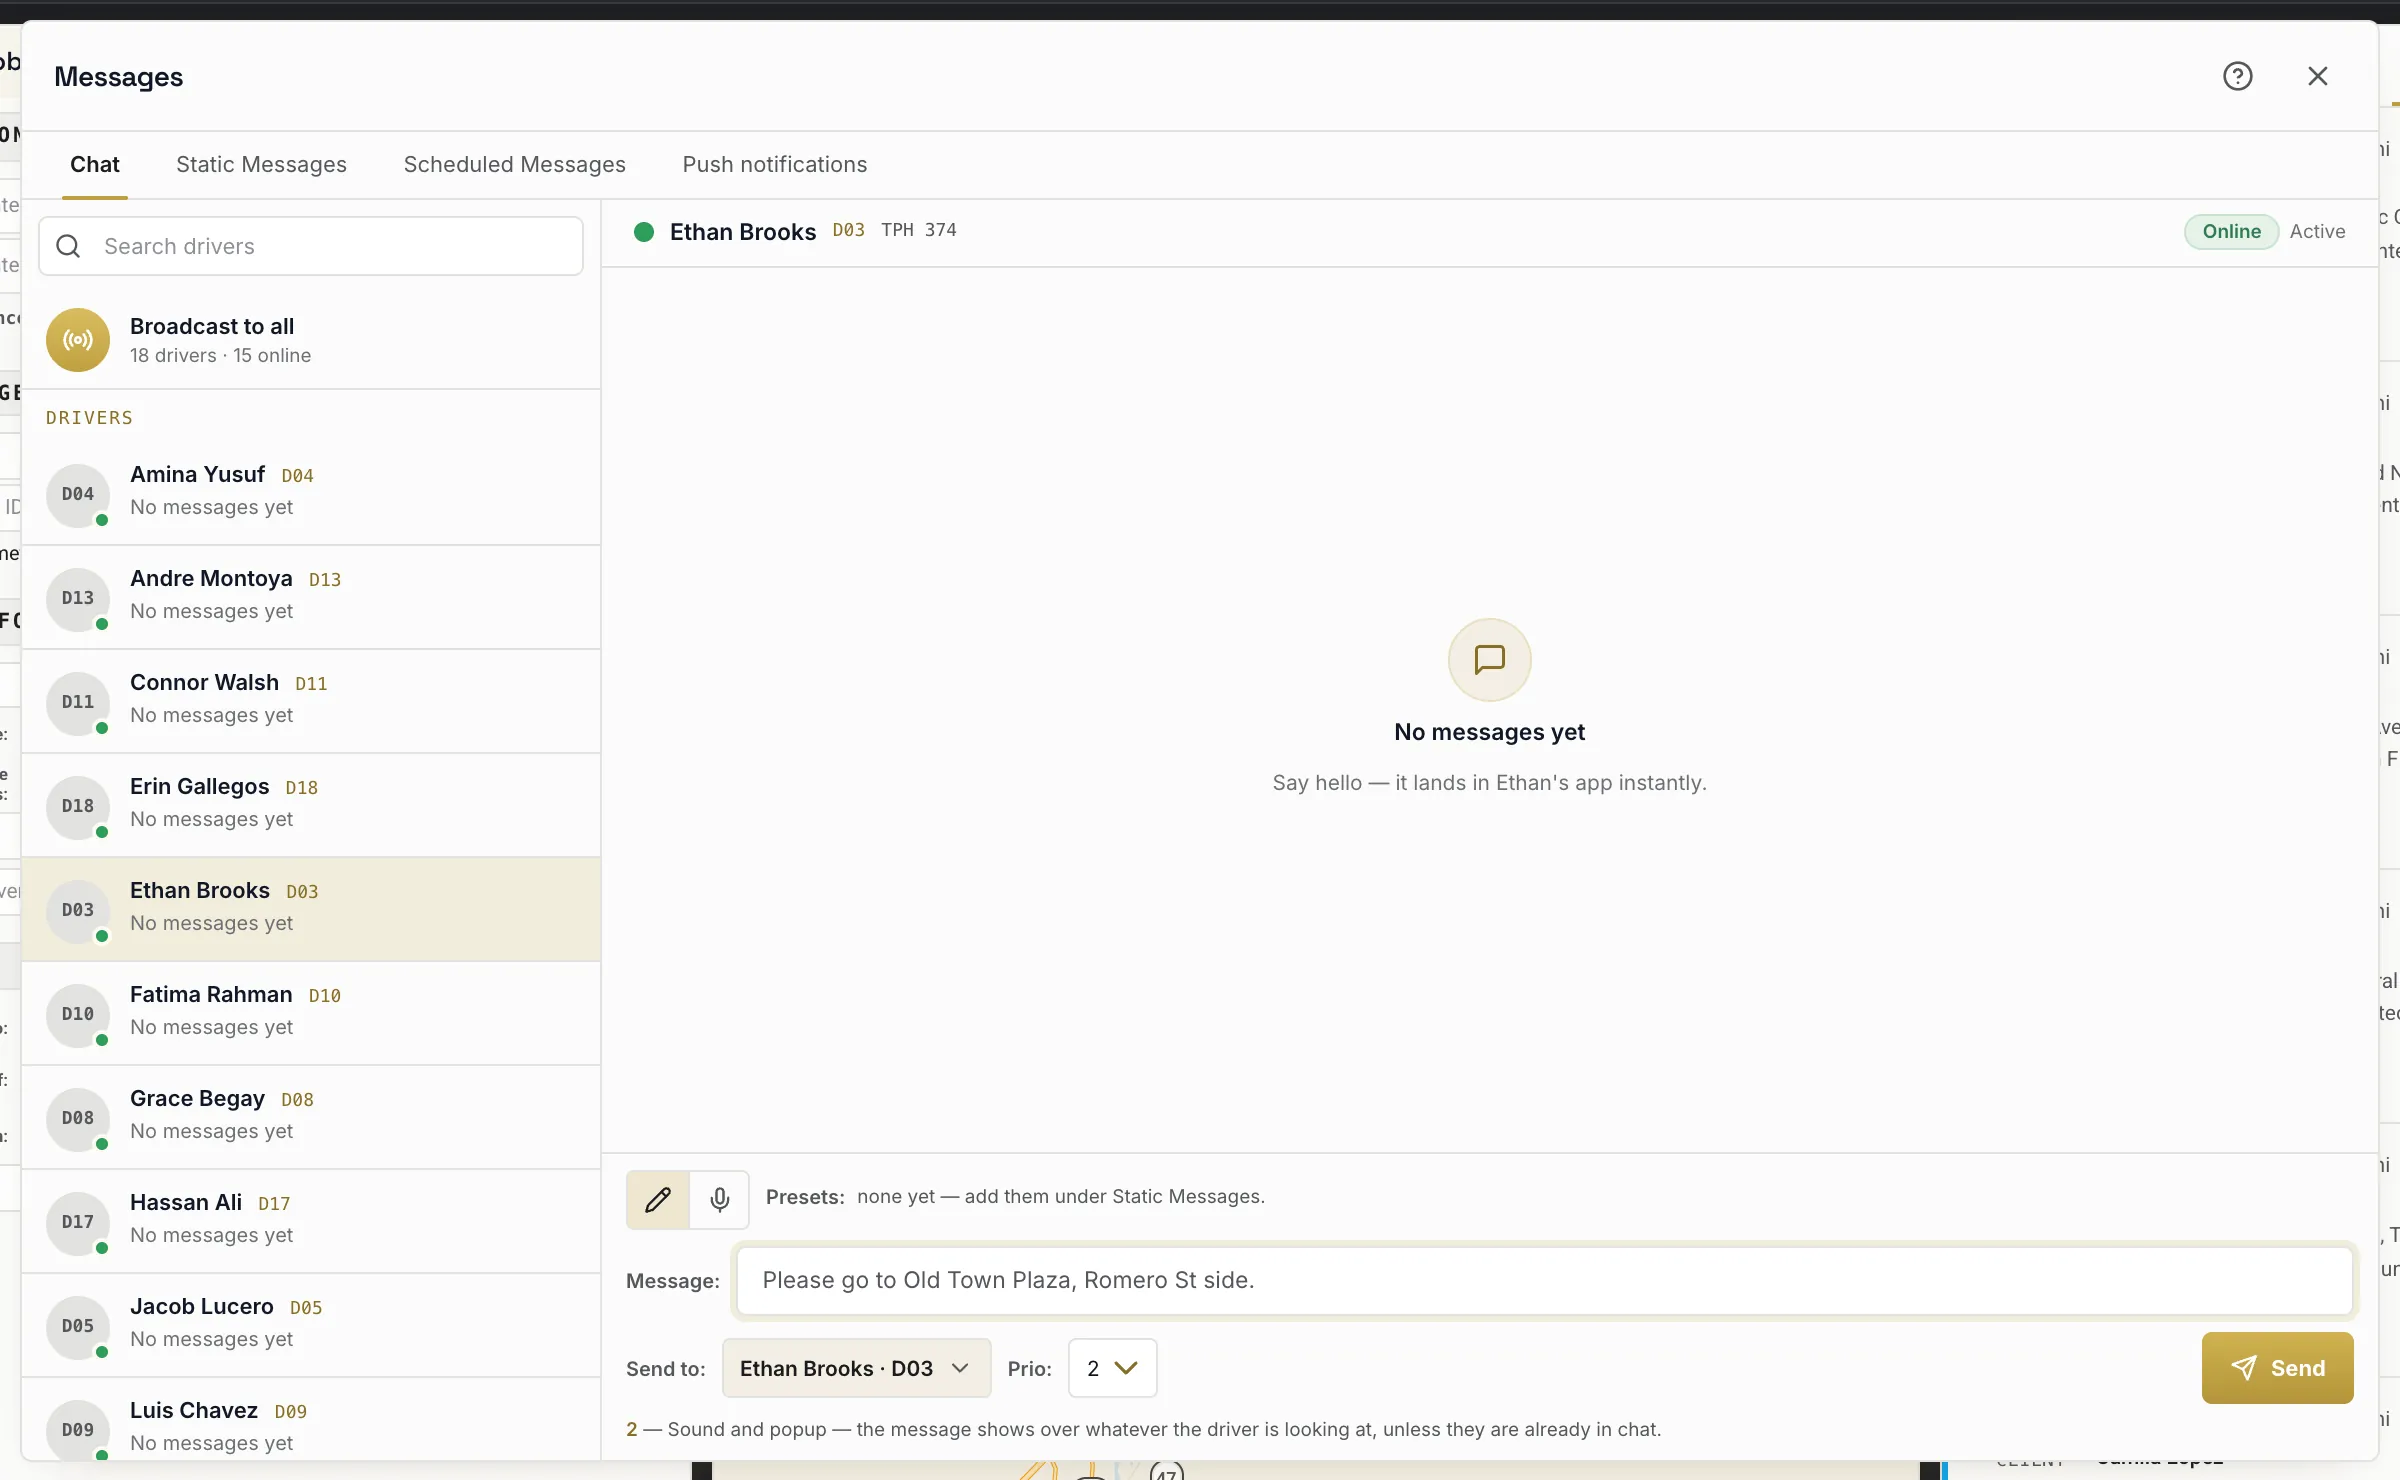
6Messages Chat, preset lines, scheduled messages and push notifications to drivers.
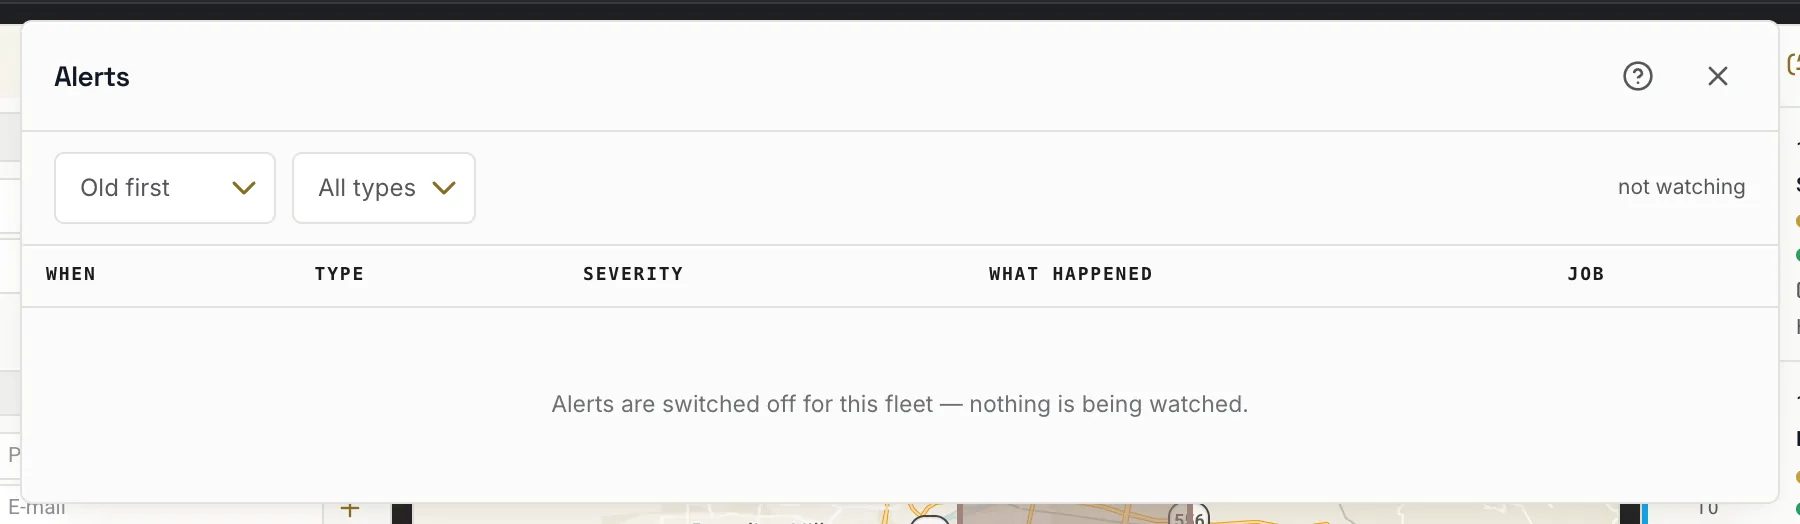
7Alerts Warnings the system raises about jobs, when alerts are switched on for the fleet.
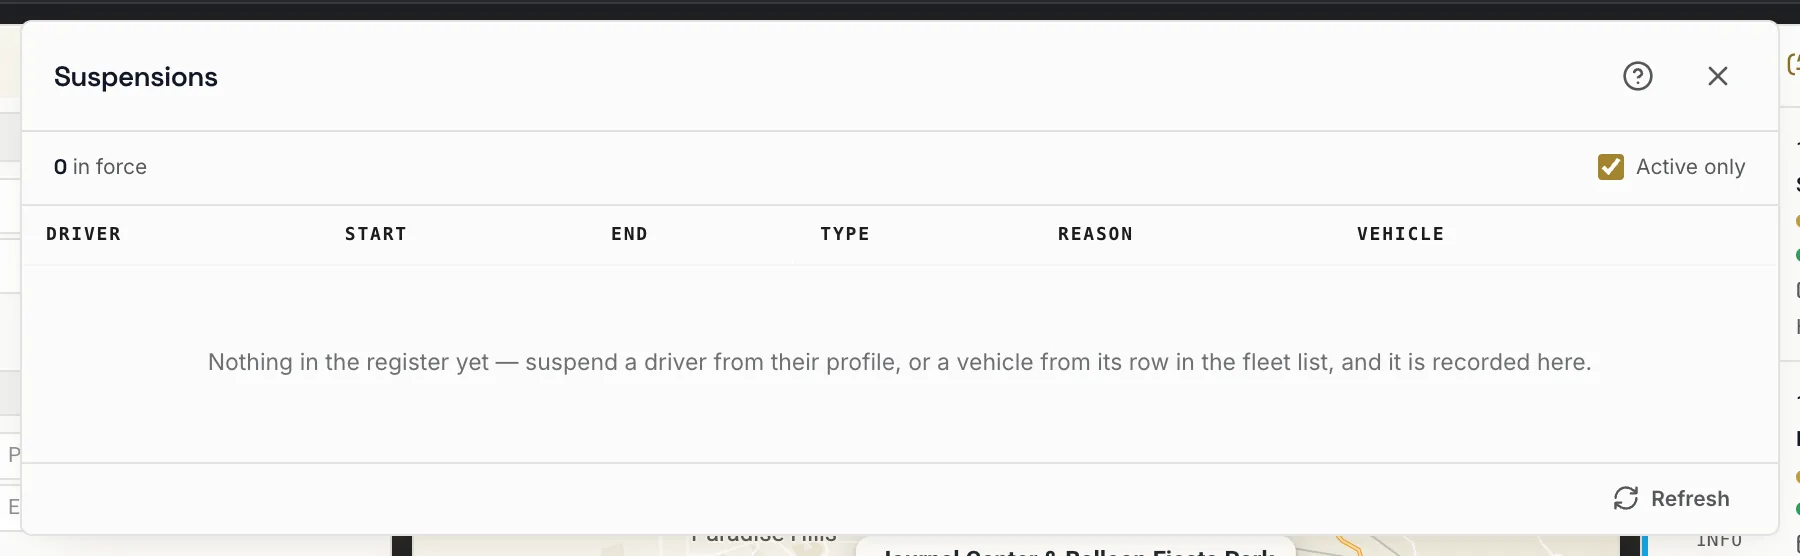
8Suspensions Drivers and vehicles taken off the road.
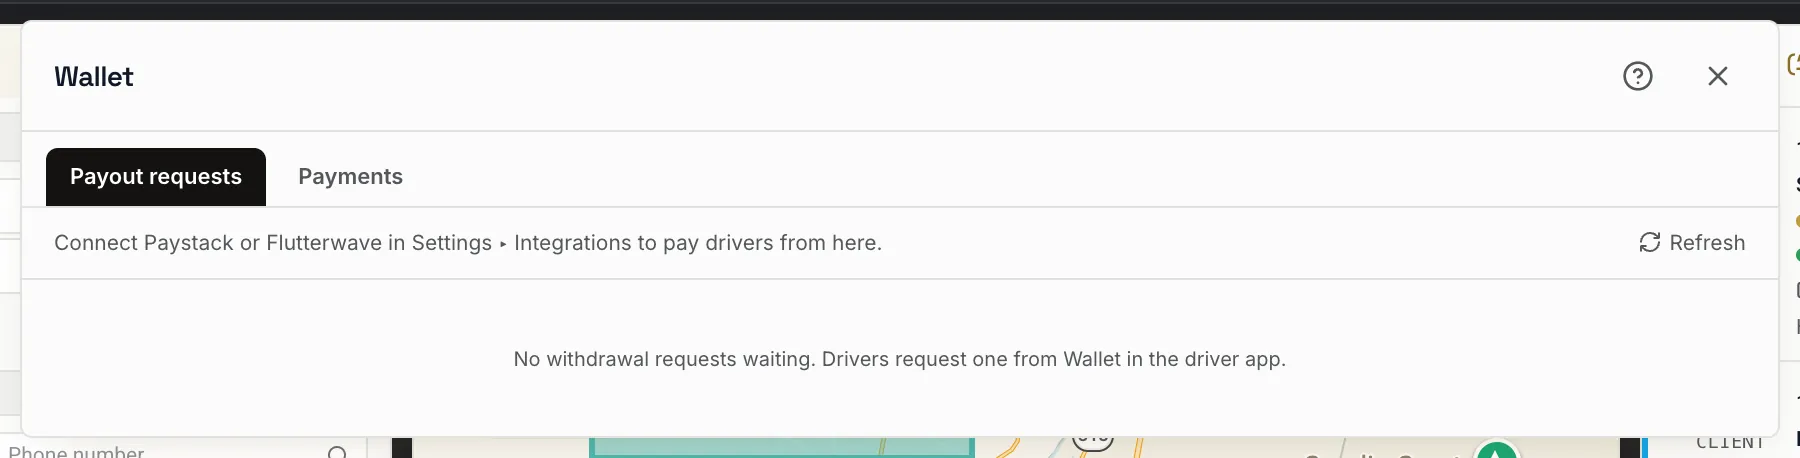
9Wallet Driver payout requests and payments.
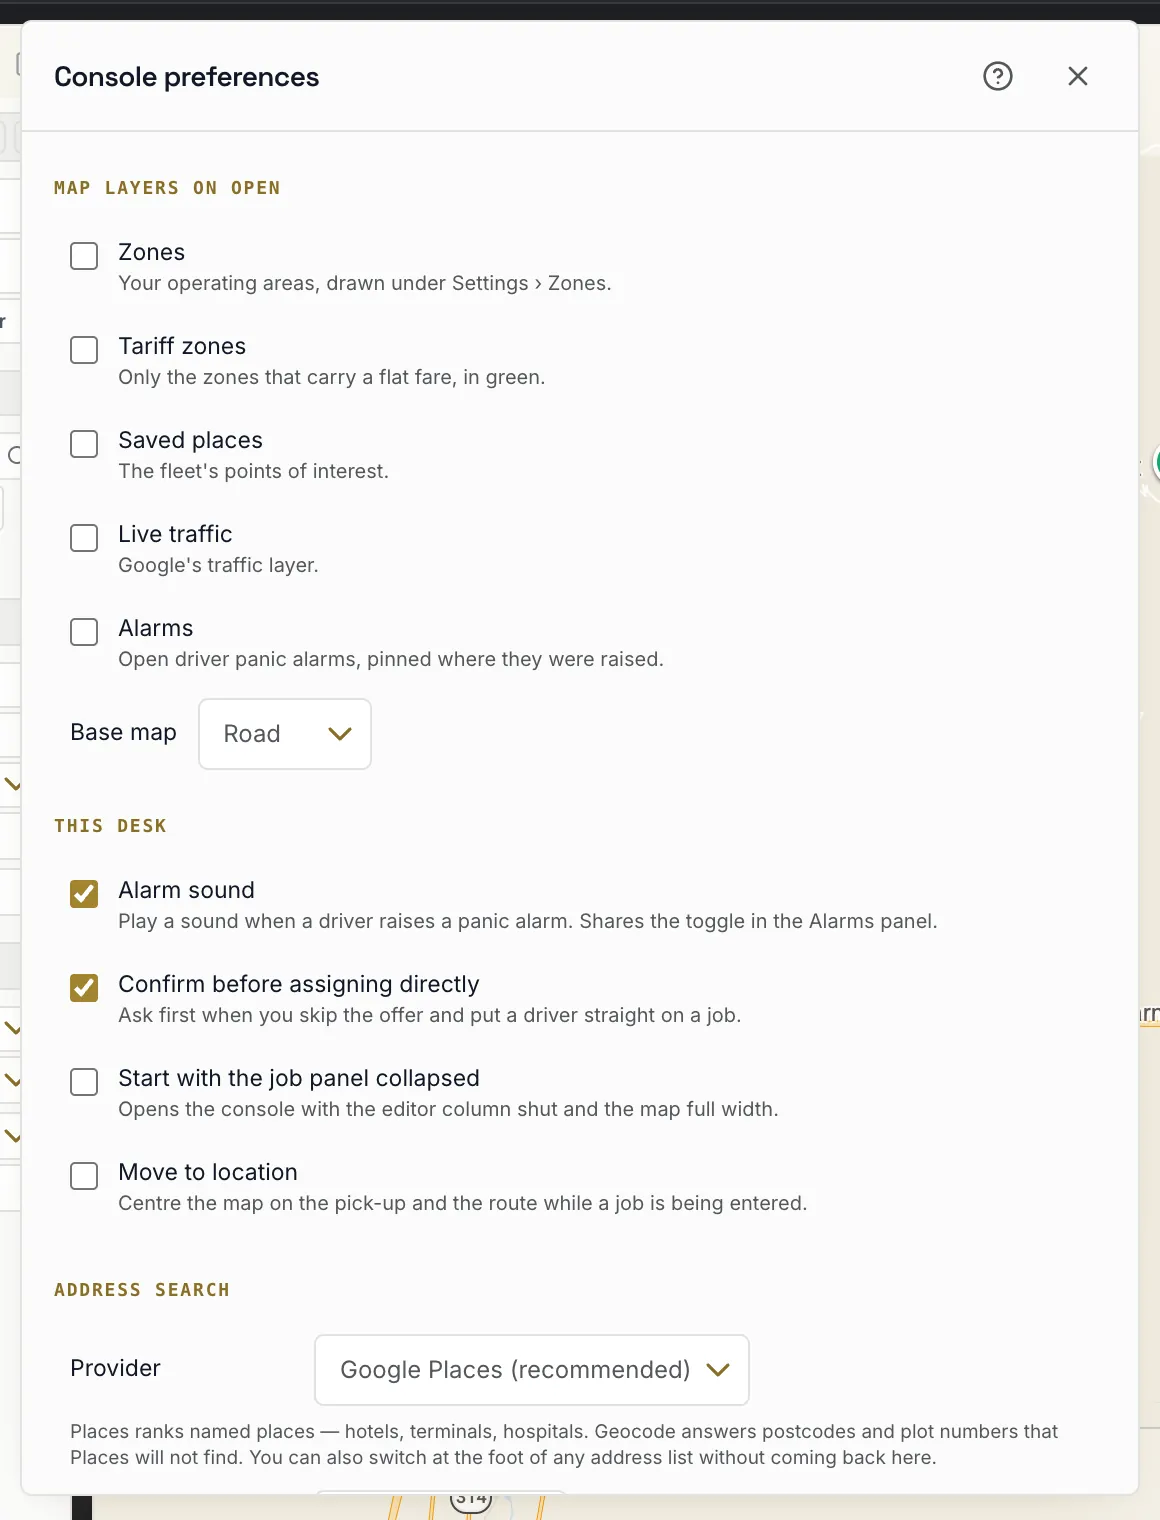
10Preferences How the console opens on this desk.
11Vehicles Opens Settings ▸ Vehicles.
12Users Opens Settings ▸ Users.
13Permits Licences, badges and inspections, with expiry dates.
14Passenger blacklist Phones, e-mails or addresses you no longer take bookings from.
15Reports Opens the booking report under History.
16Your name and duty status Who is signed in on this desk, and whether they are on duty.
17Profile / Sign out Your profile, or sign out.
How to
Find an old job
Click Search jobs (the magnifier) in the rail.
Type part of the passenger's name, a phone number or a word from an address, or open By ID for a job number.
Press Search and click the job number in the results.
How to
Send a message to a driver
Click Messages in the rail.
Click the driver on the left (or Broadcast to all).
Type the message, choose the priority and press Send.
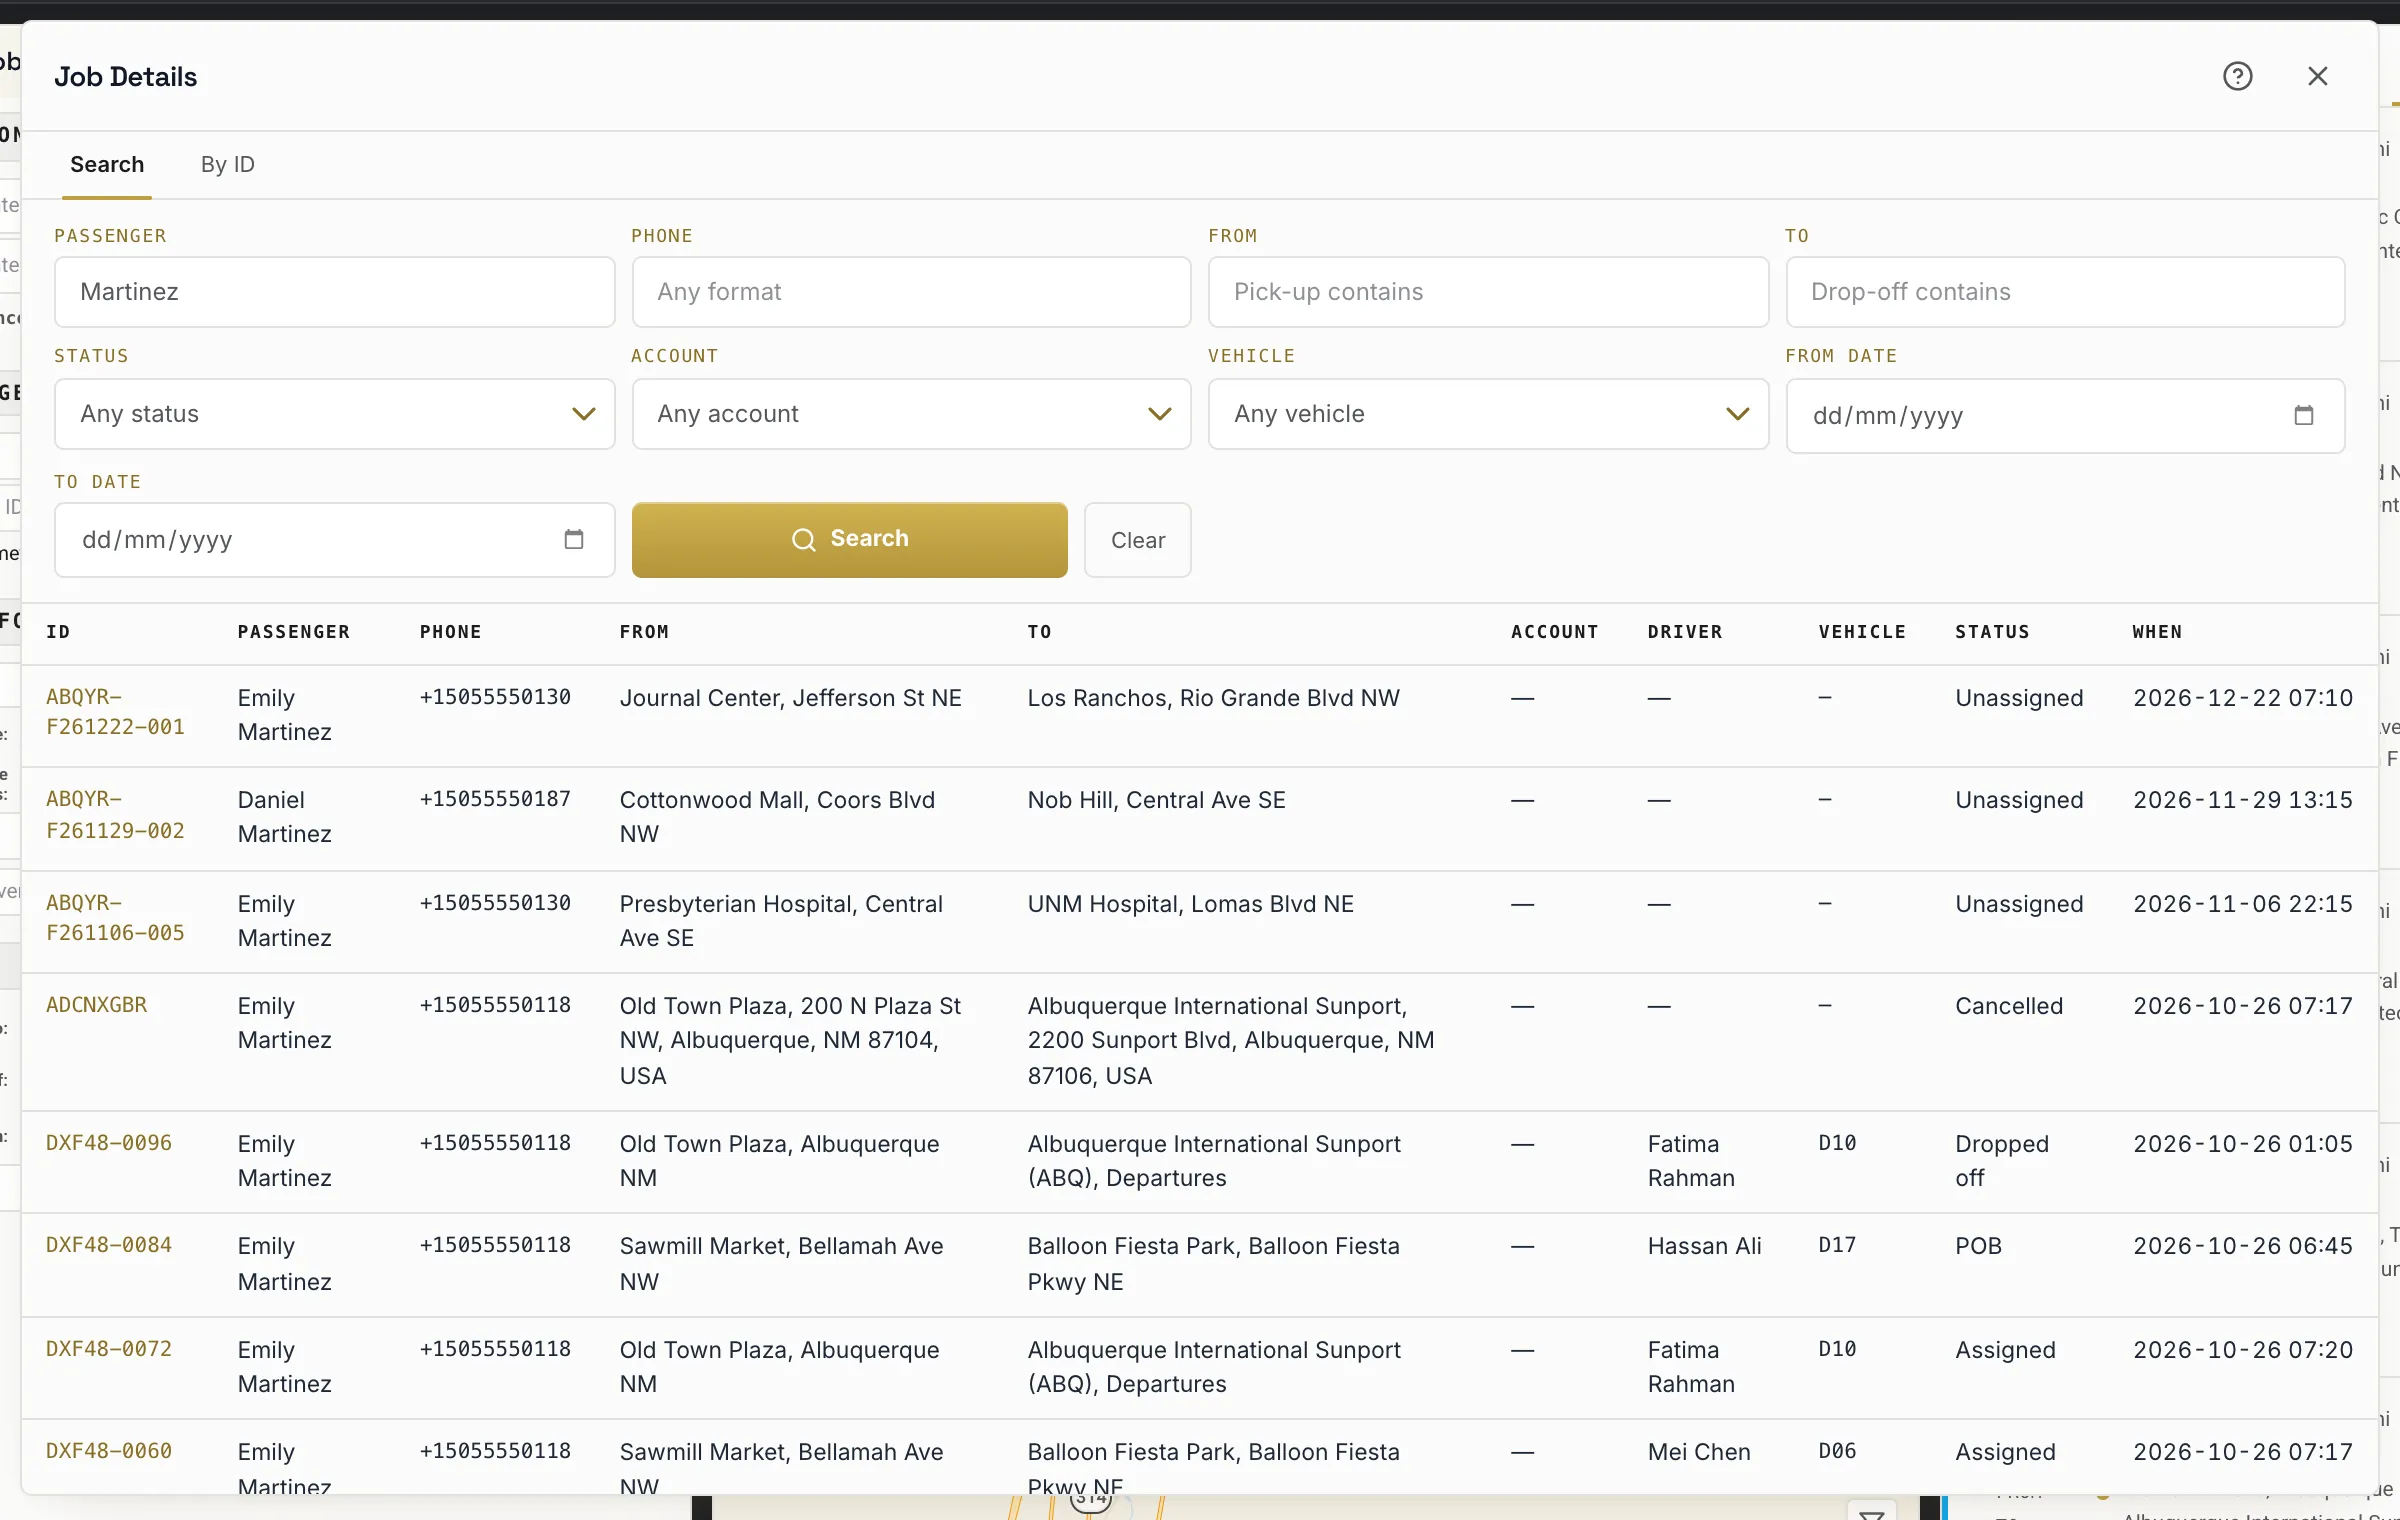
Search jobs, looking for passengers called Martinez. Date boxes follow the computer's own date format.
Click a number or a line to spotlight it
1Search · By ID Search with filters, or jump straight to one job number with By ID.
2Passenger · phone · from · to Any part of a name, any phone format, words from the addresses.
3Status · account · vehicle · dates Narrow by status, account, vehicle and dates.
4Search · Clear Run the search, or empty the fields.
5Results: ID, passenger, route, driver, vehicle, status, time Click a job number to open it.
6Help · Close The ? explains the panel; × closes it.
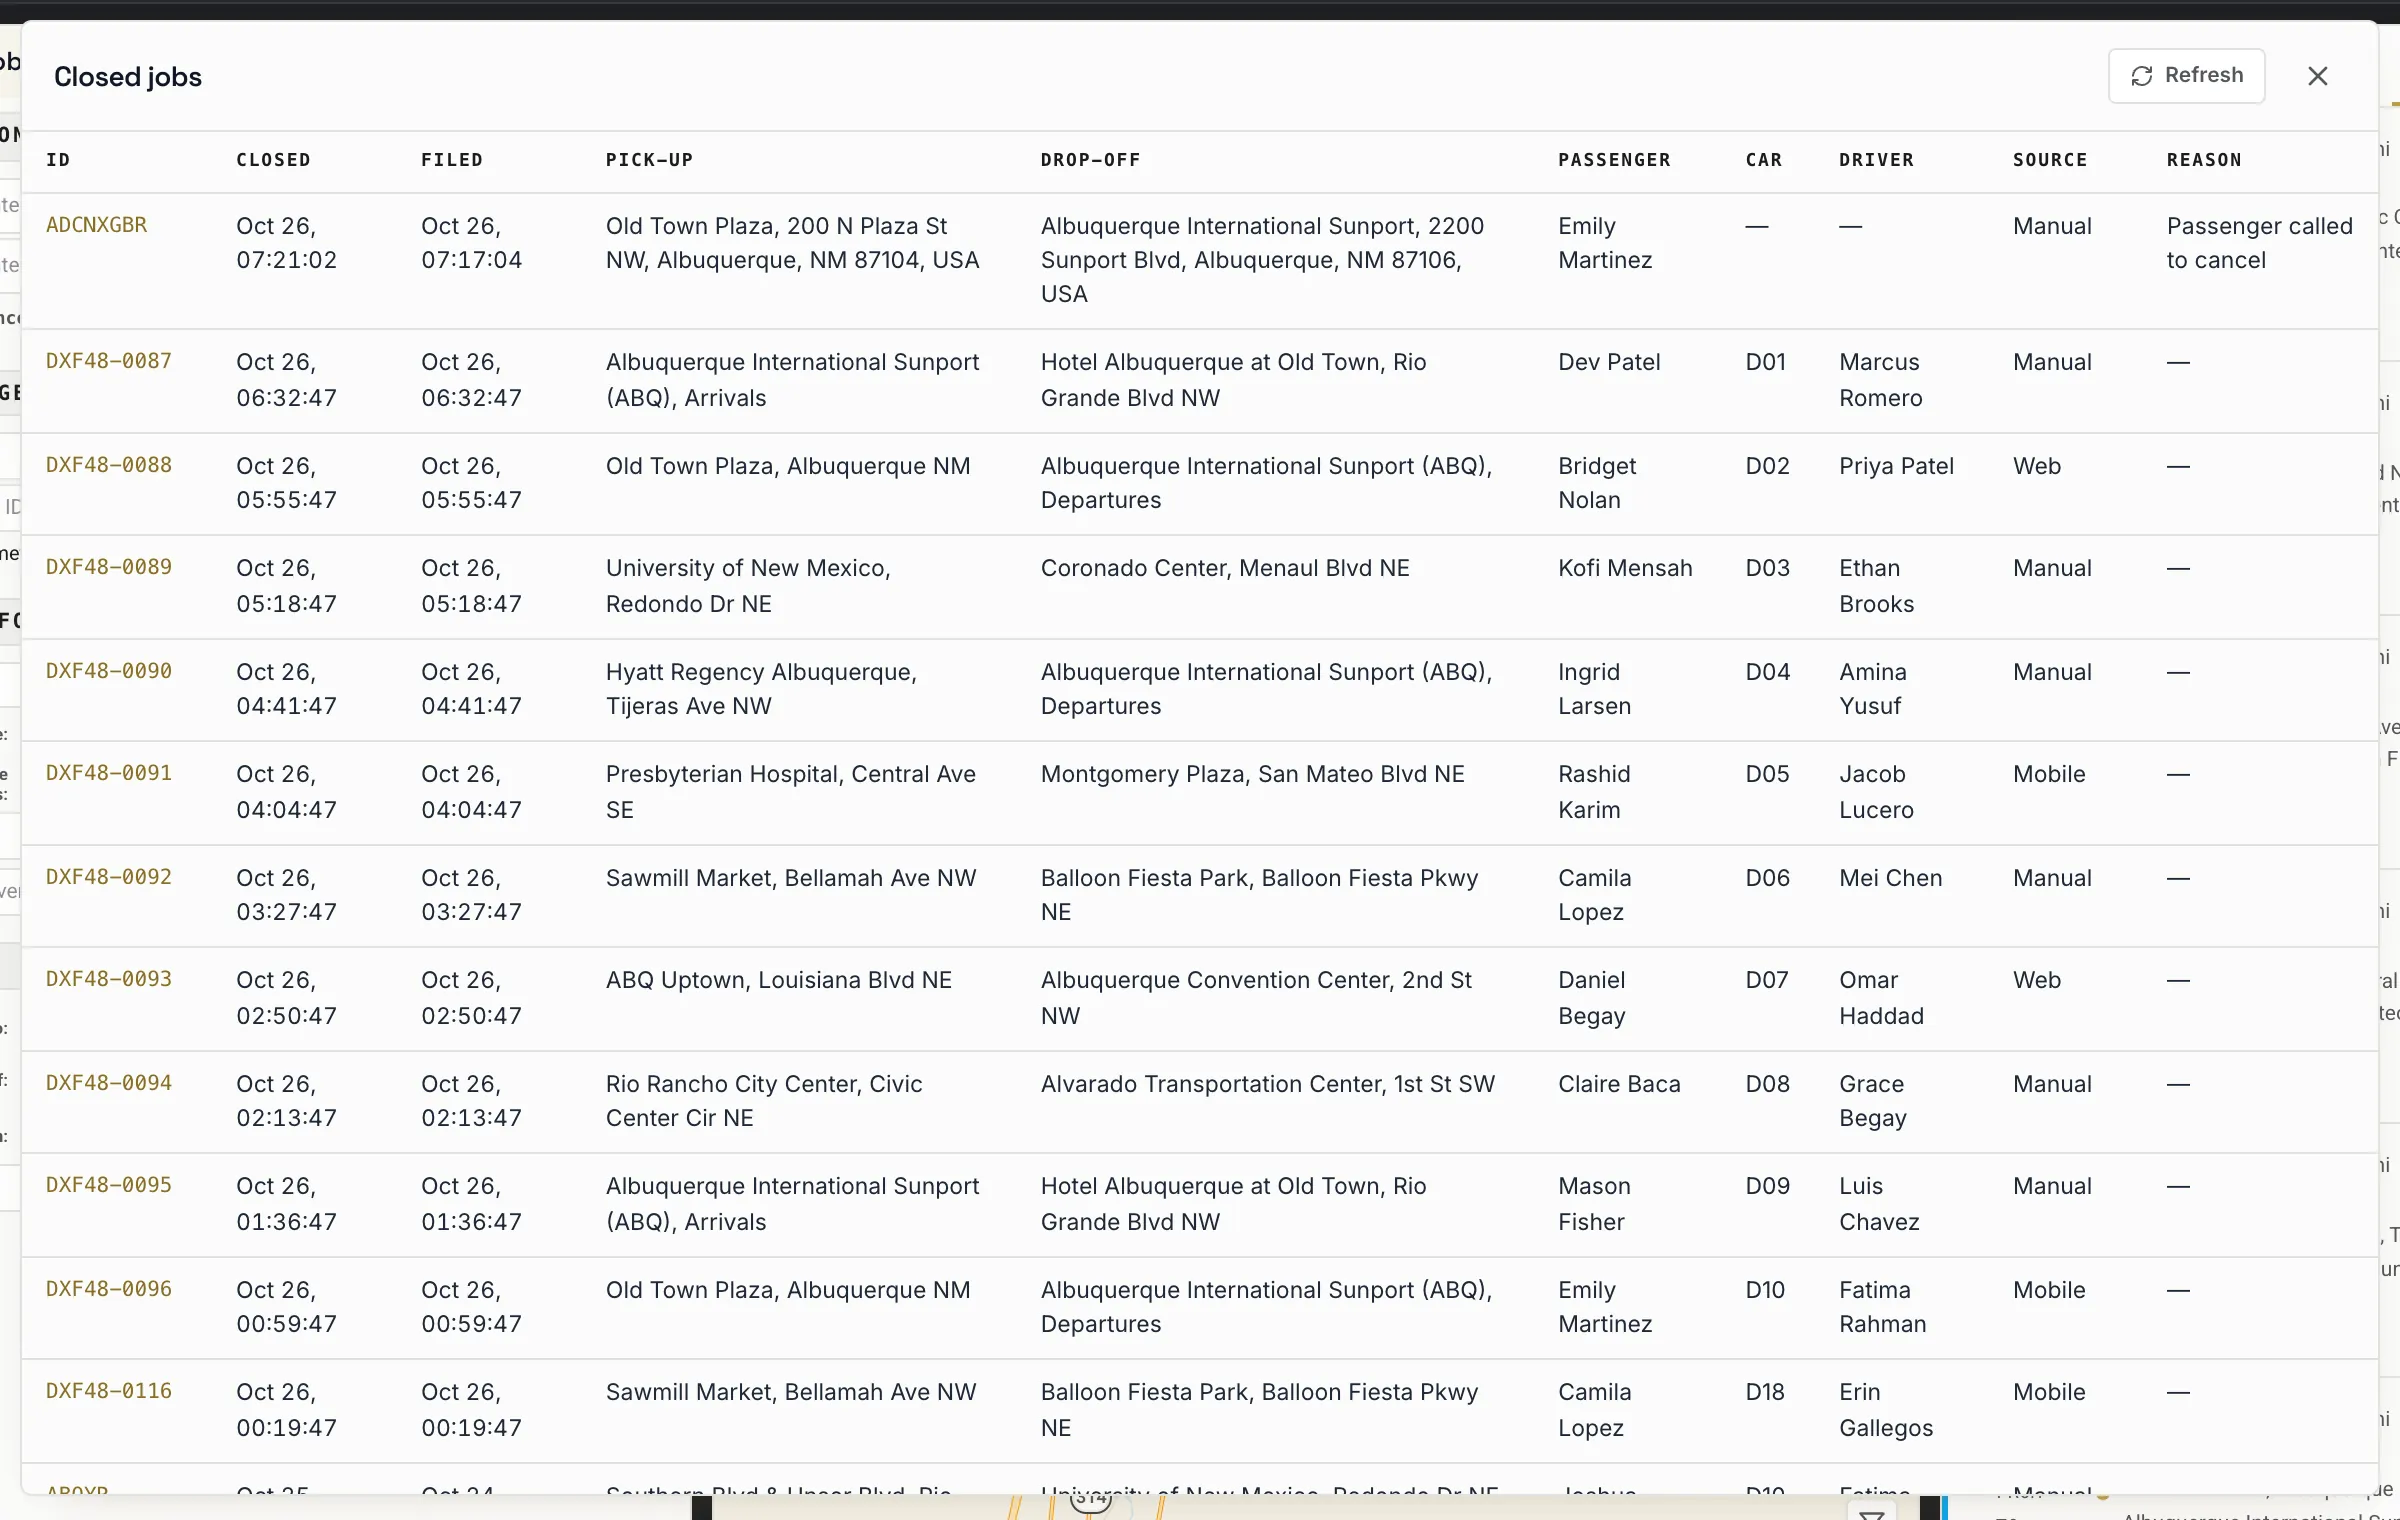
Closed jobs.
Click a number or a line to spotlight it
1Refresh Reload the list.
2Closed and filed times, pick-up, drop-off, passenger, car, driver When the job closed and when it was filed, the route, passenger, car and driver.
3Source Where the job came from: Manual, Web or Mobile.
4Reason (why it was cancelled) Why it was cancelled, when someone gave a reason.
5The job cancelled earlier, with its reason The test job cancelled earlier, with its reason.
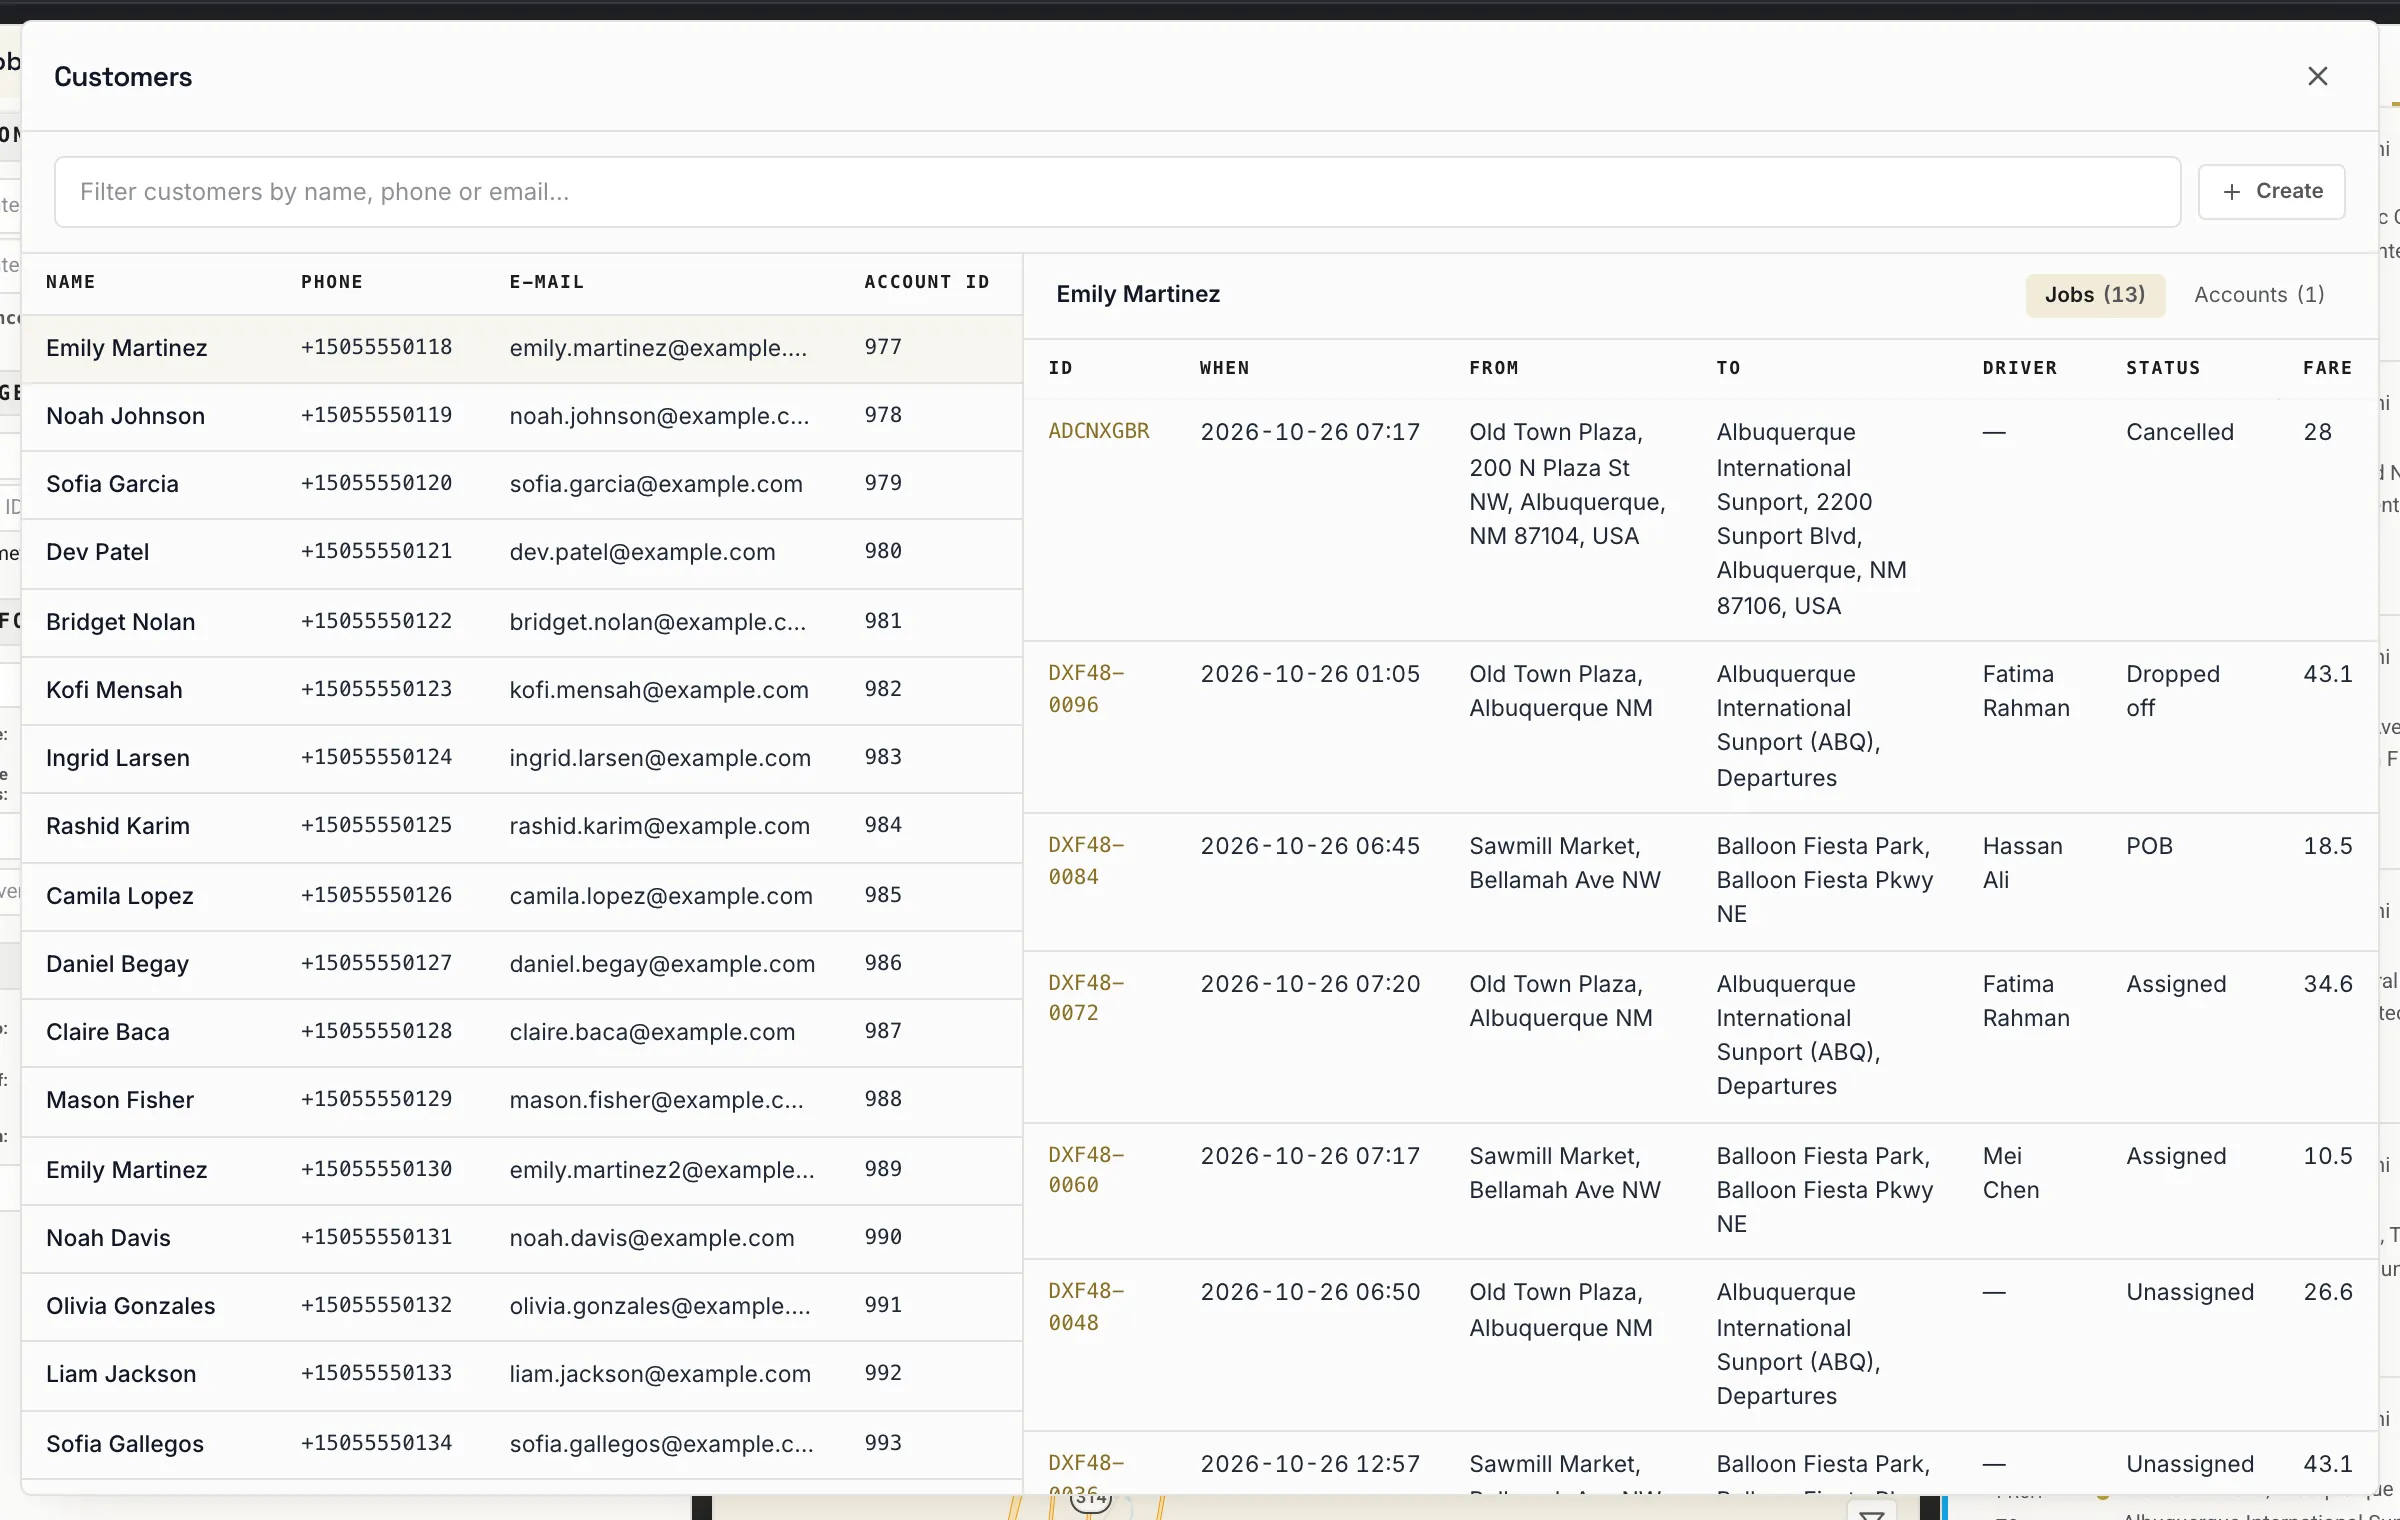
Customers, with one passenger selected.
Click a number or a line to spotlight it
1Filter by name, phone or e-mail Find a passenger by name, phone or e-mail.
2Create a customer Add a passenger before their first booking.
3Customer list: name, phone, e-mail, ID Everyone who has booked with you.
4Selected customer Click a passenger to see their history on the right.
5Jobs · Accounts tabs Their jobs, and the business accounts they ride on.
6Their jobs, with status and fare in USD When, route, driver, status and fare (in US dollars) of each job.
Messages, with a driver selected (draft not sent).
Click a number or a line to spotlight it
1Chat · Static Messages · Scheduled Messages · Push notifications Chat; Static Messages are your preset lines; Scheduled Messages go out later; Push notifications go to phones.
2Search drivers Find a driver.
3Broadcast to all drivers One message to every driver: 18 drivers, 15 online here.
4Driver list (green dot = online) A green dot means the driver is online.
5Conversation with the selected driver The selected driver, his car and whether he is online.
6Text or voice · preset lines Type or record, and pick a preset line.
7Message Your message.
8Send to · Prio Who receives it, and how loudly (priority 0 to 4).
9Send Sends it to the driver app.
10What the priority does Priority 2 = sound and popup over whatever the driver is looking at, unless they are already in chat.
Console preferences.
Click a number or a line to spotlight it
1Map layers shown when the console opens Which layers are on when the console opens: zones, tariff zones, saved places, live traffic, alarms.
2Base map Road, Satellite, Hybrid or Terrain.
3This desk: alarm sound, confirm before assigning, start collapsed Settings for this computer only.
4Address search: provider, country, search area Google Places or Geocode, which country, and how far around your fleet to look.
5Help · Close Help for the panel, and close.
Alarms: nothing open in the last 24 hours.
Alerts: switched off for this fleet.
Suspensions: the register is empty.
Wallet: payout requests and payments.
03
Chapter 3 · 1 screen · 1 how-to
Jobs Overview
WhereDISPATCH ▸ Jobs Overview
Every job as one sortable table, for when the board is not enough.
3.1 The jobs table
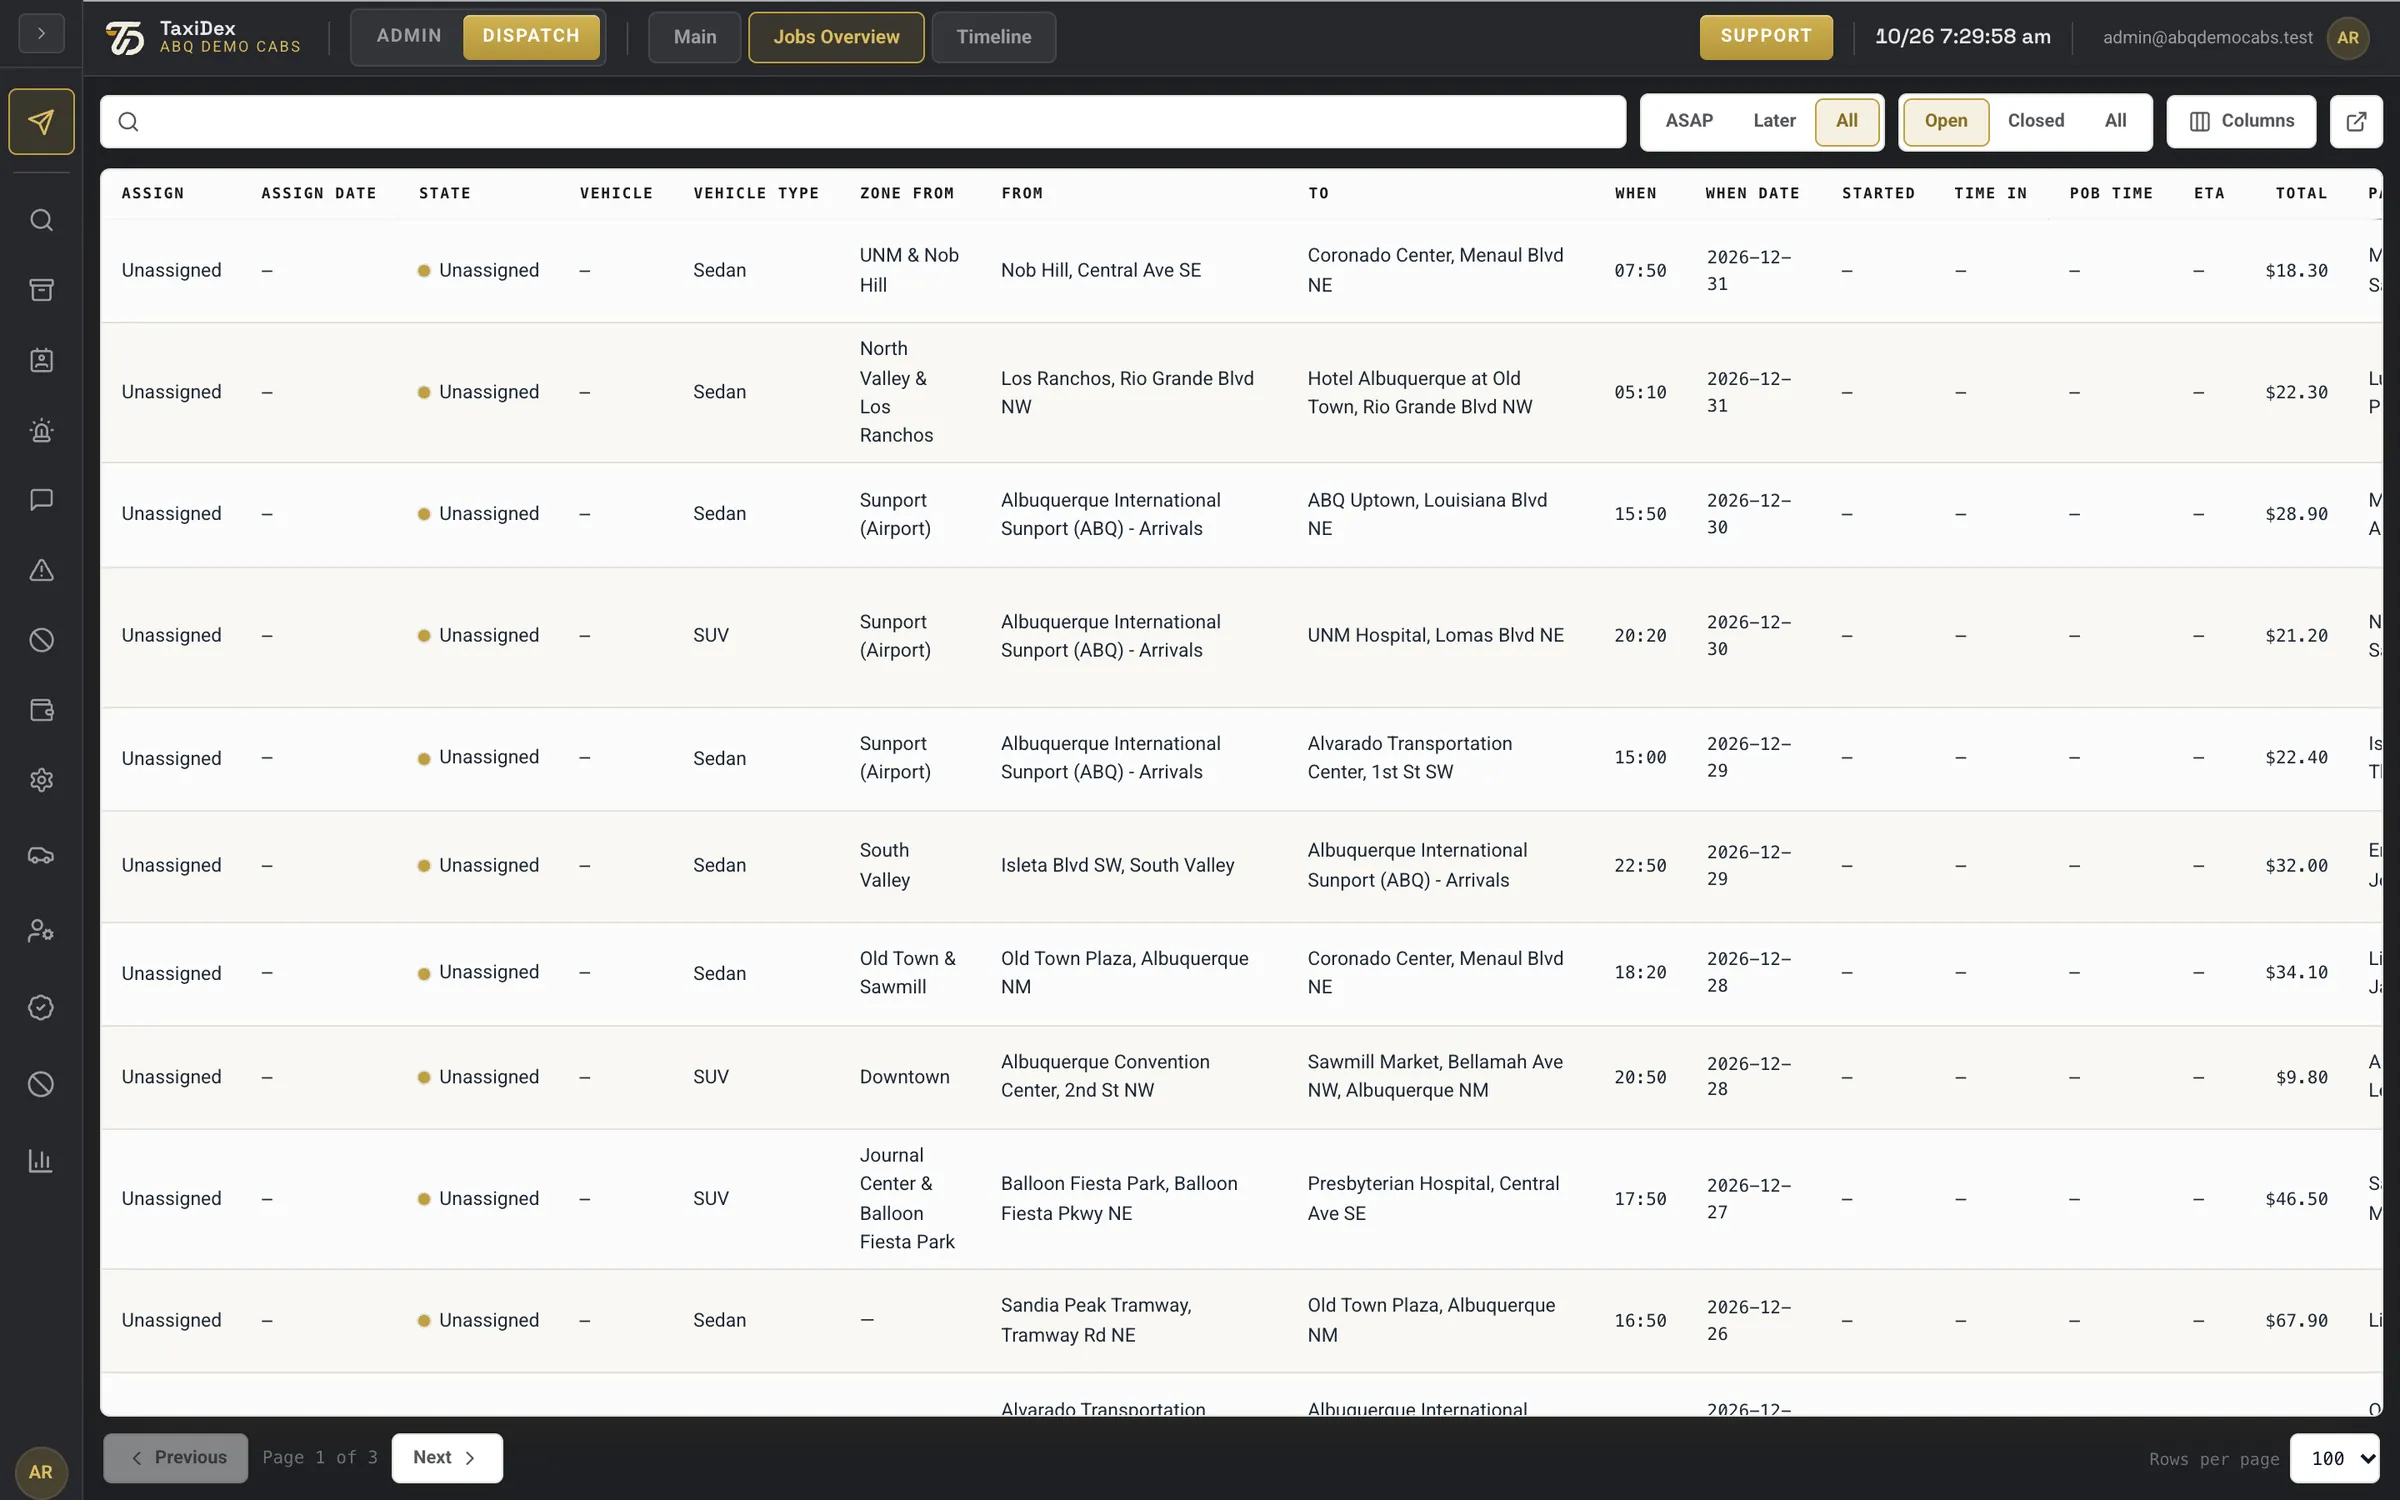
Jobs Overview lists open and closed jobs with many columns. Use the two switches to narrow it to ASAP or later jobs and to open or closed ones, and the search box to find one job. Right-click a row for Edit job, Clone job, Create return job, Job details, Job events and Offer history.
Jobs Overview.
Click a number or a line to spotlight it
1Jobs Overview tab The table view of every job.
2Search jobs Passenger, phone, address or reference.
3When: ASAP · Later · All Immediate jobs, pre-booked jobs, or both.
4State: Open · Closed · All Open jobs, closed jobs, or both.
5Columns Pick which columns to show.
6Pop out (own window) Opens the list in its own window, for a second screen.
7Column headings Assign, state, vehicle, type, zone, from, to, when, started, ETA, total, passenger, phone, payment, source and more.
8One job per row, total in USD One job per row, with its total in US dollars.
9Previous · page · Next Page through the results.
10Rows per page How many rows a page shows.
How to
Find a job by its reference
Click Jobs Overview in the header.
Type the reference, phone or a word from the address in Search jobs.
The table narrows as you type.
04
Chapter 4 · 1 screen · 1 how-to
Timeline
WhereDISPATCH ▸ Timeline
The day drawn as lanes, one per car, so you can see gaps and clashes at a glance.
4.1 Reading the timeline
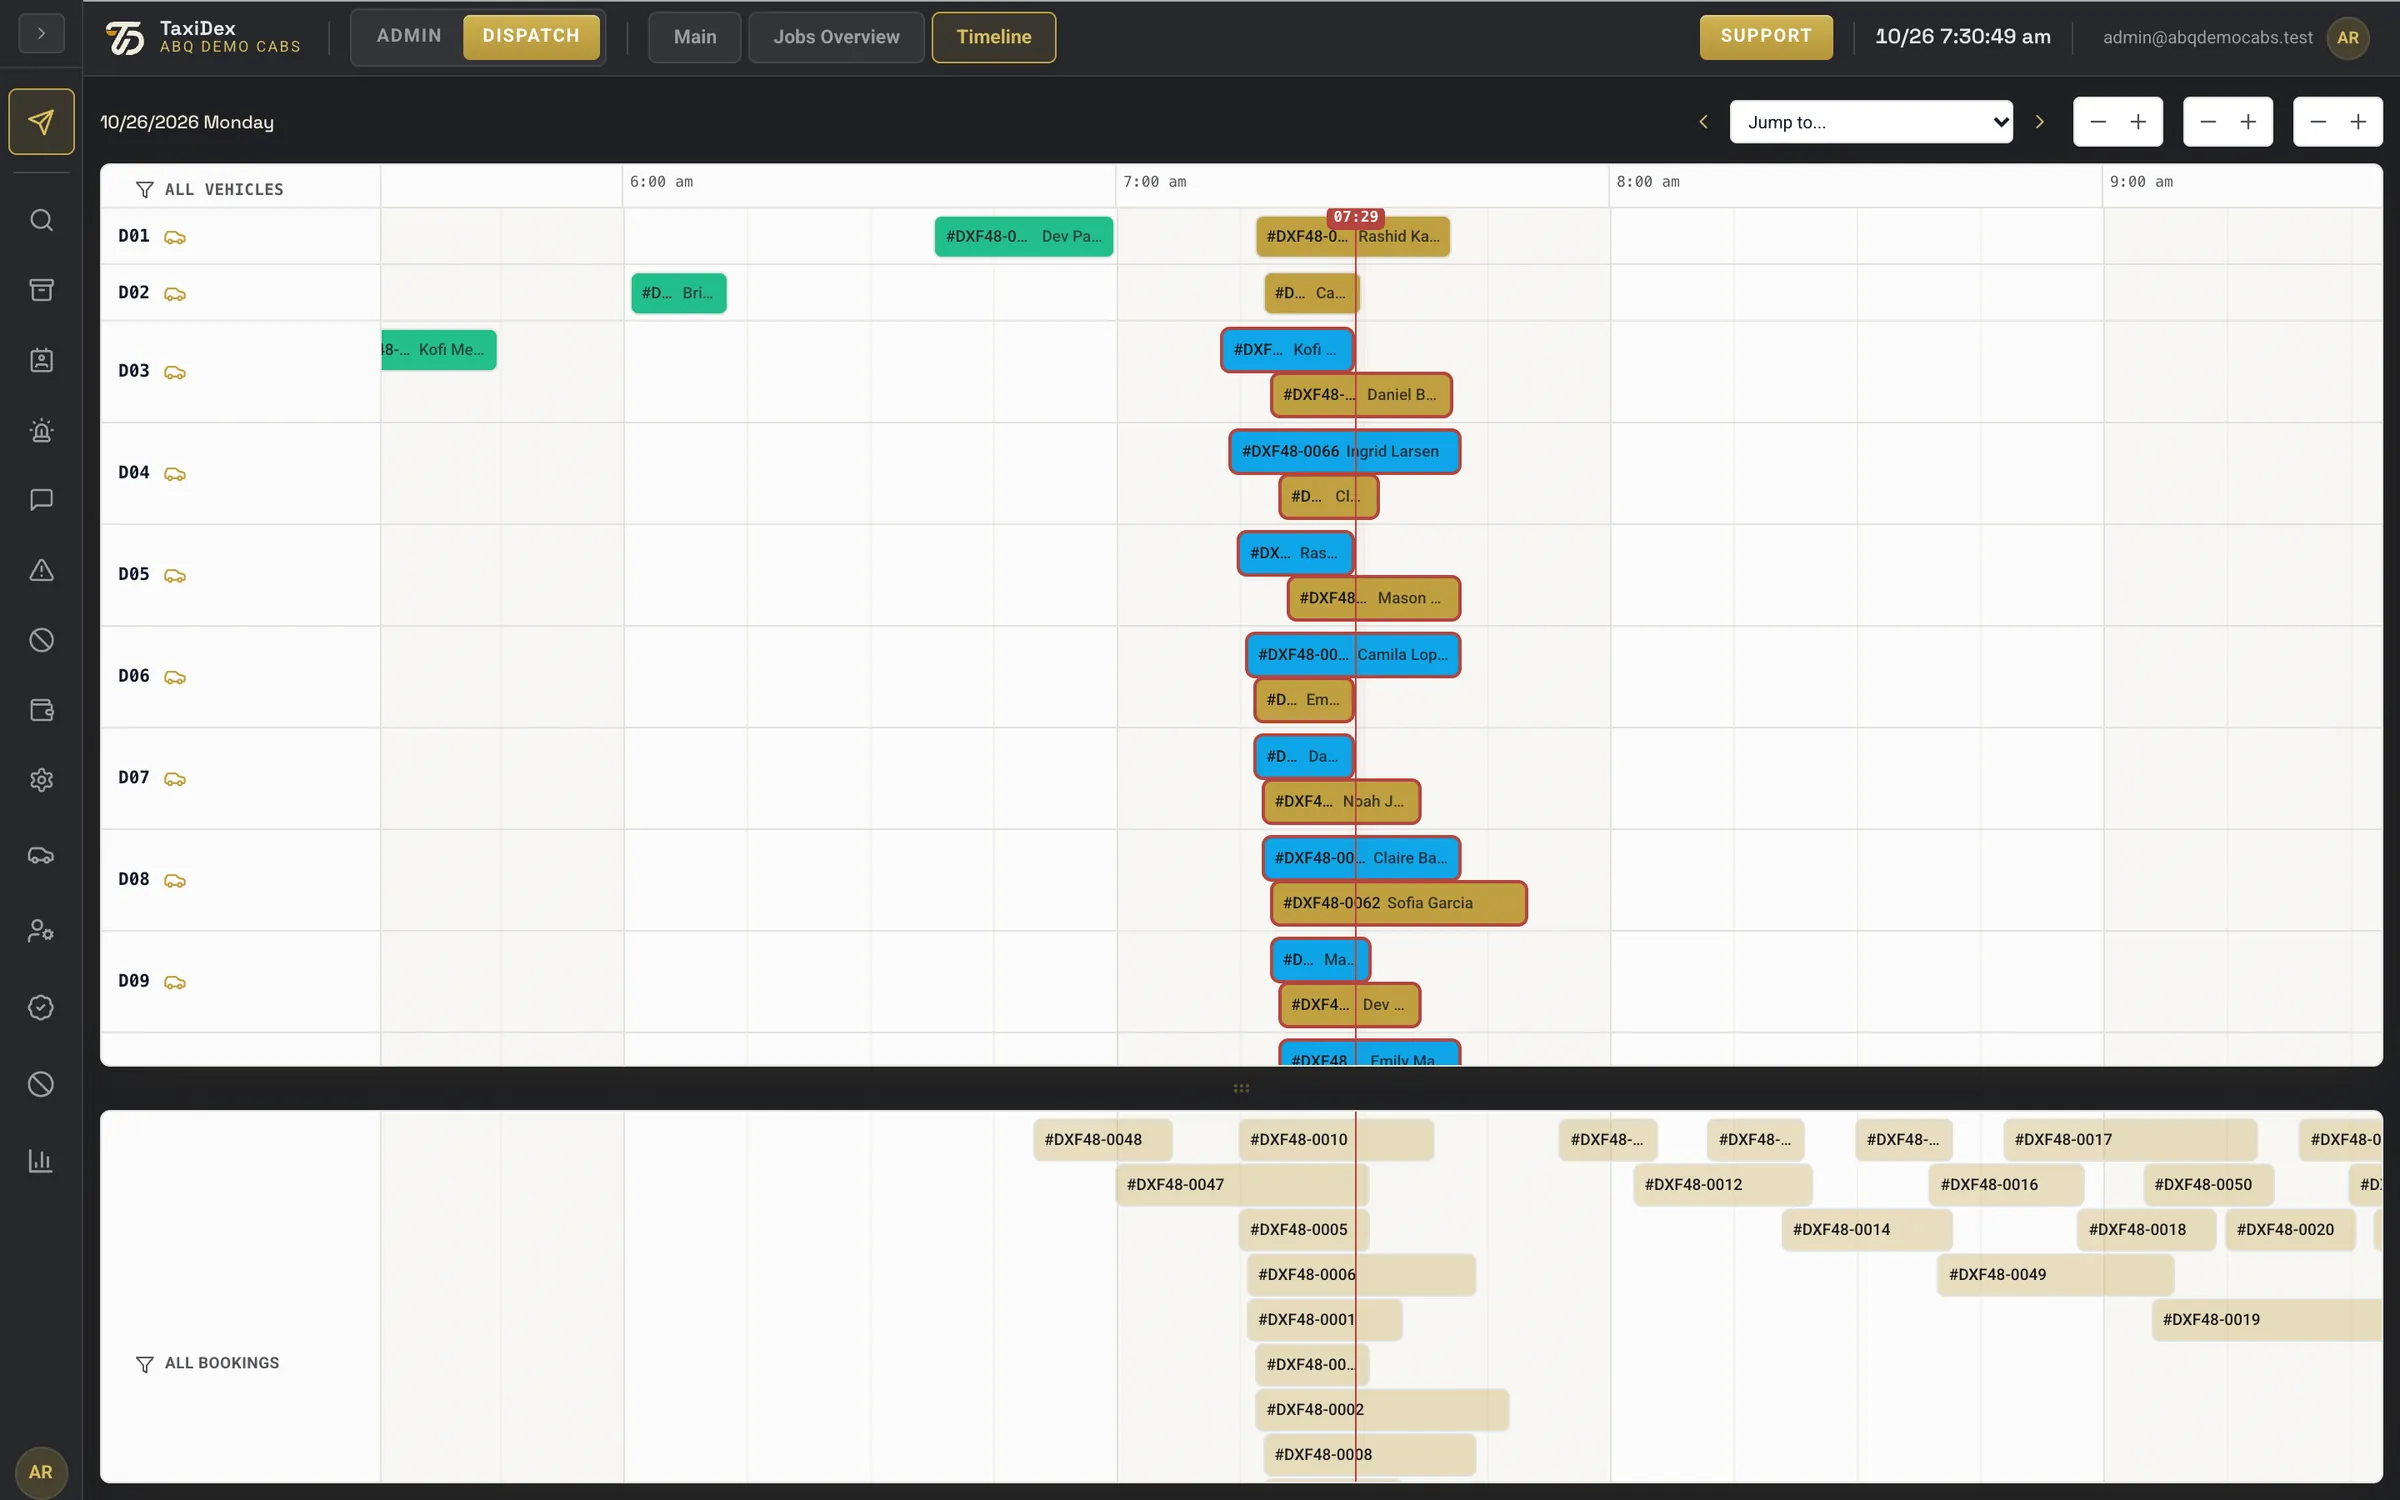
Each car has a lane; each job is a bar that starts at the promised time and is as long as the measured route. A green bar is finished. A red outline means two jobs on that car run into each other. Jobs without a car sit in the band at the bottom.
Timeline for today.
Click a number or a line to spotlight it
1The day shown The day you are looking at.
2Previous day · Jump to · Next day A day back, pick any date, or a day forward.
3Zoom the hours Stretch or squeeze the hours.
4Lane height Taller or shorter car lanes.
5Unassigned band height Taller or shorter band for jobs without a car.
6Vehicle filter Show all cars or filter them.
7One lane per car (callsign) One lane per car, by callsign.
8Hours of the day The hours of the day.
9Now The red line is the current time.
10Finished job (green) A finished job is green.
11Red outline: two jobs on one car run into each other A red outline means two jobs on that car run into each other.
12Jobs without a car, with their filter Jobs with no car yet, with their own filter.
13A job bar: drag it onto a car lane to plan it A job bar starts at the promised time and is as long as the measured route. Drag it onto a car's lane to plan it for that car.
How to
Plan or move a job on the timeline
Drag a bar from the bottom band onto a car's lane to plan it for that car, or between lanes to re-assign it.
Drag a bar sideways to change its time in quarter hours (arrow keys work too; hold Shift for whole hours).
Confirm the change when asked.
05
Chapter 5 · 25 screens · 10 how-tos
ADMIN ▸ Settings
WhereADMIN ▸ SETTINGS
Everything your fleet is set up with: company details, people, cars, areas, prices, places, the driver app, passenger messages and rosters.
5.1 Dashboard
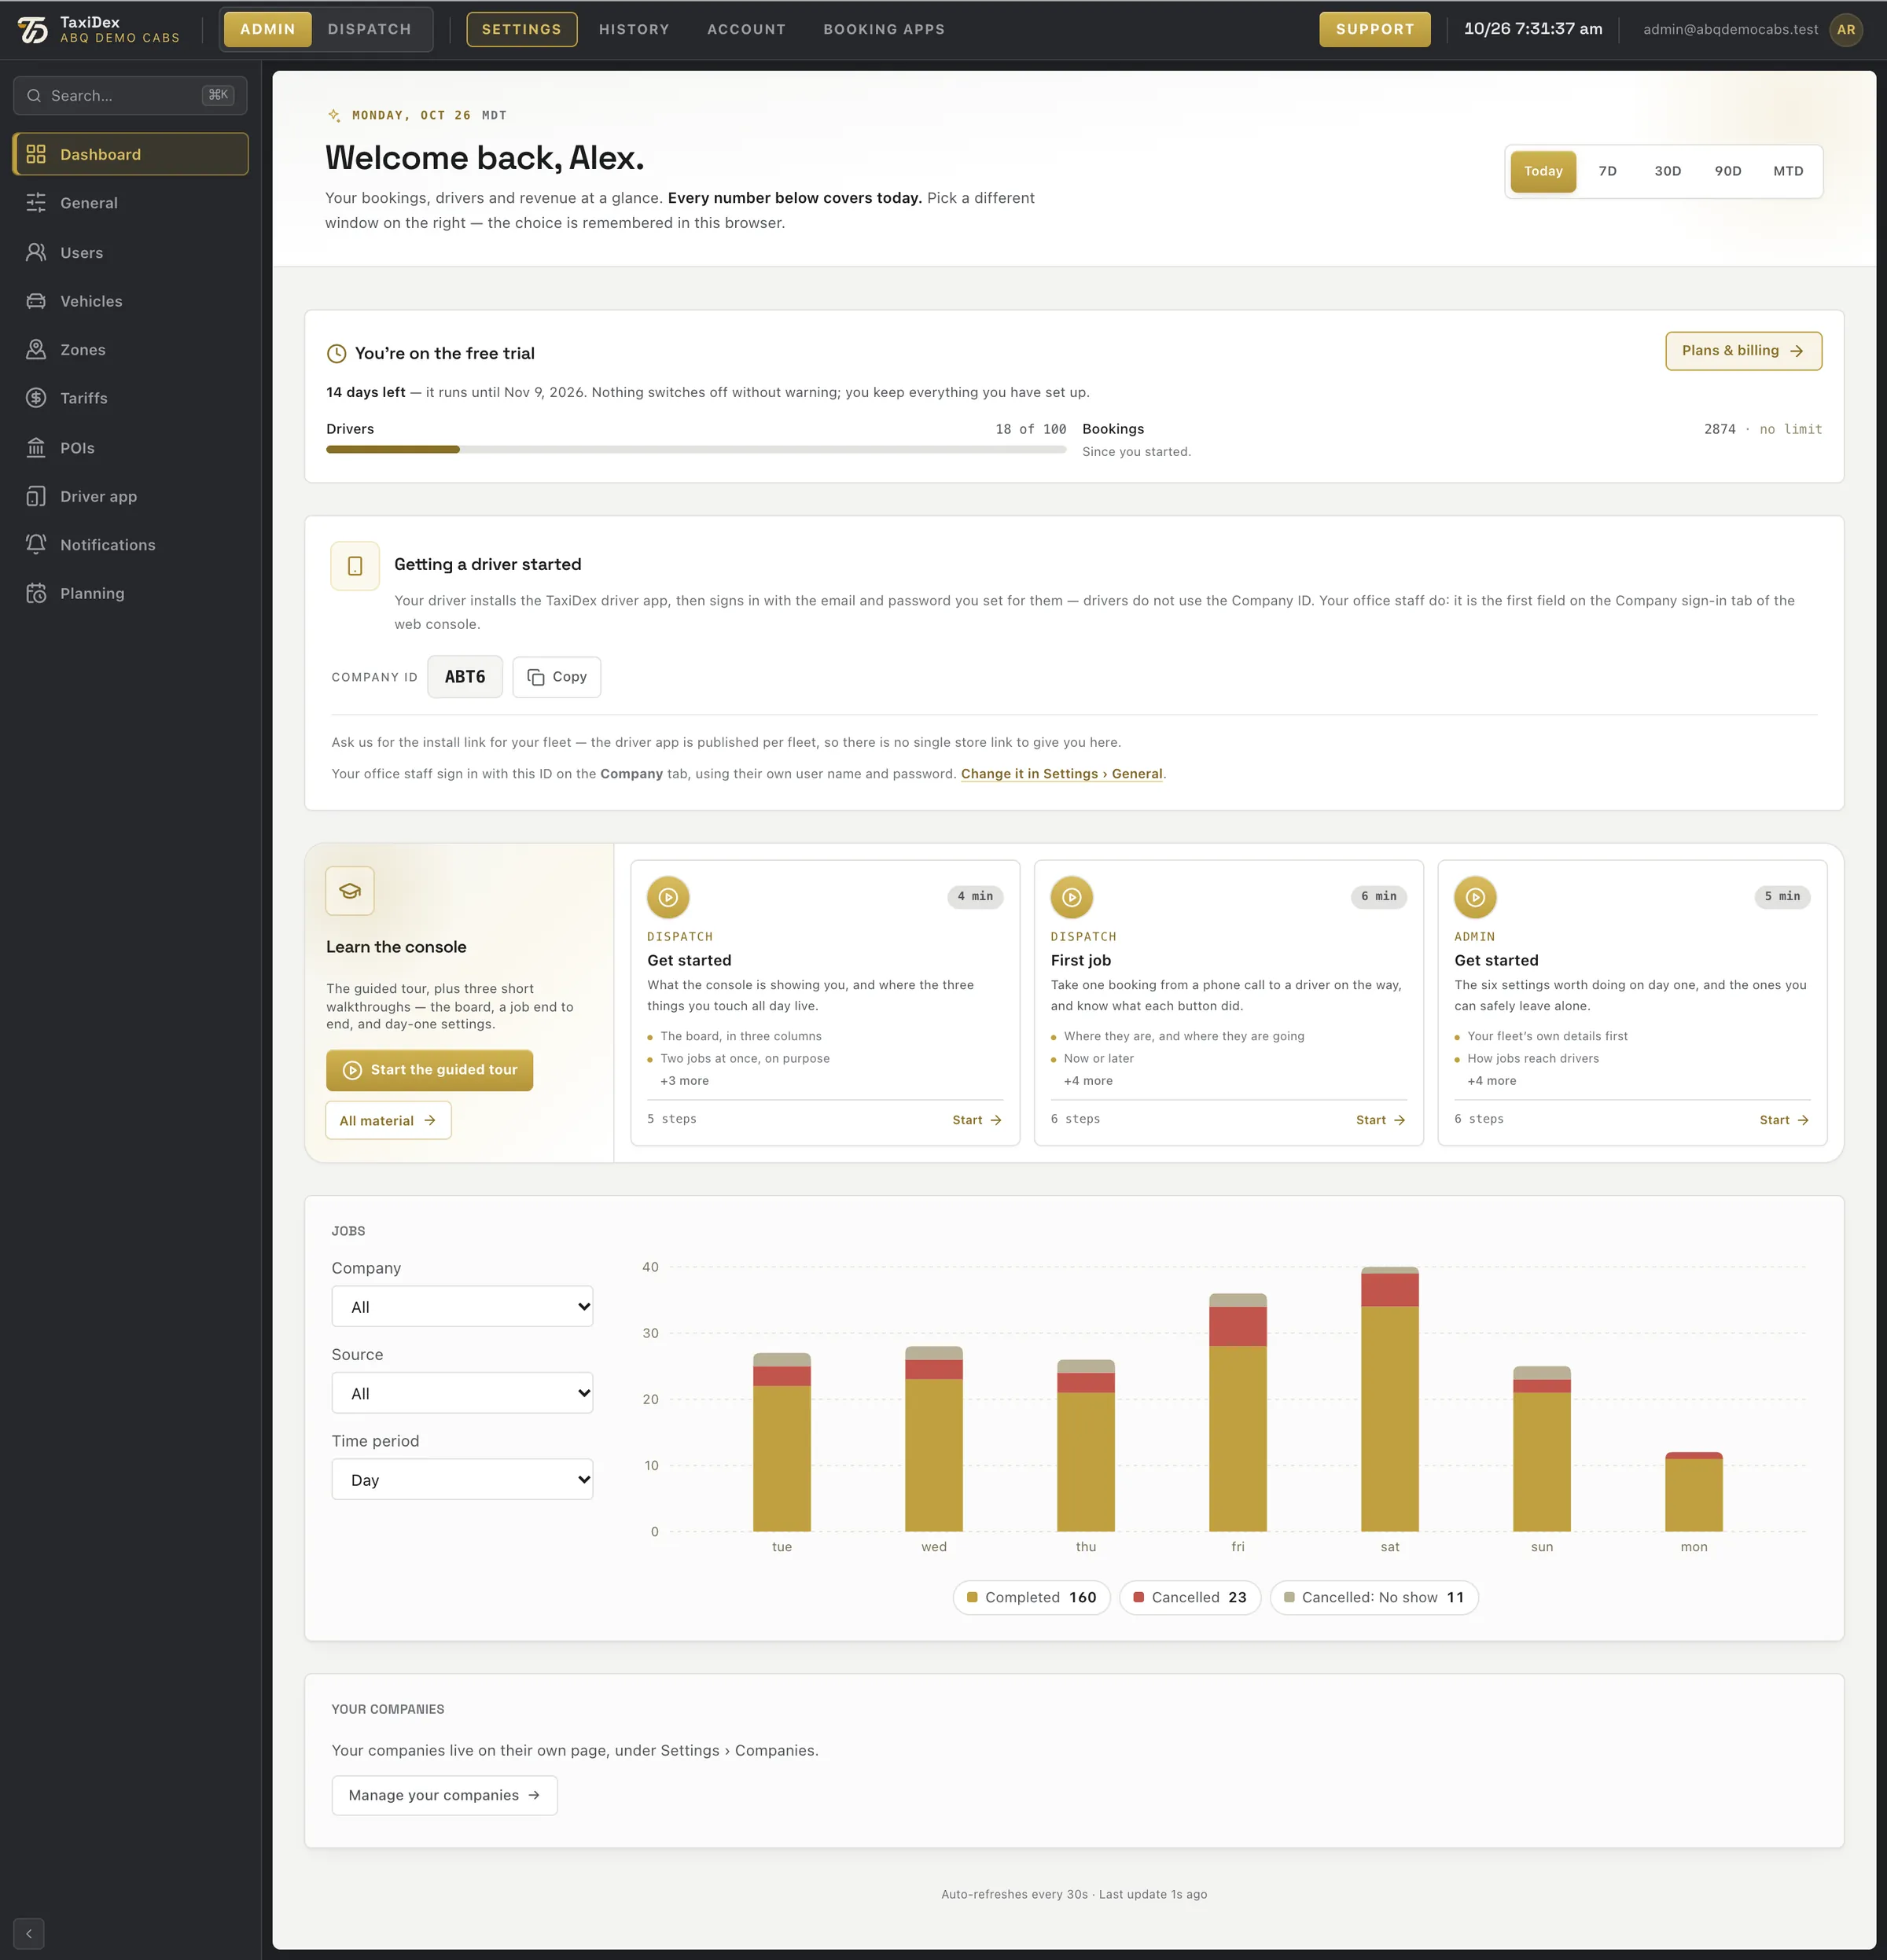
ADMIN opens on the Dashboard: your trial or plan and its usage, the Company ID to give your staff, the learning material and a jobs chart.
ADMIN ▸ Dashboard.
Click a number or a line to spotlight it
1ADMIN | DISPATCH Switch to the live console and back.
2Settings · History · Account · Booking apps The four ADMIN sections.
3Search… (⌘K) Find any setting or page.
4Settings menu The settings pages, in order.
5Time window for the numbers Today, 7, 30 or 90 days, or month to date. Remembered in this browser.
6Trial or plan, and usage against its limits Your free trial (or plan) and how many drivers and bookings you have used against its limits.
7Plans & billing Opens Account ▸ Your plan.
8Company ID and Copy The Company ID your office staff sign in with. Copy puts it on the clipboard.
9Start the guided tour Restarts the guided tour.
10Walkthroughs: Get started · First job · Admin Short walkthroughs: the board, one job end to end, and day-one settings.
11Jobs chart filters: company · source · day/week/month Show one company, one booking source, and group by day, week or month.
12Completed · Cancelled · No show, per day Completed, cancelled and no-show jobs, per day.
13Manage your companies Opens Settings ▸ Companies.
5.2 General
General holds the settings that affect the whole system. Its tabs are General (country, currency, time and units), Assignment (how jobs reach drivers), Drivers (what drivers may see and do), Dispatch console (alerts, job-card display and layout), Payments, Companies (trading names with their own numbers, area, hours and rules) and Messages (who can message whom, and preset lines).
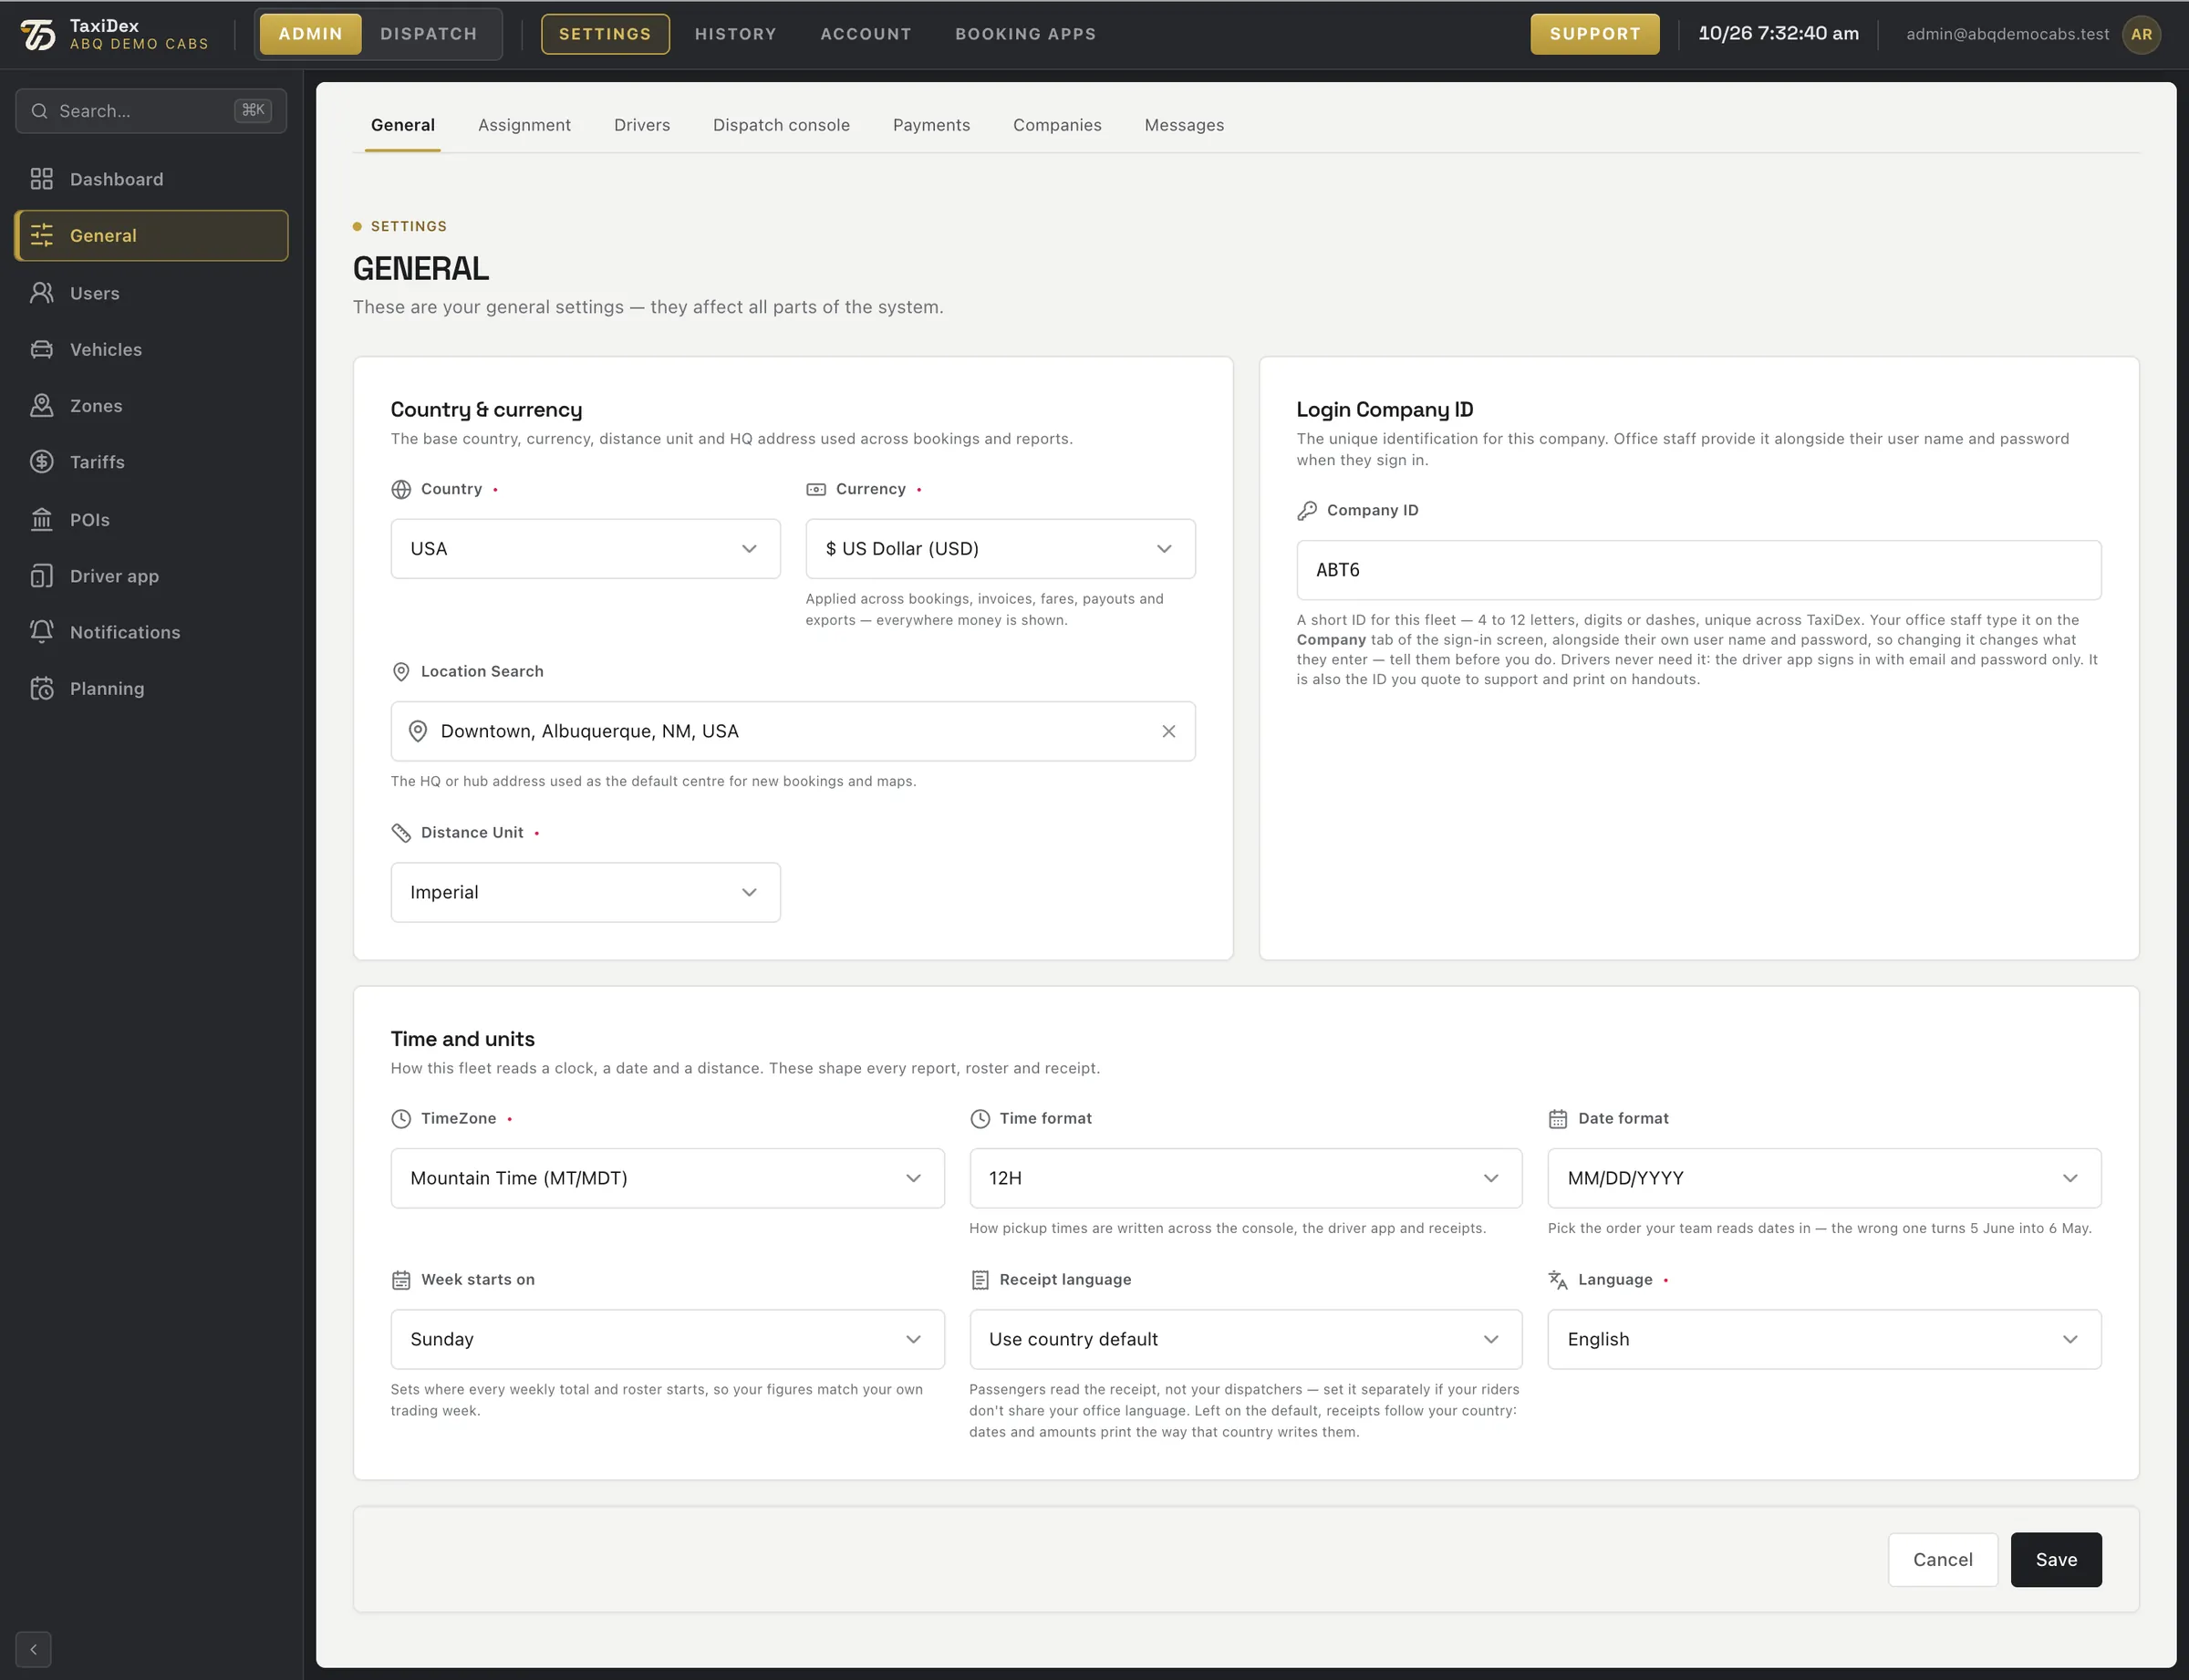
Set the country, currency and distance unit first: they decide how every price and distance in the portal is shown. The example fleet uses the United States, US dollars and miles.
Settings ▸ General.
Click a number or a line to spotlight it
1General sub-tabs General, Assignment, Drivers, Dispatch console, Payments, Companies, Messages.
2Country Your fleet's country.
3Currency Used on bookings, invoices, fares, payouts and exports — here US dollars.
4Location (HQ address, map centre) Your HQ address. New bookings and maps start from here.
5Distance unit Metric or imperial (miles).
6Company ID (used to sign in) The ID office staff type on the Company sign-in tab.
7Time zone Every time in the portal follows this zone.
8Time format · Date format 12-hour or 24-hour, and the order of month, day and year.
9Week starts on Where weekly totals and rosters start.
10Receipt language The language of passenger receipts.
11Portal language The portal's language.
12Cancel · Save Nothing changes until you press Save.
How to
Change how jobs reach drivers
Open Settings ▸ General ▸ Assignment.
Check that Automatic dispatching is on (off means every job waits for a dispatcher).
Pick a style under How drivers are chosen, for example One at a time.
Set the search radius, the seconds a driver gets to accept and the number of tries.
Choose what happens when nobody accepts, then save. The plain-English summary at the top updates to match.
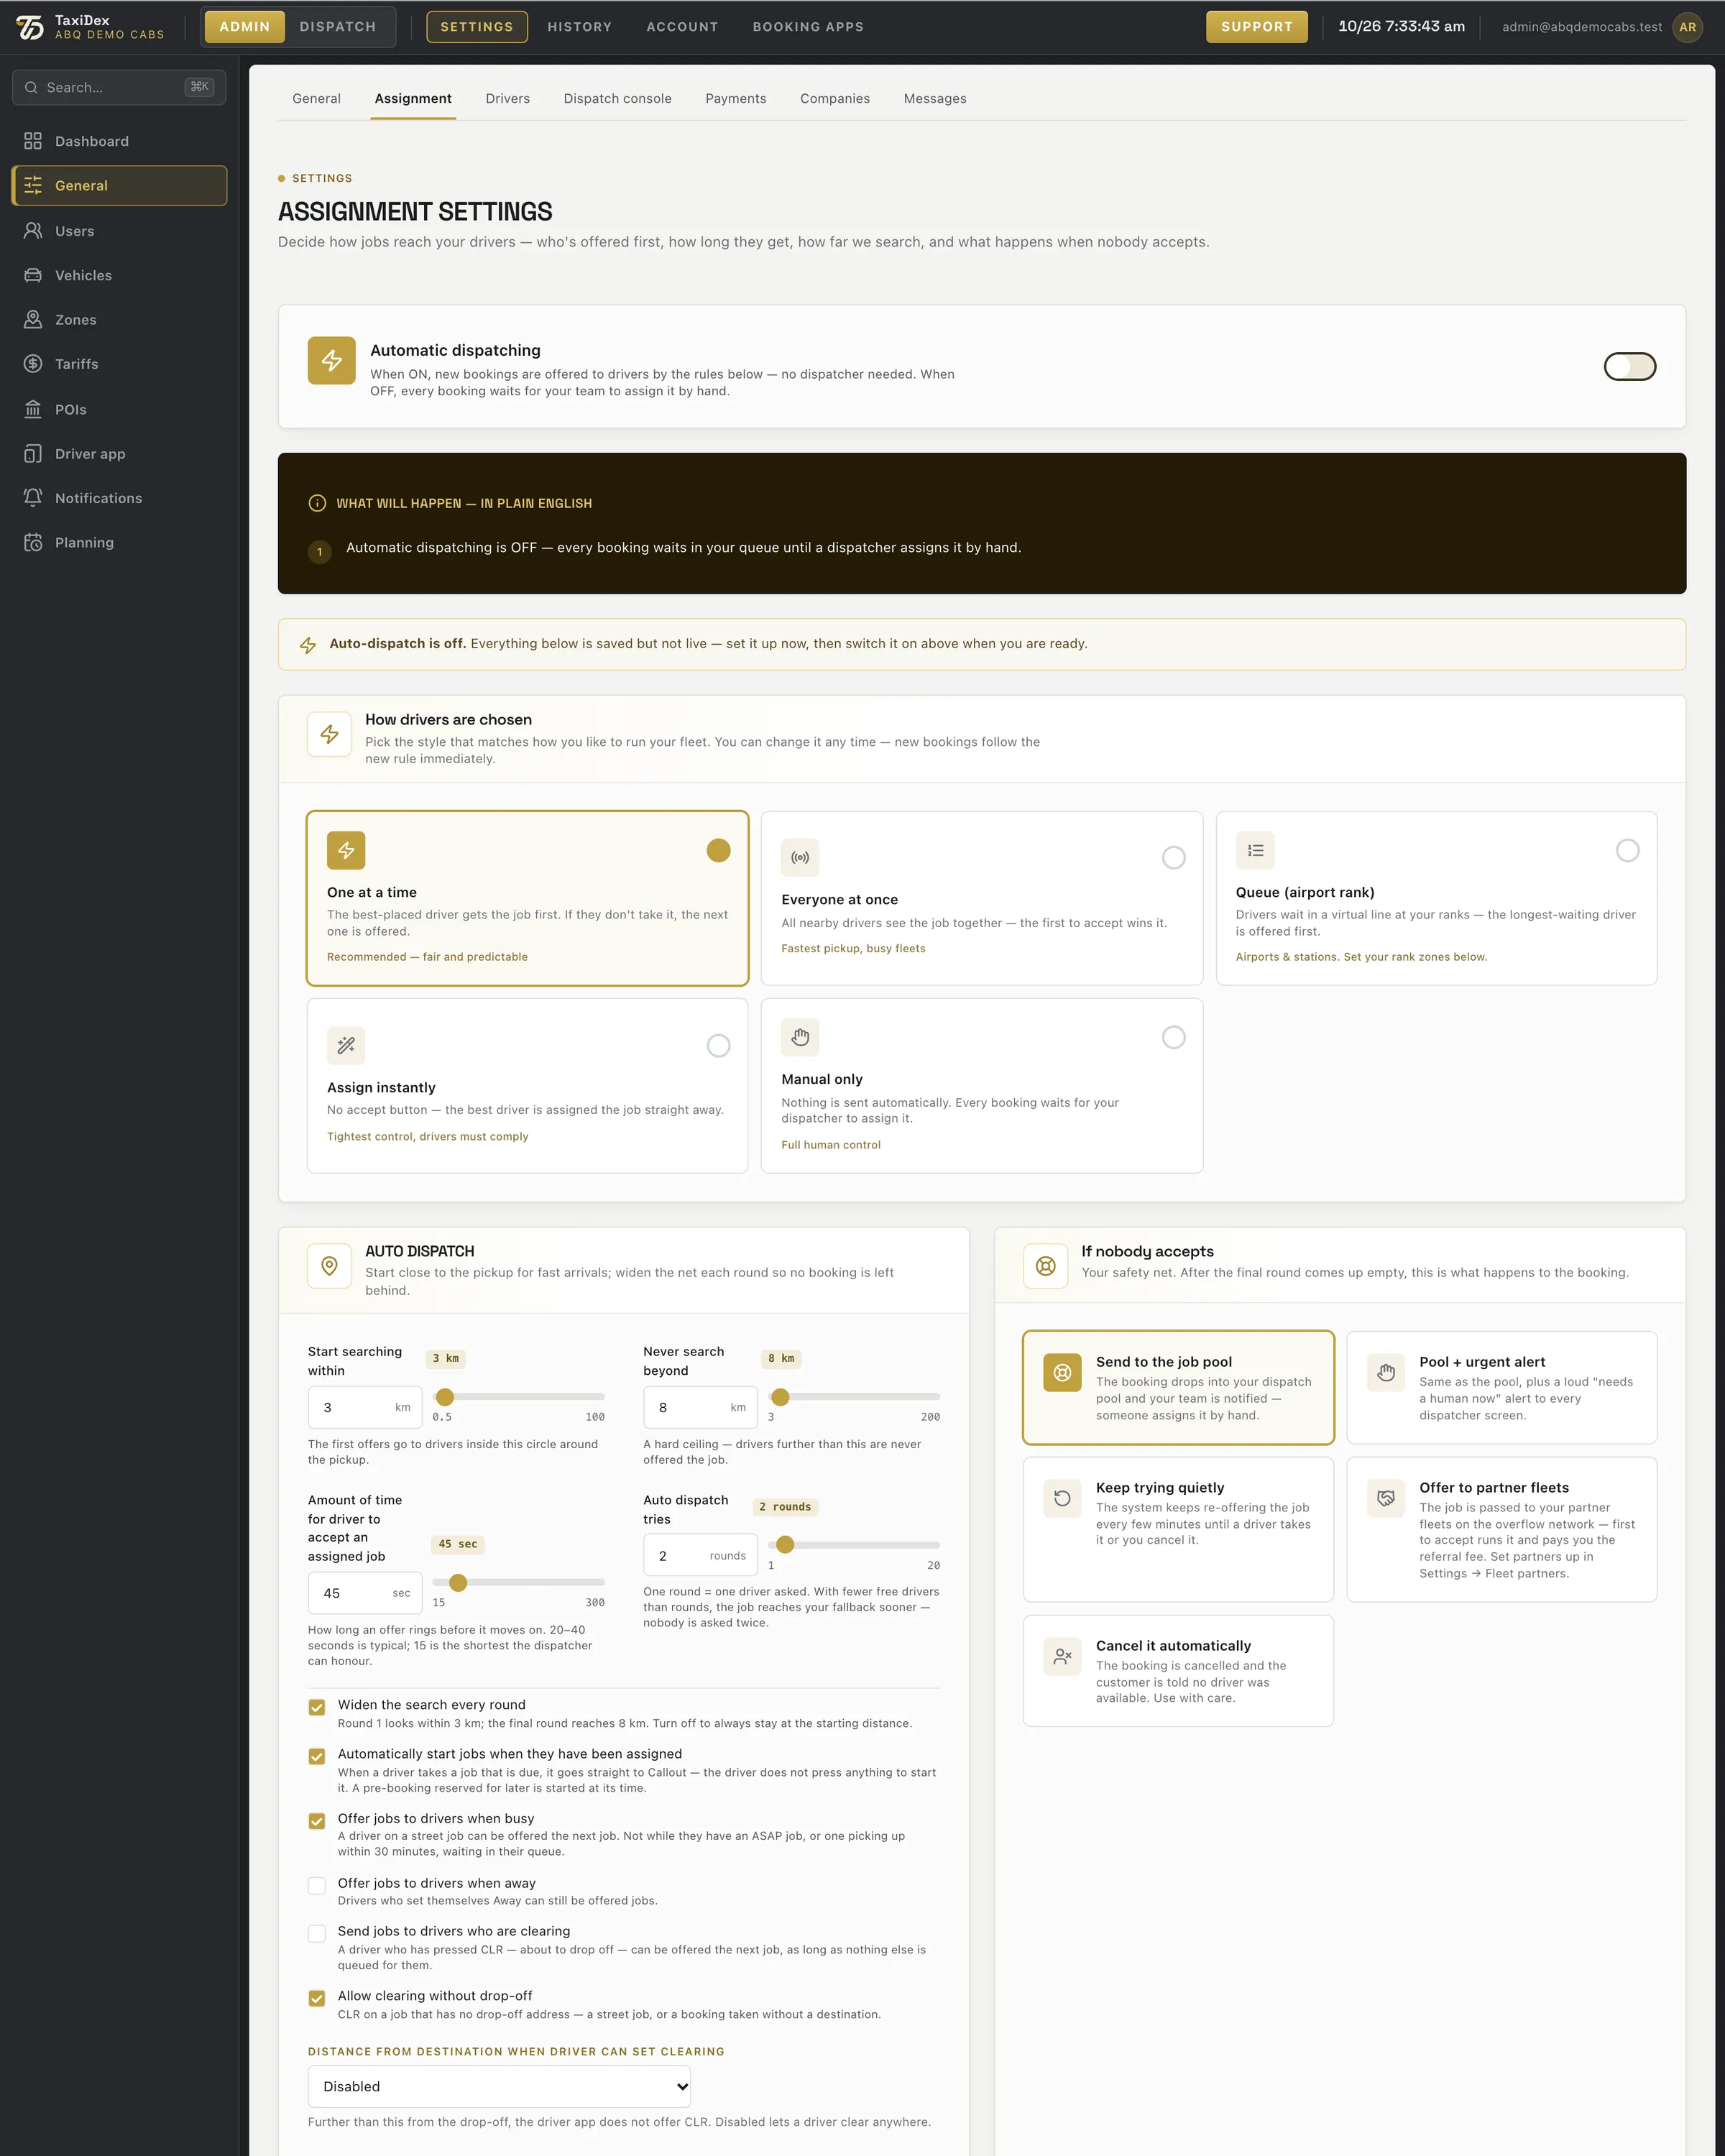
Settings ▸ General ▸ Assignment (top half).
Click a number or a line to spotlight it
1Assignment sub-tab Assignment is the second General tab.
2Automatic dispatching ON / OFF On: new bookings are offered to drivers by the rules below. Off: every booking waits for a dispatcher.
3What will happen — plain-English summary Your current rules, written out in plain sentences.
4How drivers are chosen (5 styles) One at a time, Everyone at once, Queue (airport rank), Assign instantly, or Manual only.
5Search radius: start · never beyond How far to search at first, and never beyond.
6Seconds to accept (45) · tries How many seconds a driver has to accept (45 here), and how many tries.
7Round-by-round options What changes from one round to the next, such as searching a little wider.
8If nobody accepts Send to the job pool, pool with an urgent alert, keep trying quietly, offer to partner fleets, or cancel automatically.
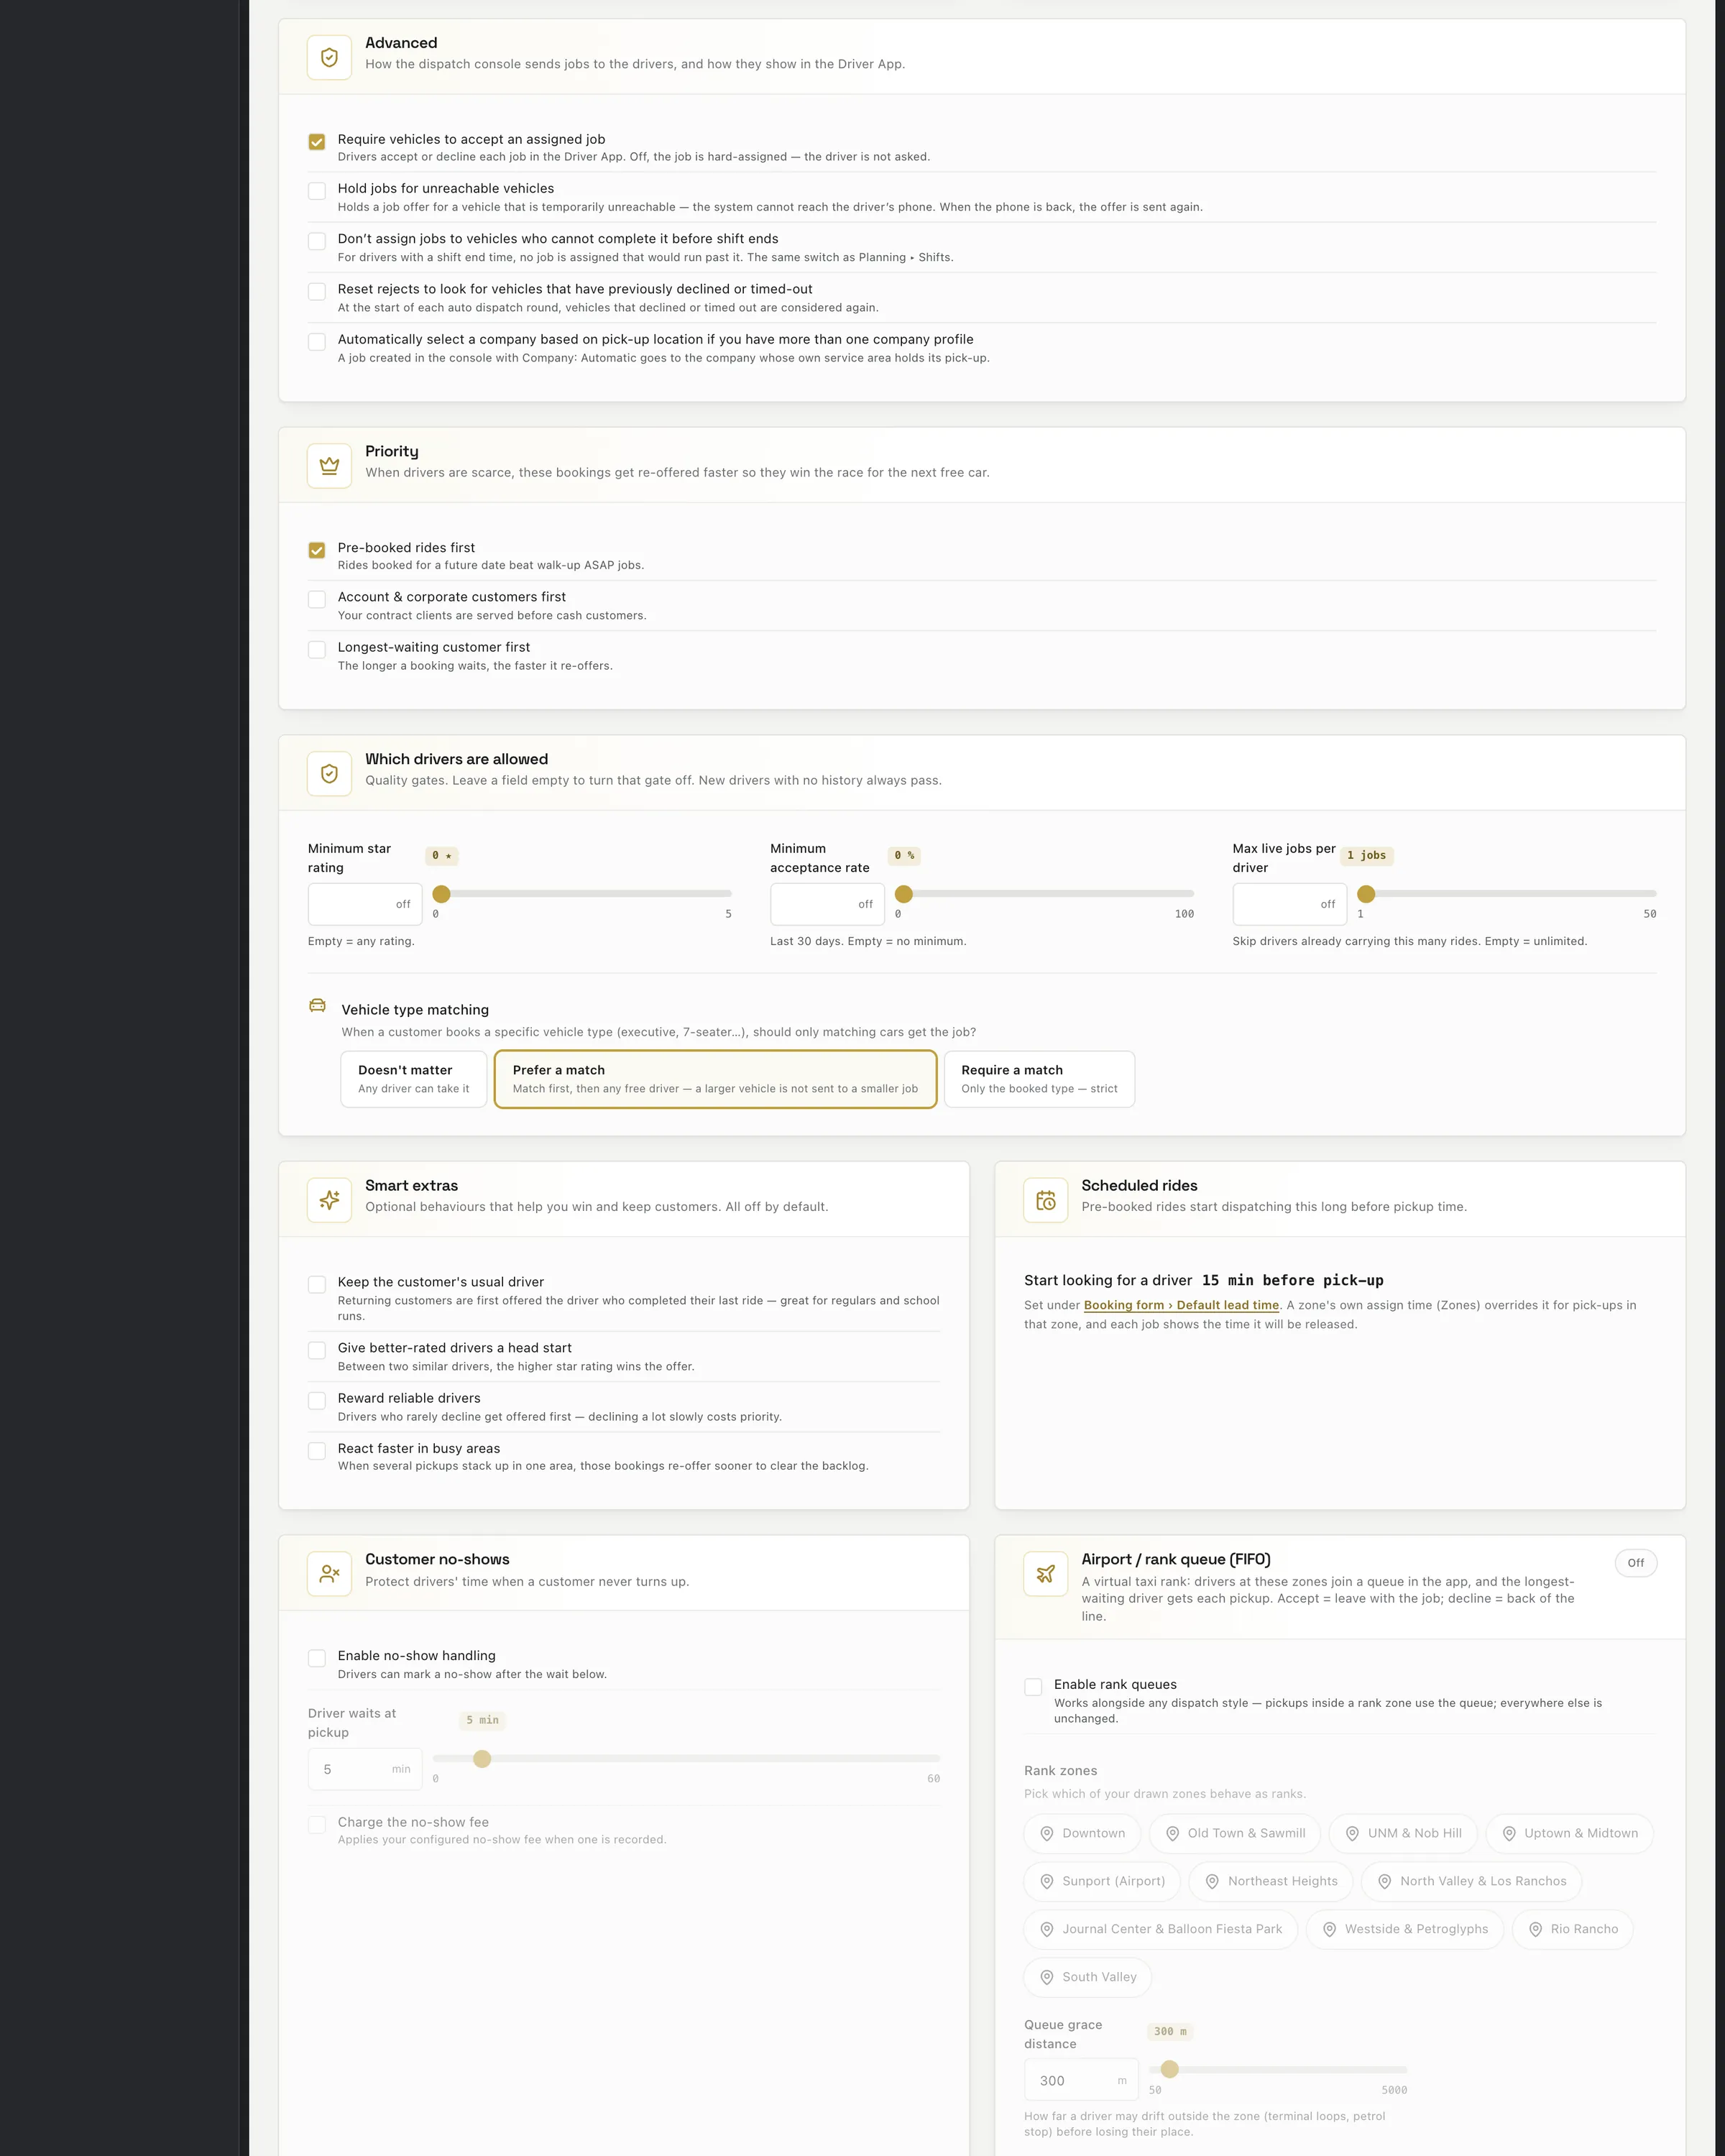
3Which drivers are allowed Minimum star rating, minimum acceptance rate, how many live jobs a driver may hold, and how strictly vehicle types must match.
4Smart extras Auto-accept, keep the customer's usual driver, a head start for better-rated drivers, and faster reactions in busy areas.
5Scheduled rides How many minutes before a pre-booking dispatch starts looking for a driver.
6Customer no-shows Let drivers mark a no-show, how long they wait, and whether the no-show fee is charged.
7Airport / rank queue First-in-first-out queues at your ranks (such as the Sunport), which zones are ranks, and the grace distance.
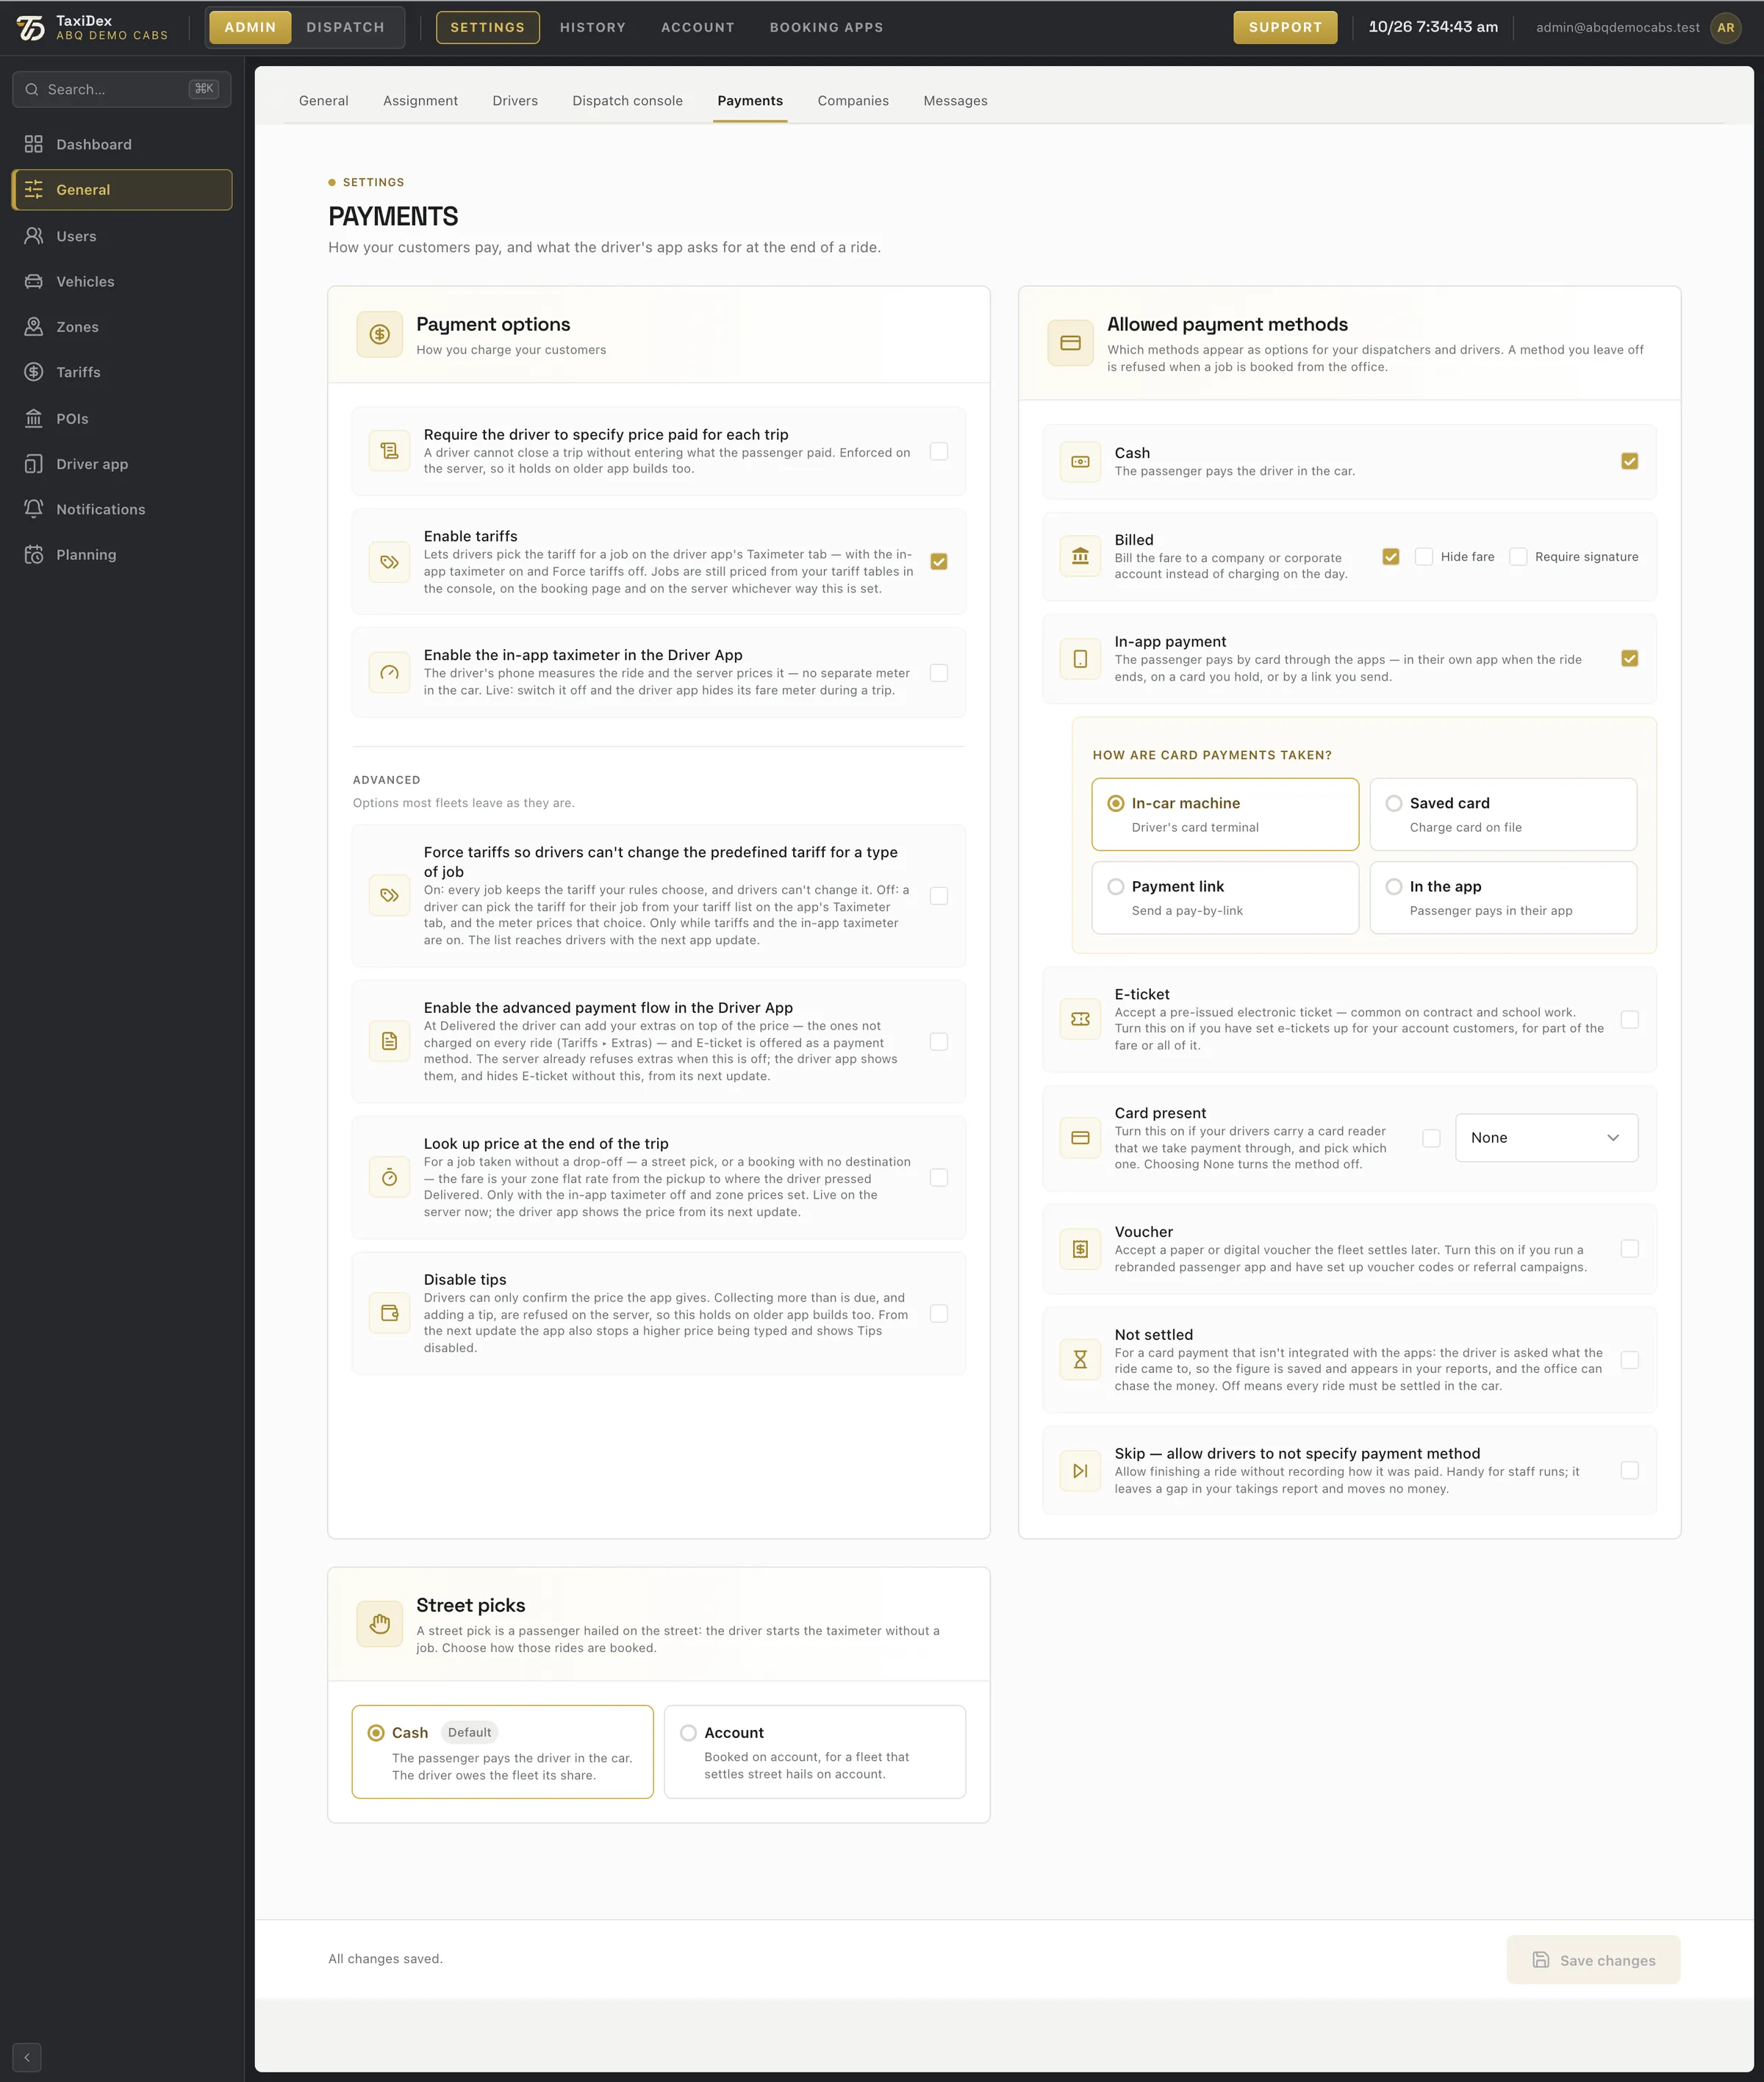
Settings ▸ General ▸ Payments.
Click a number or a line to spotlight it
1Payments sub-tab Payments is a General tab.
2Driver must enter the price paid Drivers cannot close a trip without entering what the passenger paid.
3Enable tariffs Price jobs from your tariff tables. Untick it and tariffs are switched off everywhere.
4In-app taximeter The driver's phone measures the ride and the server prices it.
5Advanced options Force tariffs, the advanced payment flow, price look-up at the end of the trip, and switching tips off.
6Allowed payment methods Cash, Billed, In-app payment, E-ticket, Card present, Voucher, Not settled and Skip.
7Street picks: default payment What a street pick-up defaults to: Cash or Account.
8Save changes Saves this page.
5.3 Users and permits
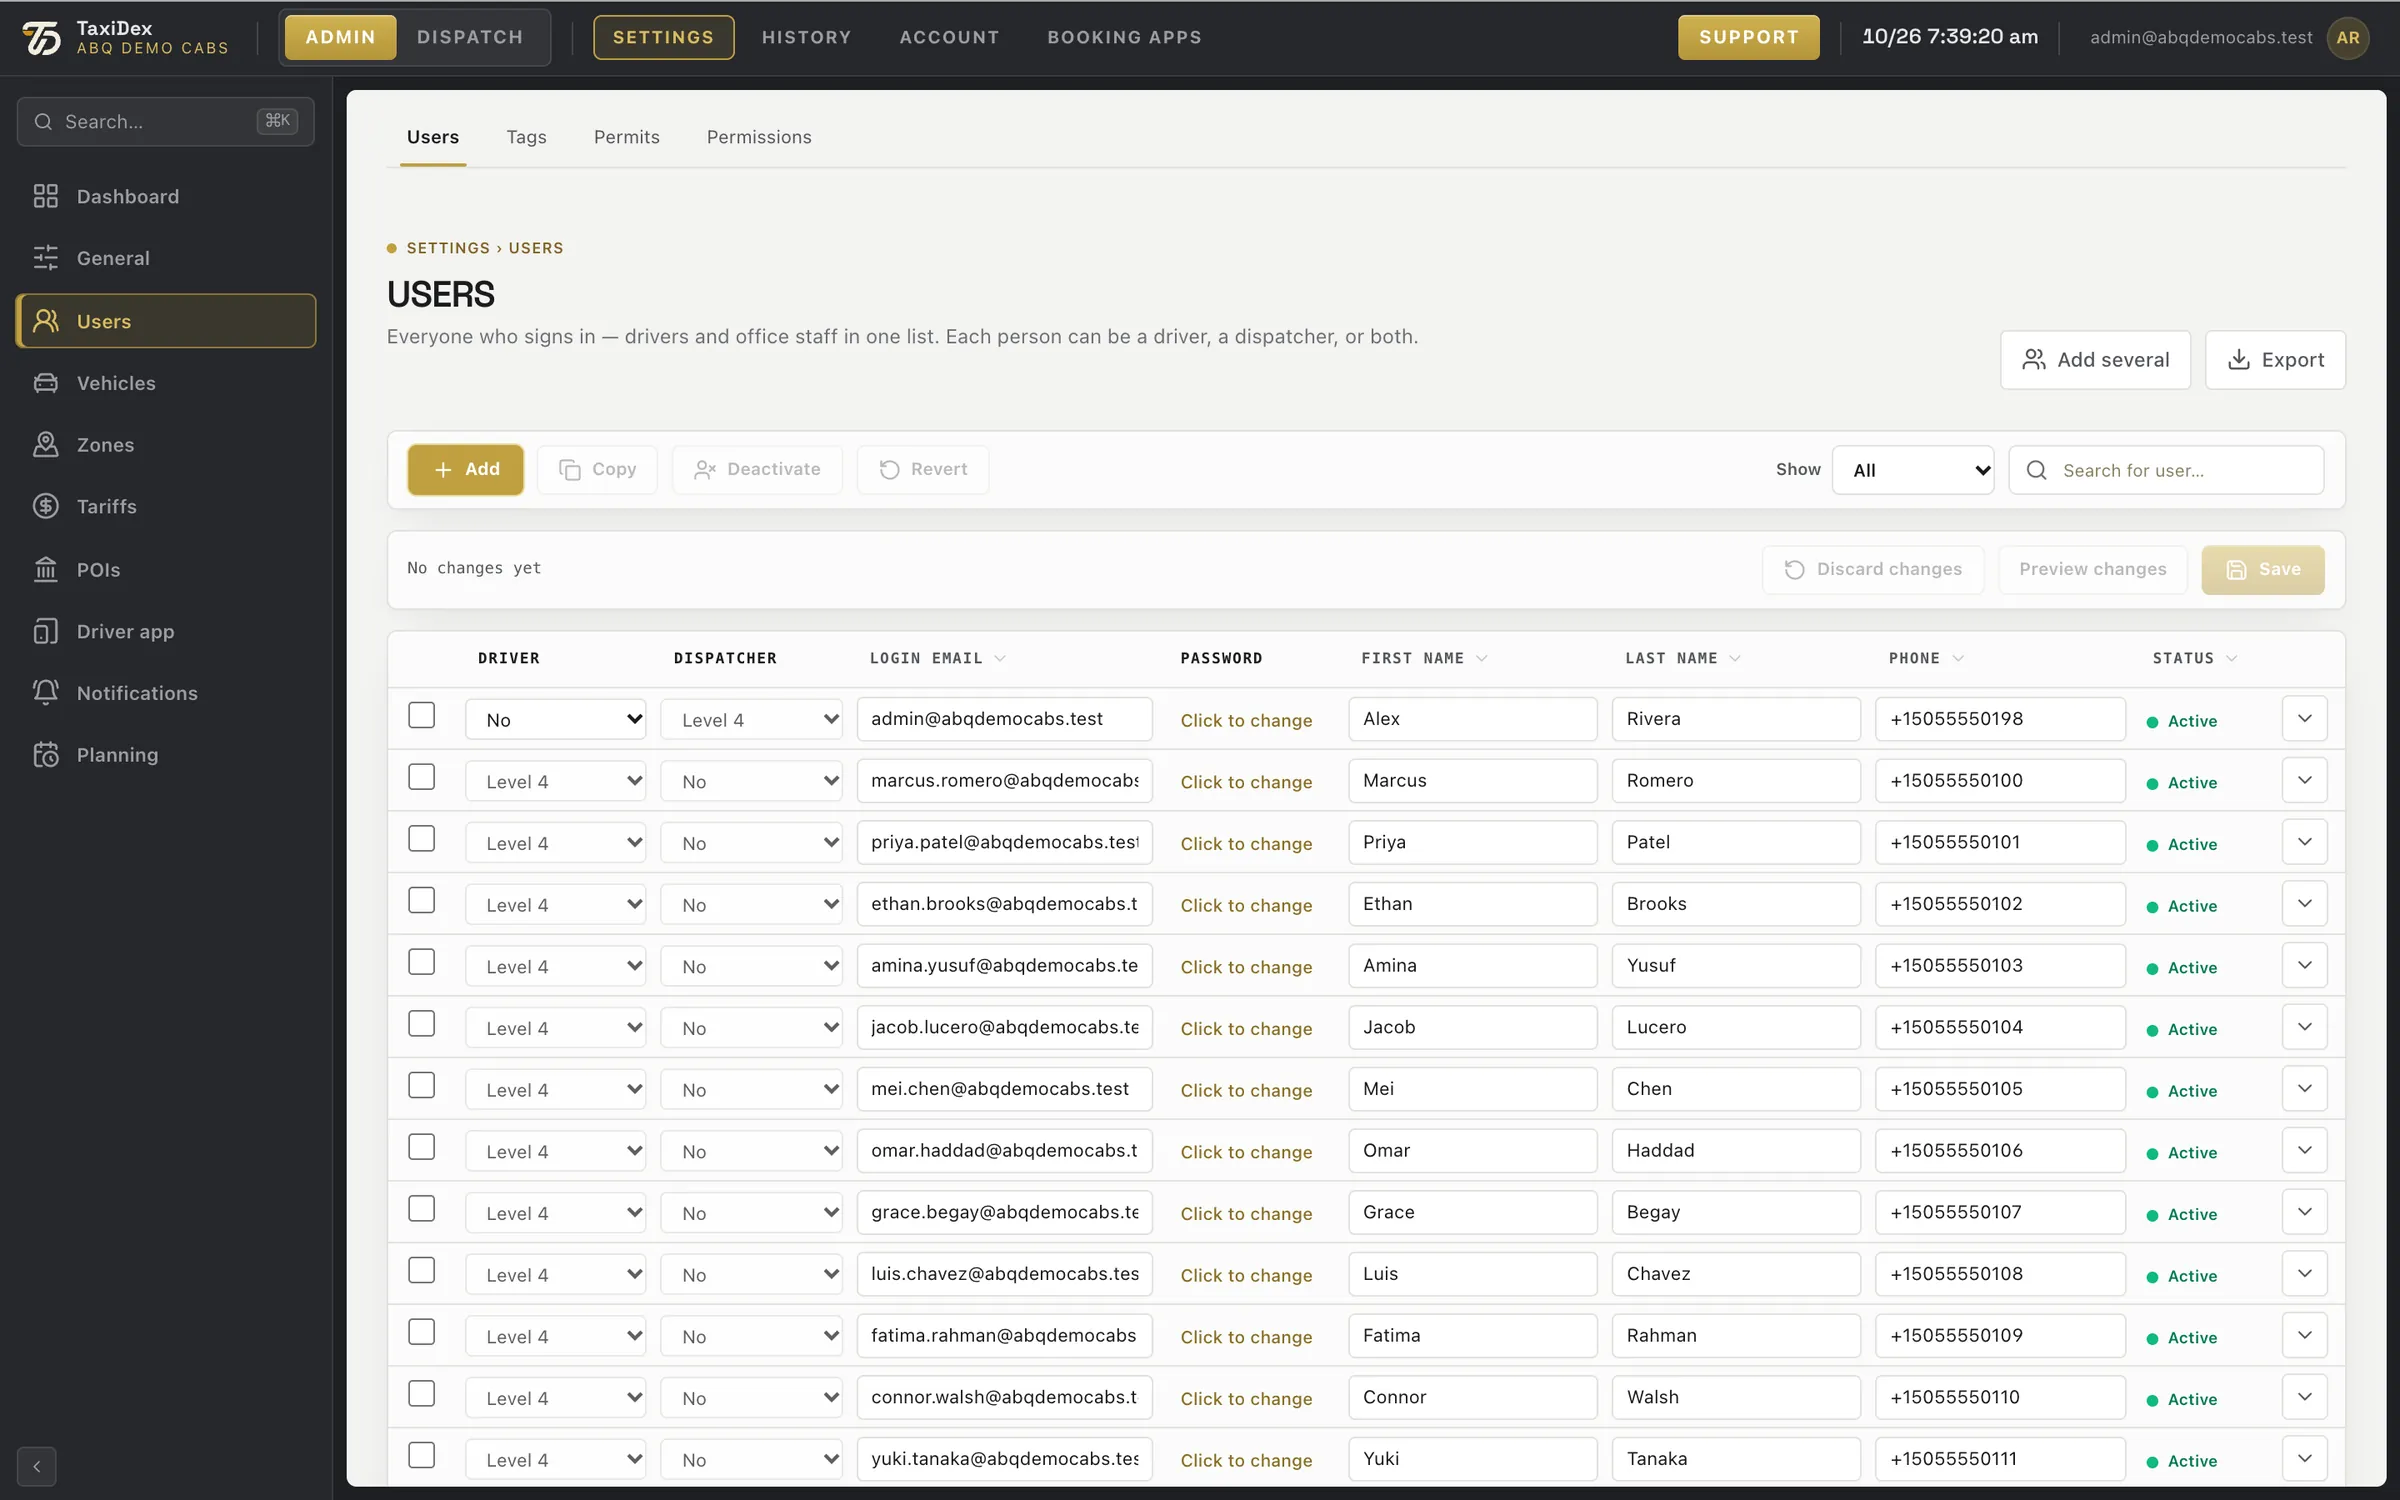
Users is one list of everyone who signs in: drivers and office staff. Each person can be a driver, a dispatcher, or both. The list works like a spreadsheet: edit cells, then save everything at once.
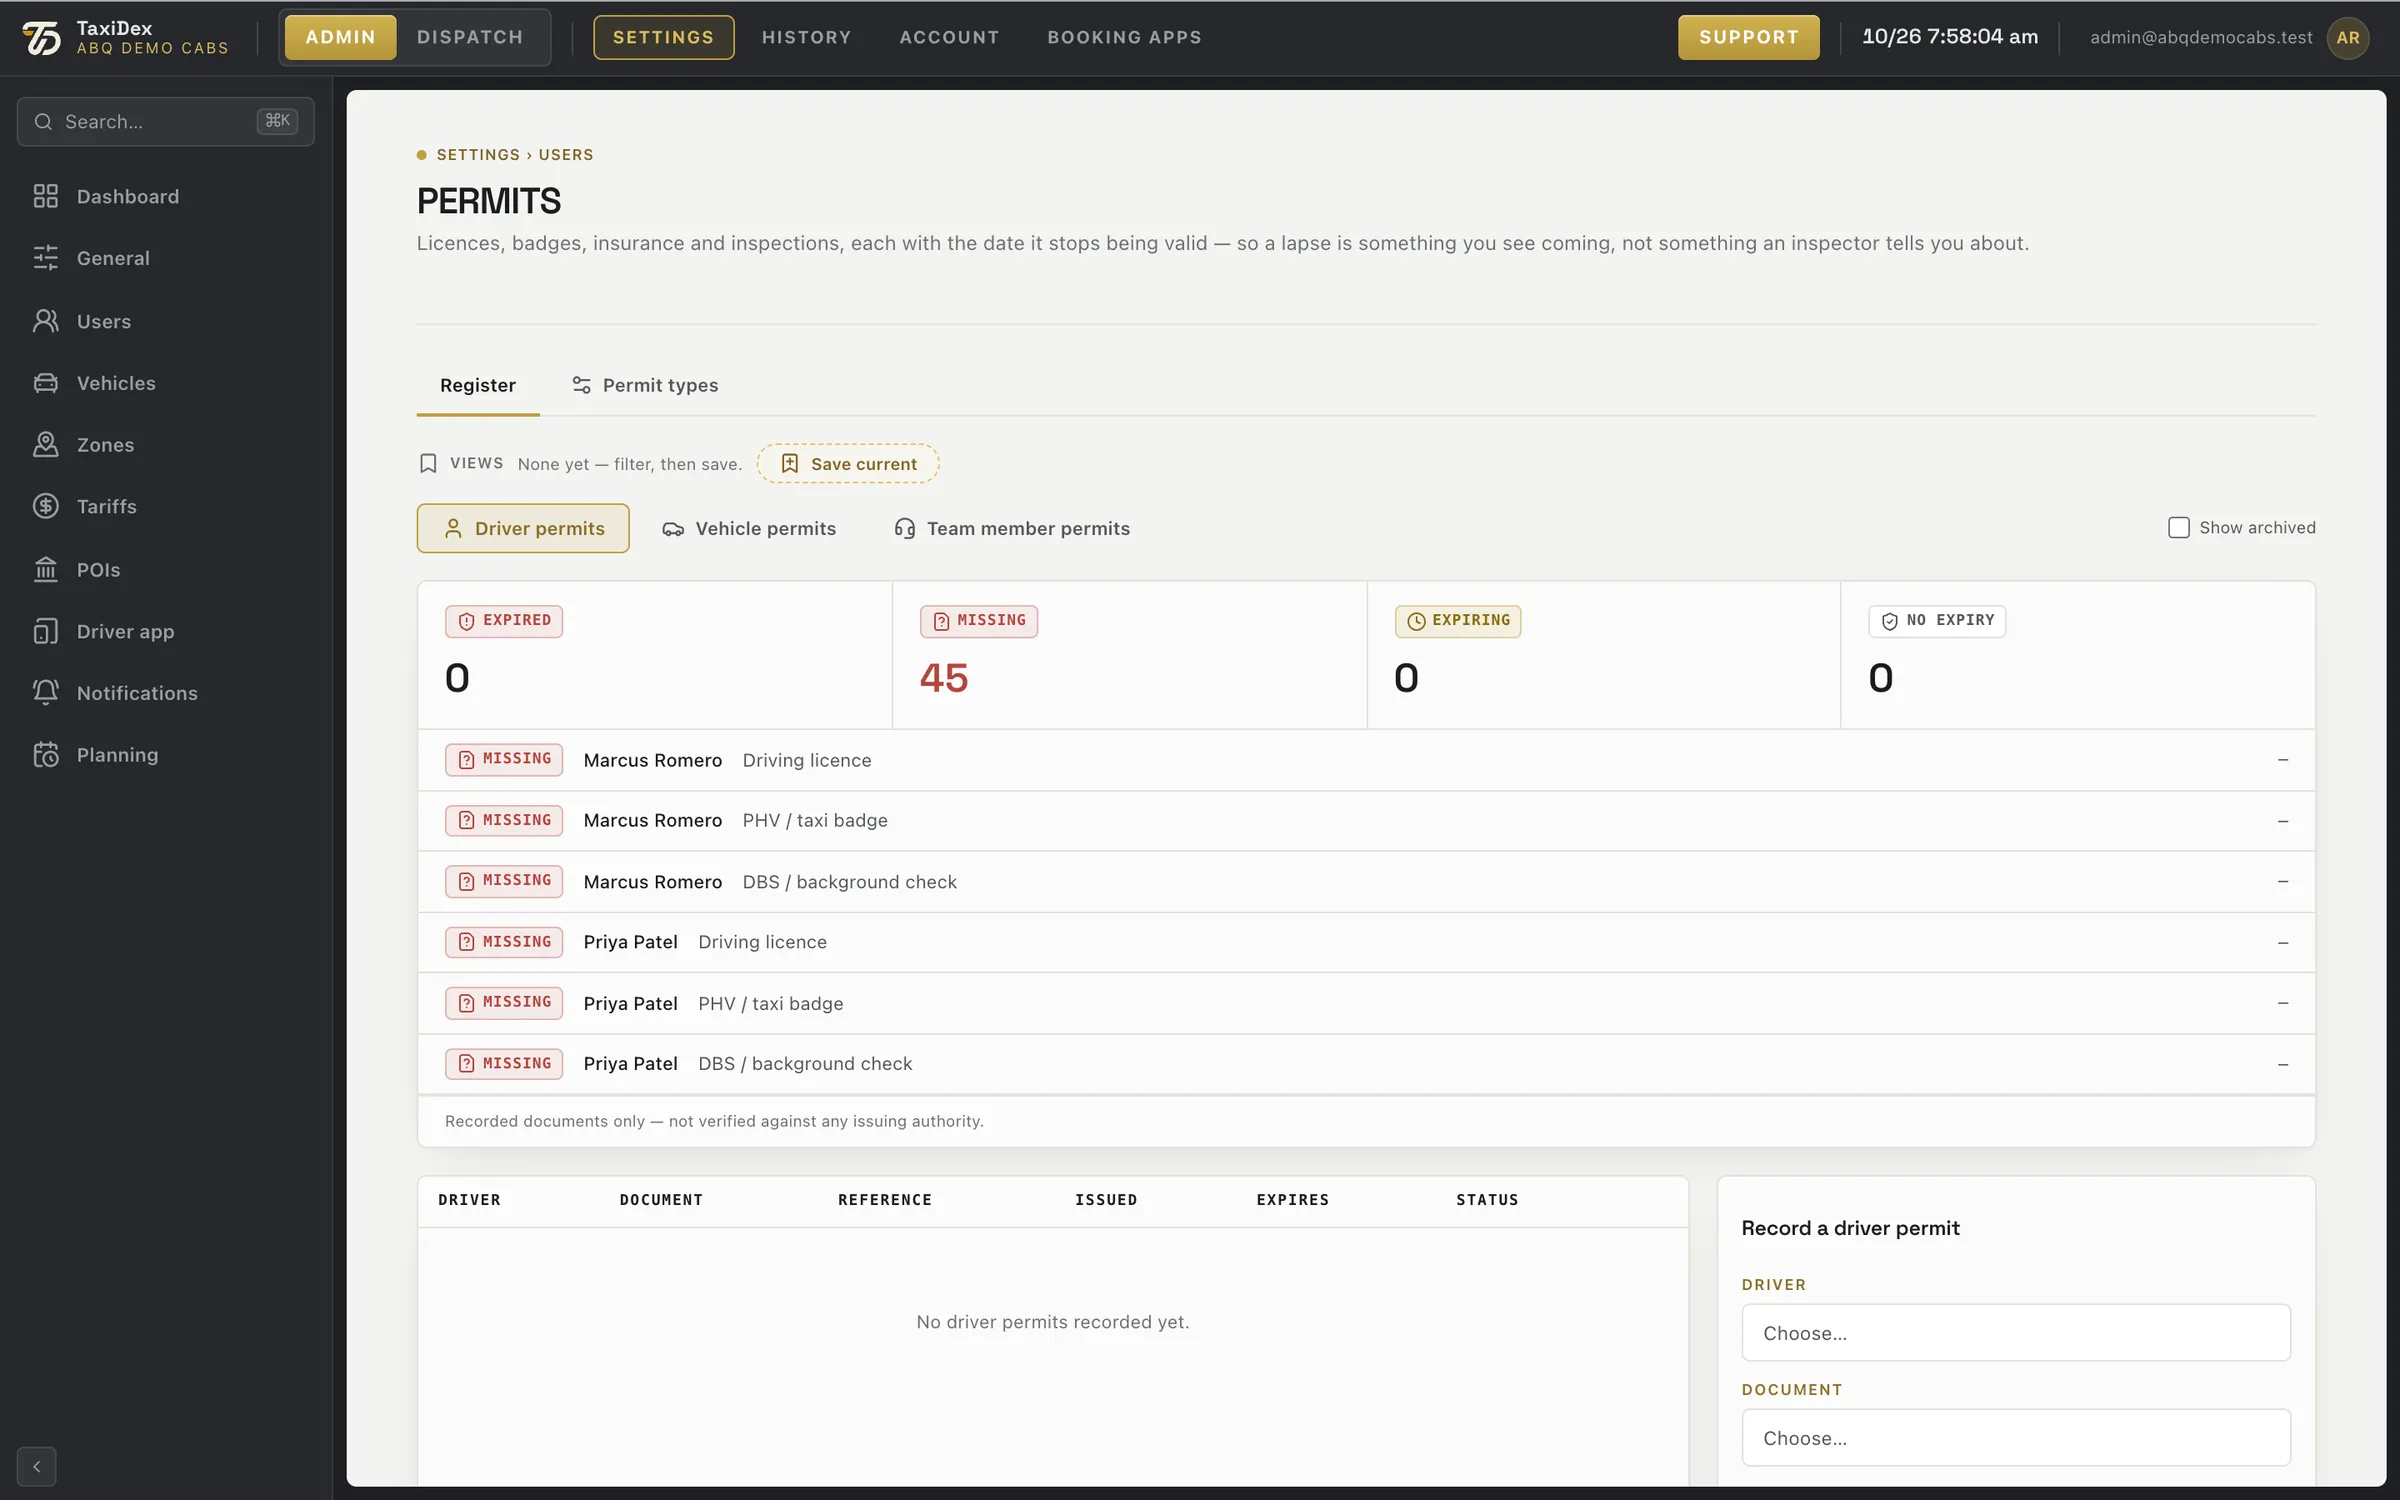
The Permits tab tracks licences, badges, insurance and inspections, with the date each stops being valid, so a lapse is something you see coming.
2Add several · Export Add many people at once from a list, or export everyone.
3Add · Copy · Deactivate · Revert Add a row, copy selected rows, deactivate, or revert unsaved edits.
4Show: All · Drivers · Dispatchers · Deactivated All, Drivers, Dispatchers or Deactivated.
5Search Searches every column.
6Discard · Preview · Save Edits are kept until you Save; Preview shows them first.
7Driver level No, Standard or Level 1 to 4. Anything but No makes the person a driver.
8Dispatcher level Anything but No lets them use the console.
9Login e-mail Their sign-in e-mail.
10Password — click to change Opens a box to set a new password. The stored one is never shown.
11Name and phone First name, last name and phone.
12Status Active or Off.
13Advanced options More settings for this person.
How to
Add a driver or a dispatcher
Open Settings ▸ Users and press Add. A new row appears at the bottom marked NEW.
For a driver set Driver to a level; for office staff set Dispatcher to a level. Set both for someone who does both.
Type their login e-mail and a password of at least 8 characters.
Add their first name, last name and phone.
Press Save. Drivers then sign in to the driver app with that e-mail and password.
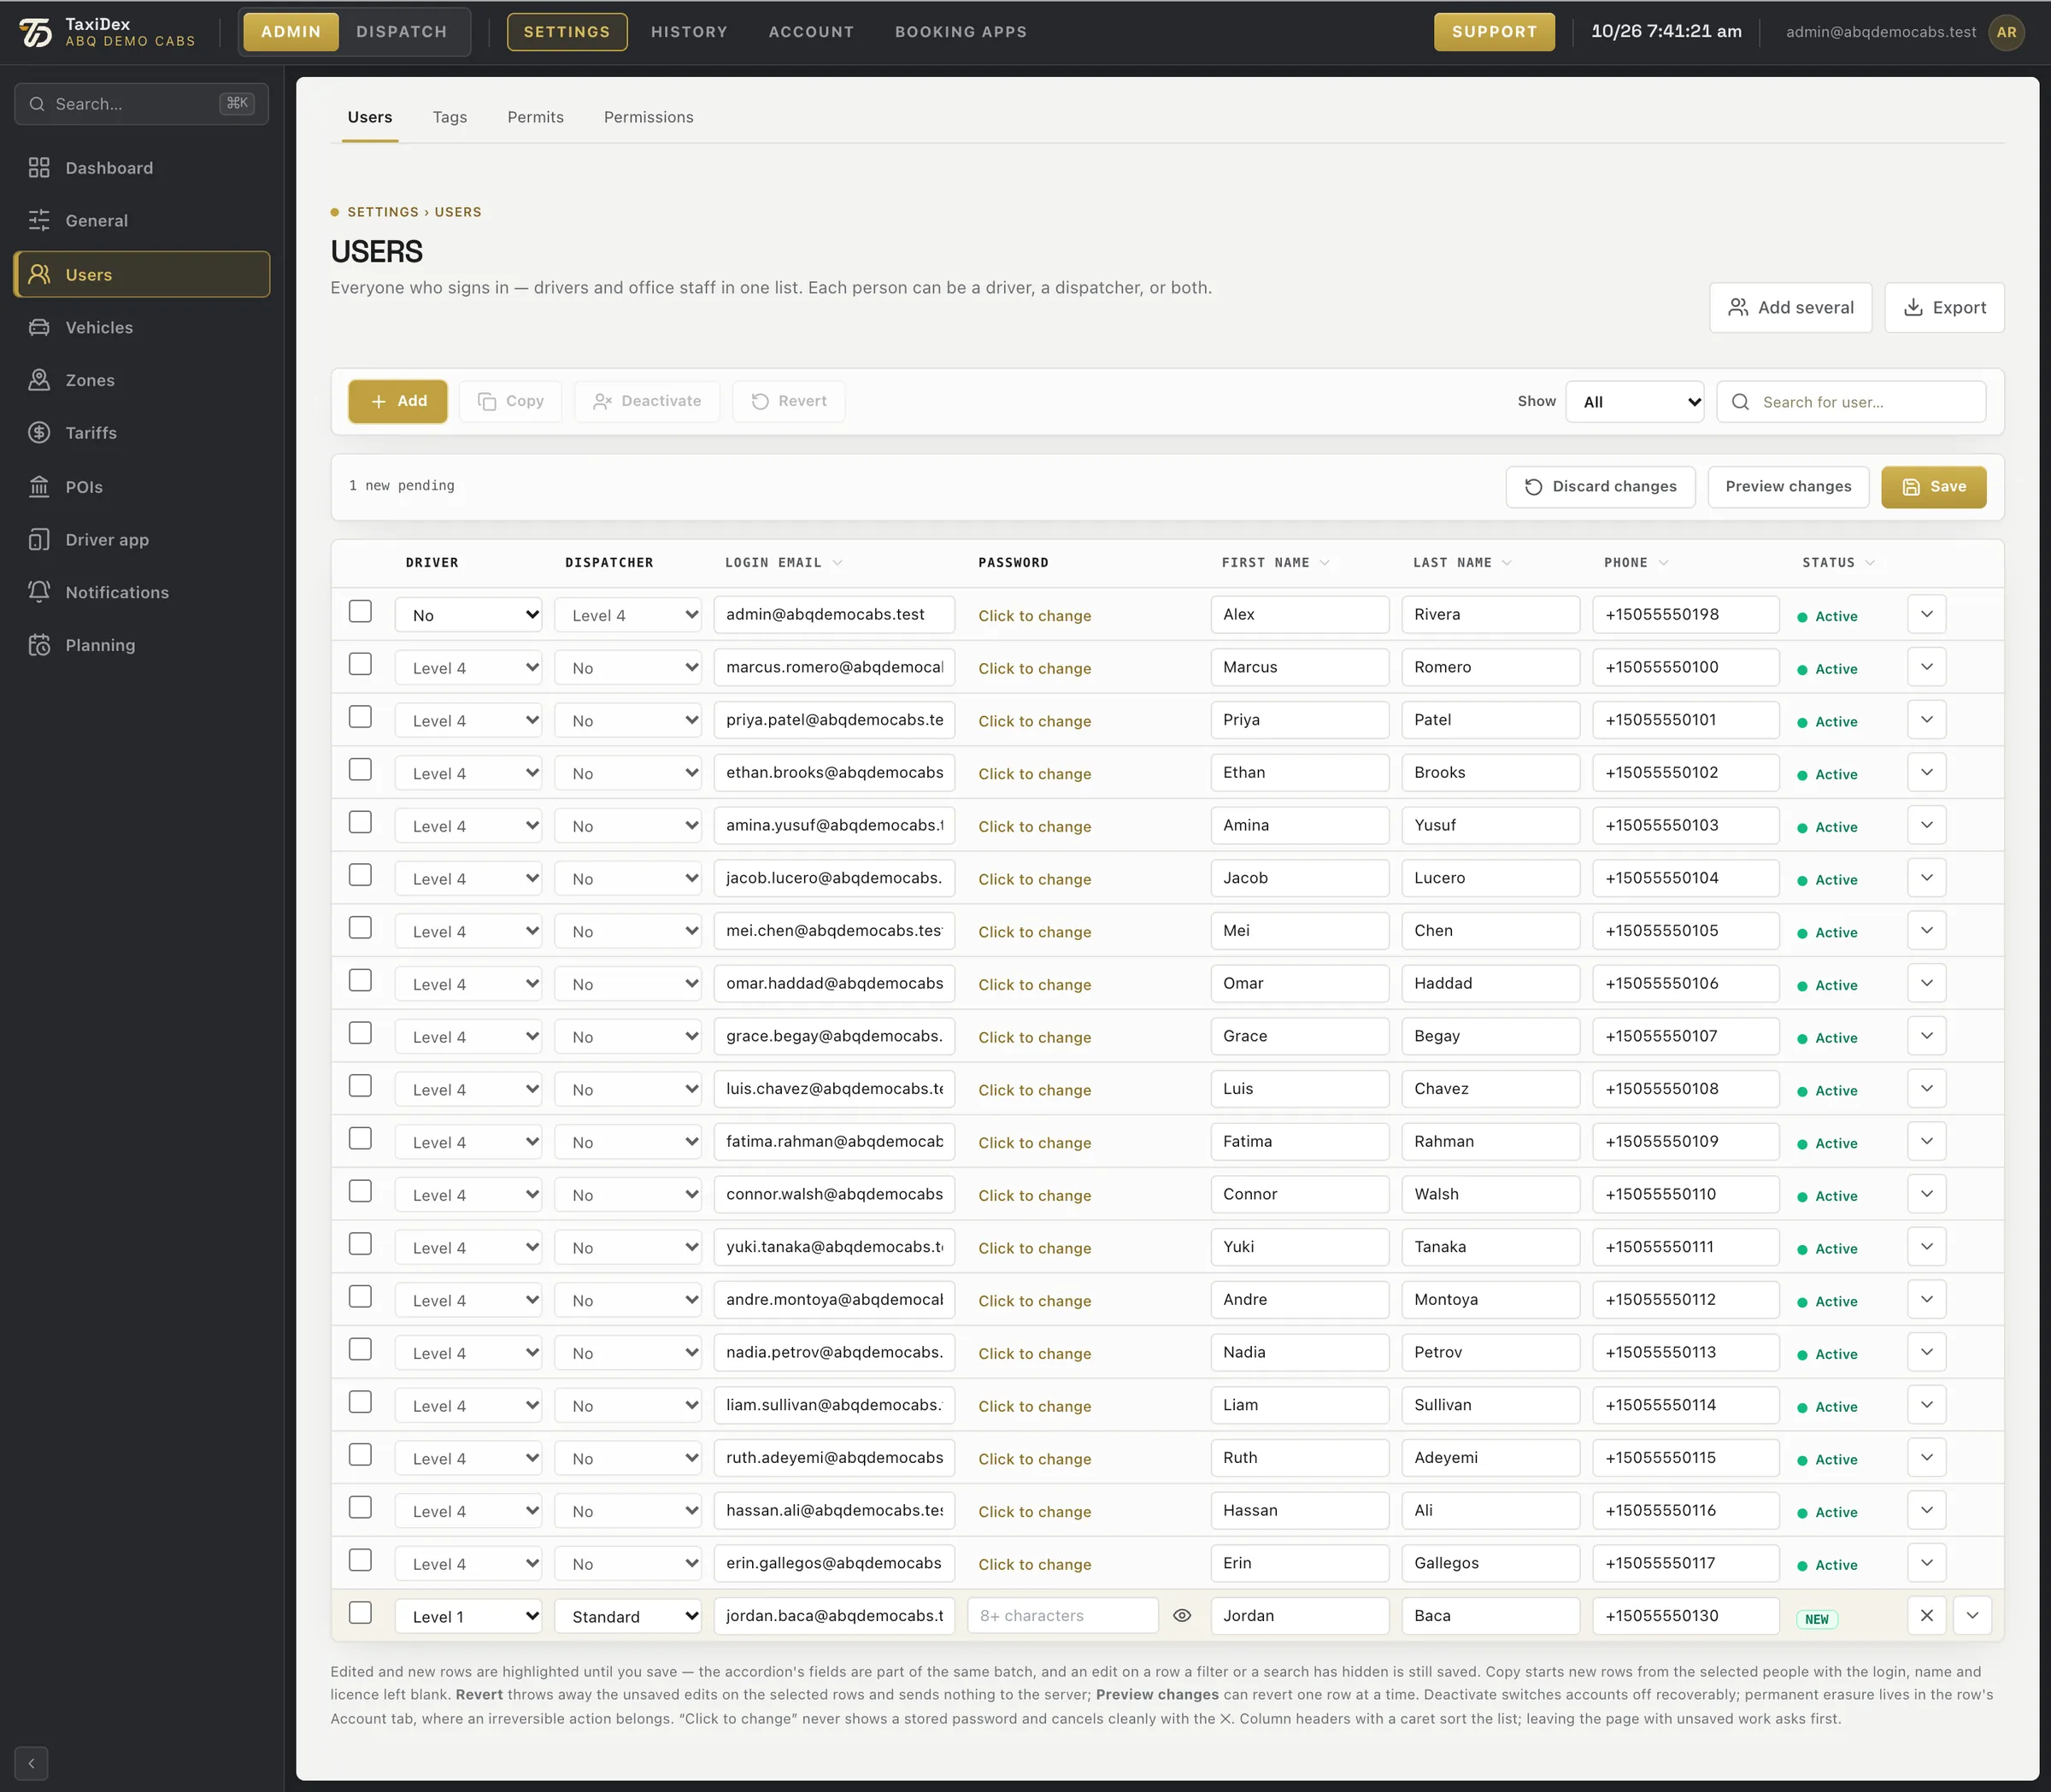
A new row after pressing Add (not saved).
Click a number or a line to spotlight it
1New row: choose Driver and/or Dispatcher level Choose a driver level, a dispatcher level, or both.
2Login e-mail This becomes their sign-in.
3Password (8+ characters) · show At least 8 characters. The eye shows what you typed.
4First name · last name · phone Their name and phone number.
5NEW until saved · remove row NEW stays until you save. The cross removes the row.
6Pending changes: Discard · Preview · Save 1 new pending: Discard throws it away, Preview shows the change, Save writes it.
7How saving works Edited and new rows stay highlighted until you press Save.
Settings ▸ Users ▸ Permits.
Click a number or a line to spotlight it
1Register · Permit types The register of permits, and the permit types you track.
2Saved views Save a filter you use often.
3Driver · Vehicle · Team member permits Permits for drivers, vehicles or office staff.
4Show archived Include archived permits.
5Counts: expired · missing · expiring · no expiry How many are expired, missing, expiring soon or have no expiry.
6What is missing, per person and document What each person still has to hand in.
7Recorded permits: reference, issued, expires, status Recorded permits, with reference, issue and expiry dates.
8Record a driver permit Driver, document, reference number and dates.
Good to knowDeactivate switches an account off and can be undone. Permanent erasure is on the person's Account tab under Advanced options.
5.4 Vehicles
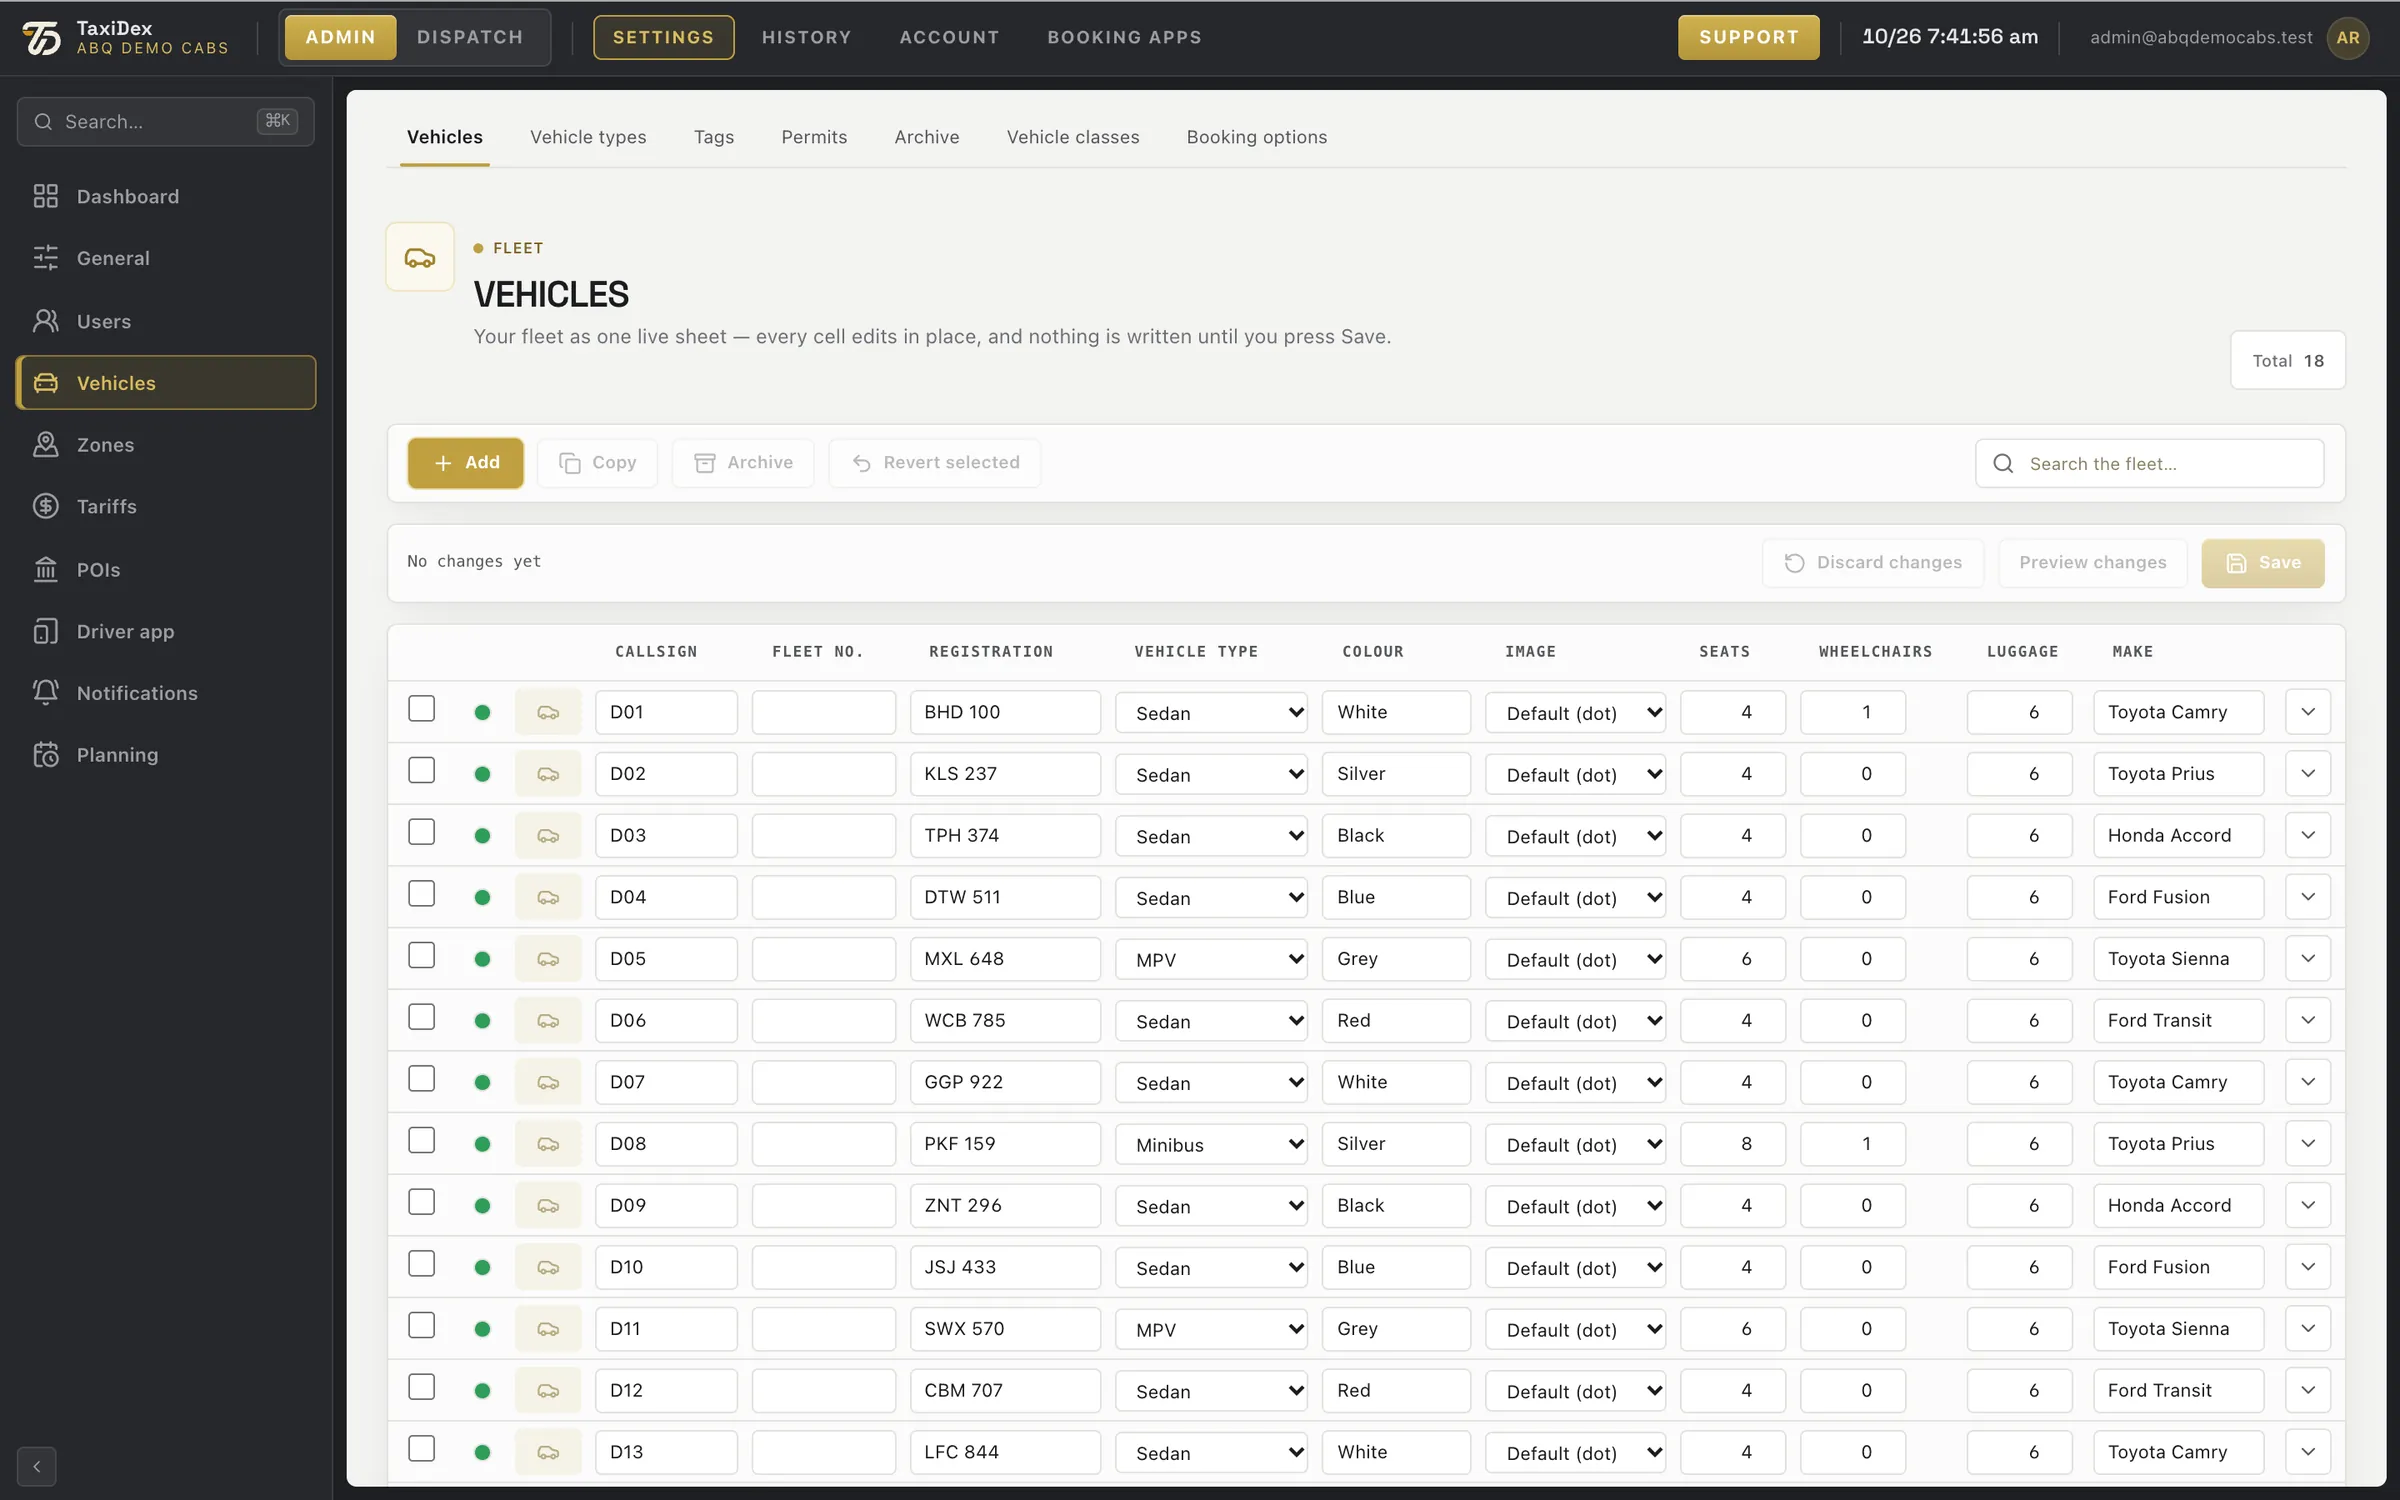
Vehicles is the list of your cars. Like Users it edits like a spreadsheet and saves in one go. The arrow at the end of a row opens the vehicle panel right under it, with six tabs for everything the sheet does not carry.
2Add · Copy · Archive · Revert selected Add a vehicle, copy one, archive it, or undo unsaved edits.
3Search vehicles Searches every column.
4Discard · Preview · Save Edits are kept until you Save.
5Take off the road (suspend) The green dot takes the car off the road and records it under Suspensions.
6Callsign · fleet no. · registration How the office refers to the car. The plate is its registration.
7Vehicle type Sedan, SUV, Minibus or your own types.
8Colour · map image Colour, and the icon the map uses.
9Seats · wheelchairs · luggage What the car can carry.
10Make Make and model.
11More: the vehicle panel (6 tabs) Opens the vehicle panel under the row (next picture).
How to
Add a vehicle
Open Settings ▸ Vehicles and press Add.
Fill in callsign, fleet number and registration (plate).
Choose the vehicle type and enter seats, wheelchair places and luggage.
Press Save. Open the row's arrow to add tags, equipment or the drivers it is kept for.
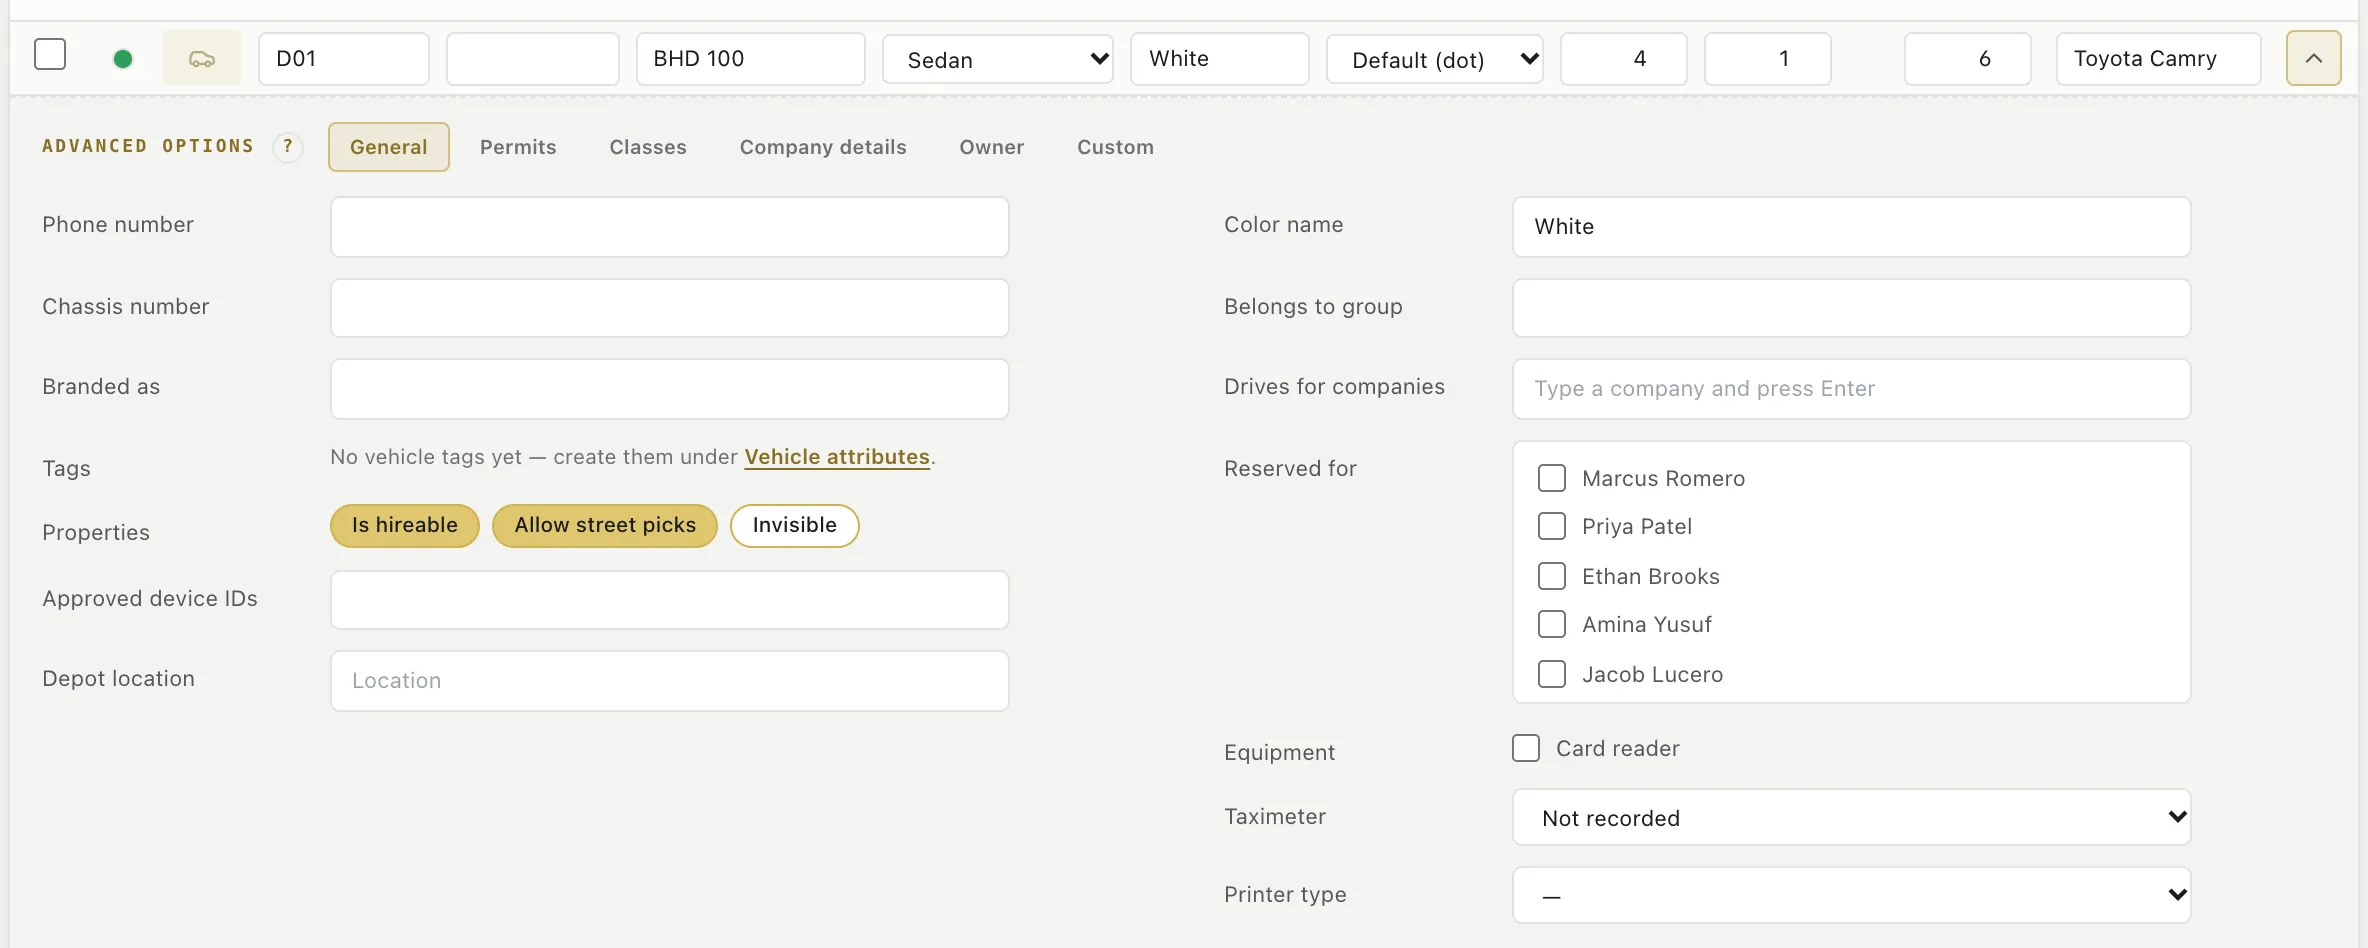
The vehicle panel of D01, opened under its row.
Click a number or a line to spotlight it
1Panel tabs: General · Permits · Classes · Company details · Owner · Custom General, Permits, Classes, Company details, Owner and Custom.
2Phone · chassis number · branded as The car's phone, chassis number and the name it is branded as.
3Tags (vehicle attributes) Tags such as a wheelchair lift, made under Vehicle attributes.
4Properties: hireable · street picks · invisible Is hireable, Allow street picks, Invisible (hidden from the console).
5Approved device IDs · depot location Which phones may sign in on this car, and the depot it returns to.
6Colour name · group Colour name and the group it belongs to.
7Drives for companies Companies this car may drive for.
8Reserved for (drivers) Drivers the car is kept for.
9Equipment: card reader · taximeter · printer Card reader, the kind of taximeter, and the receipt printer.
10Open / close the panel Opens and closes the panel.
5.5 Zones
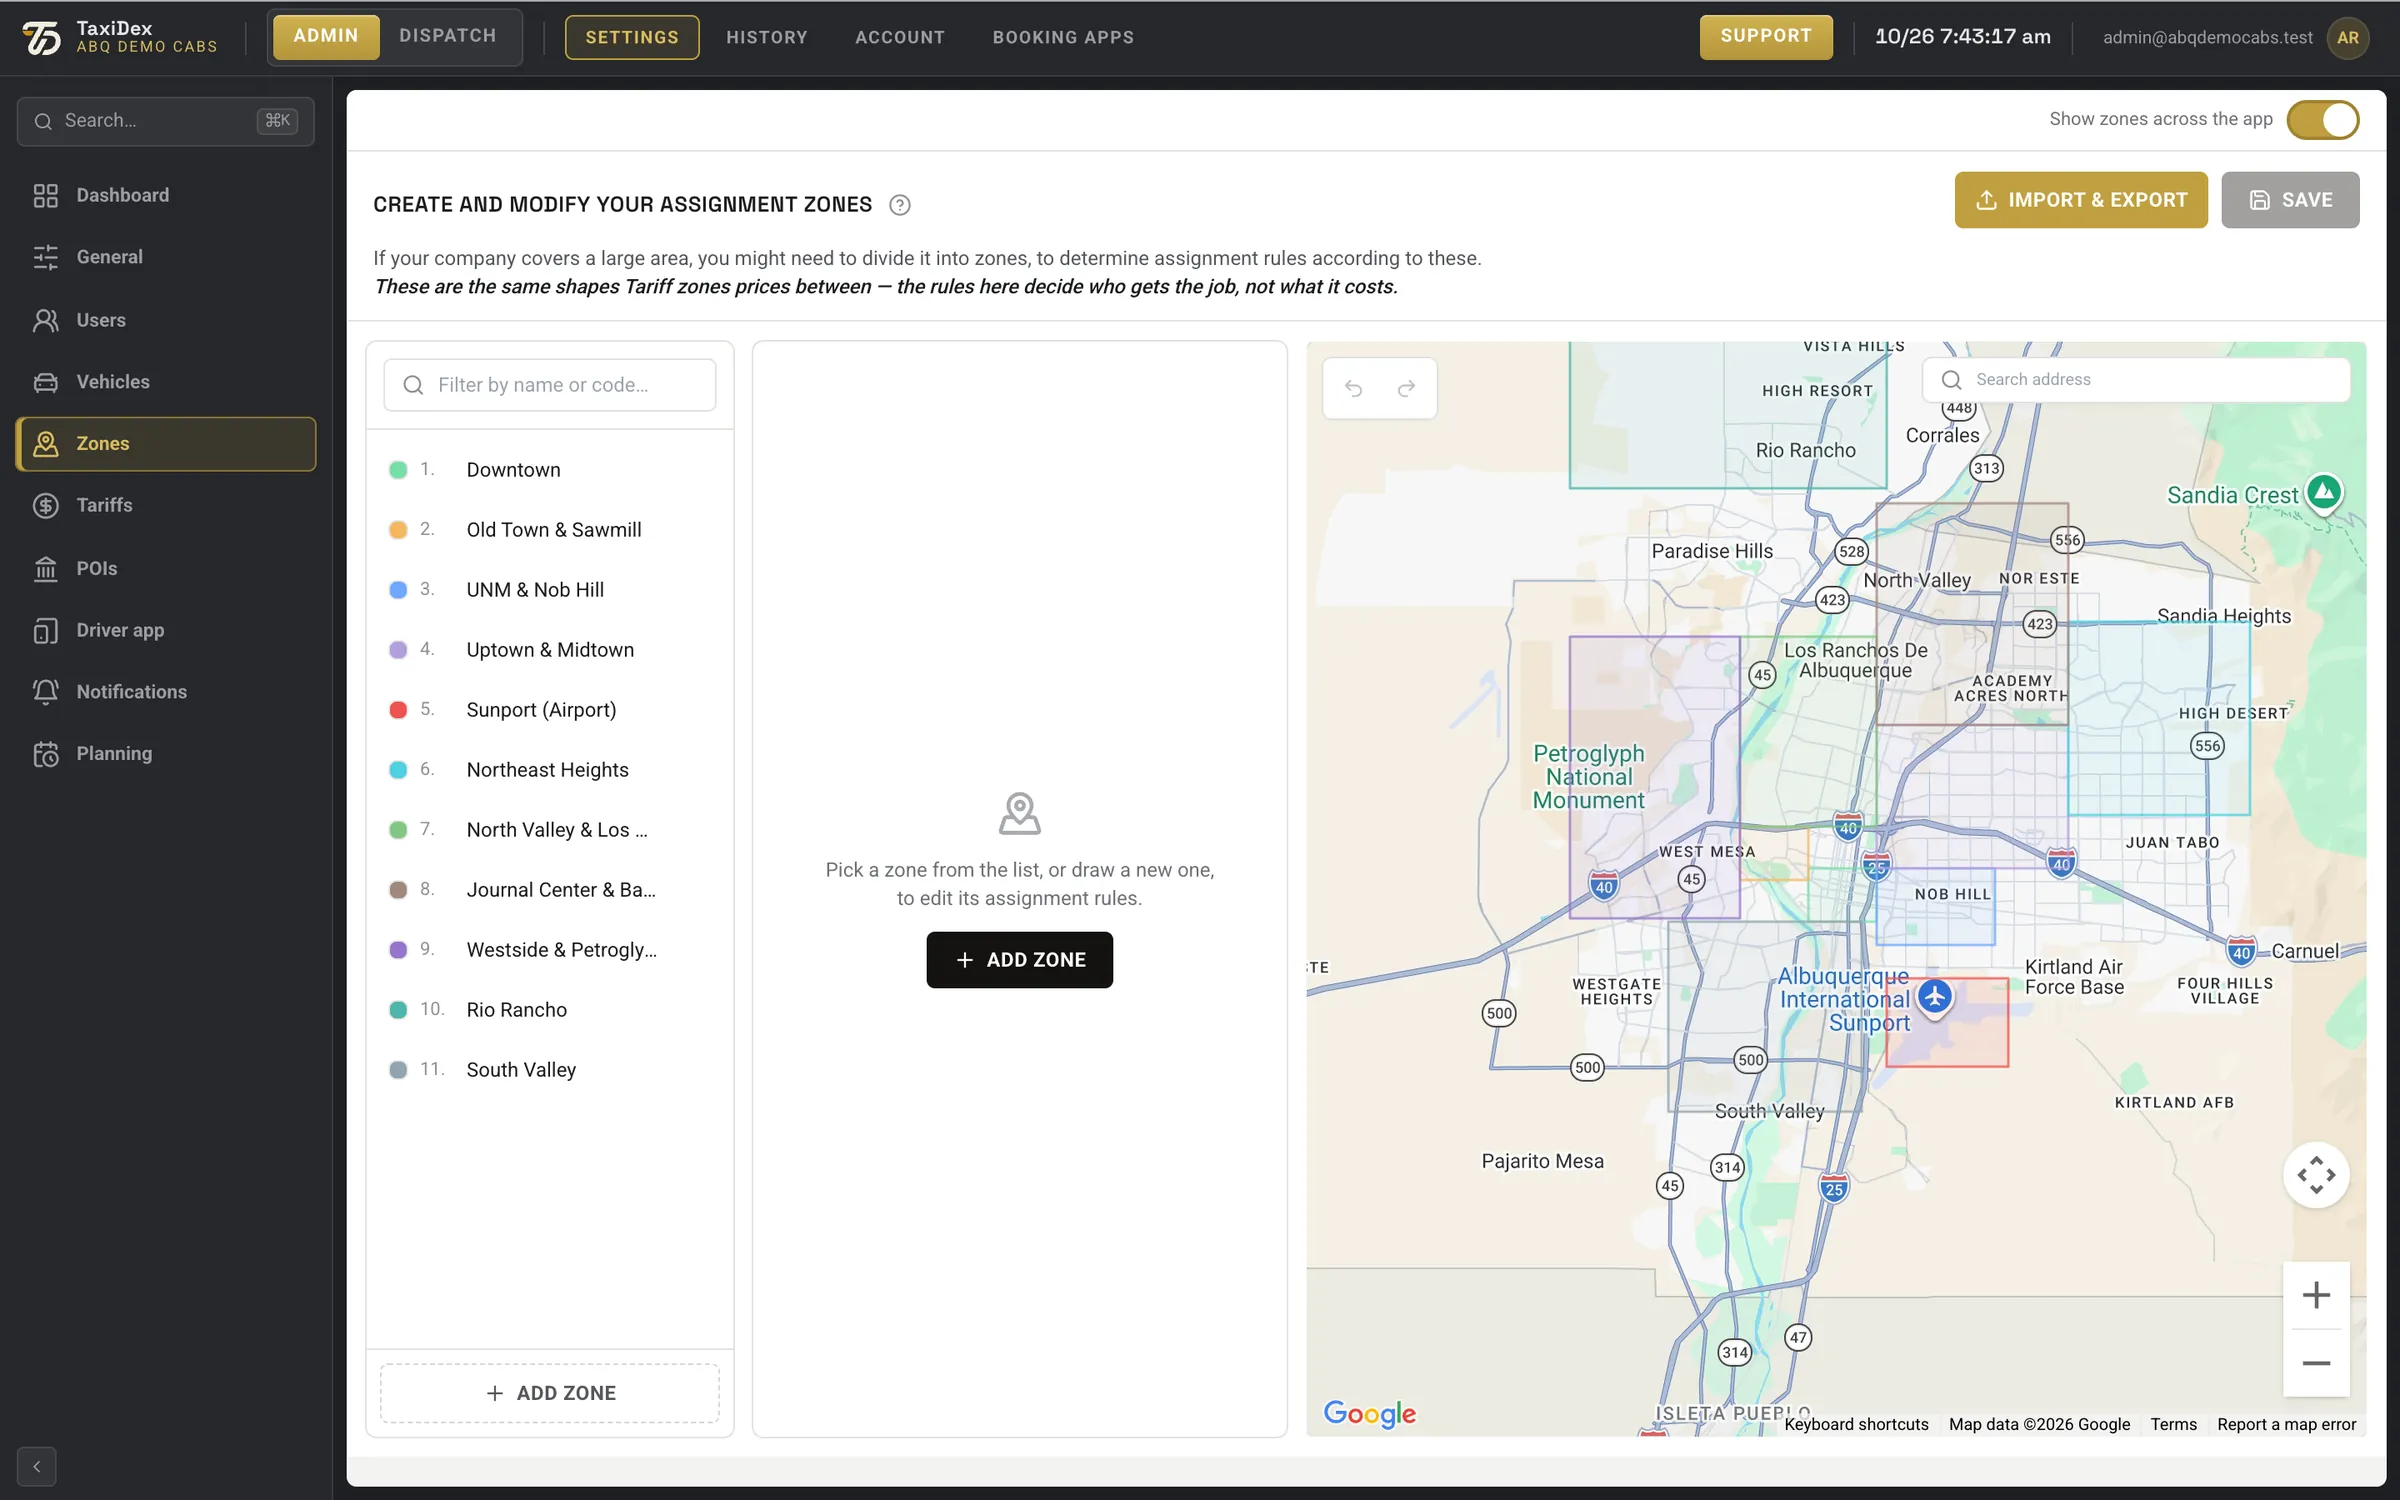
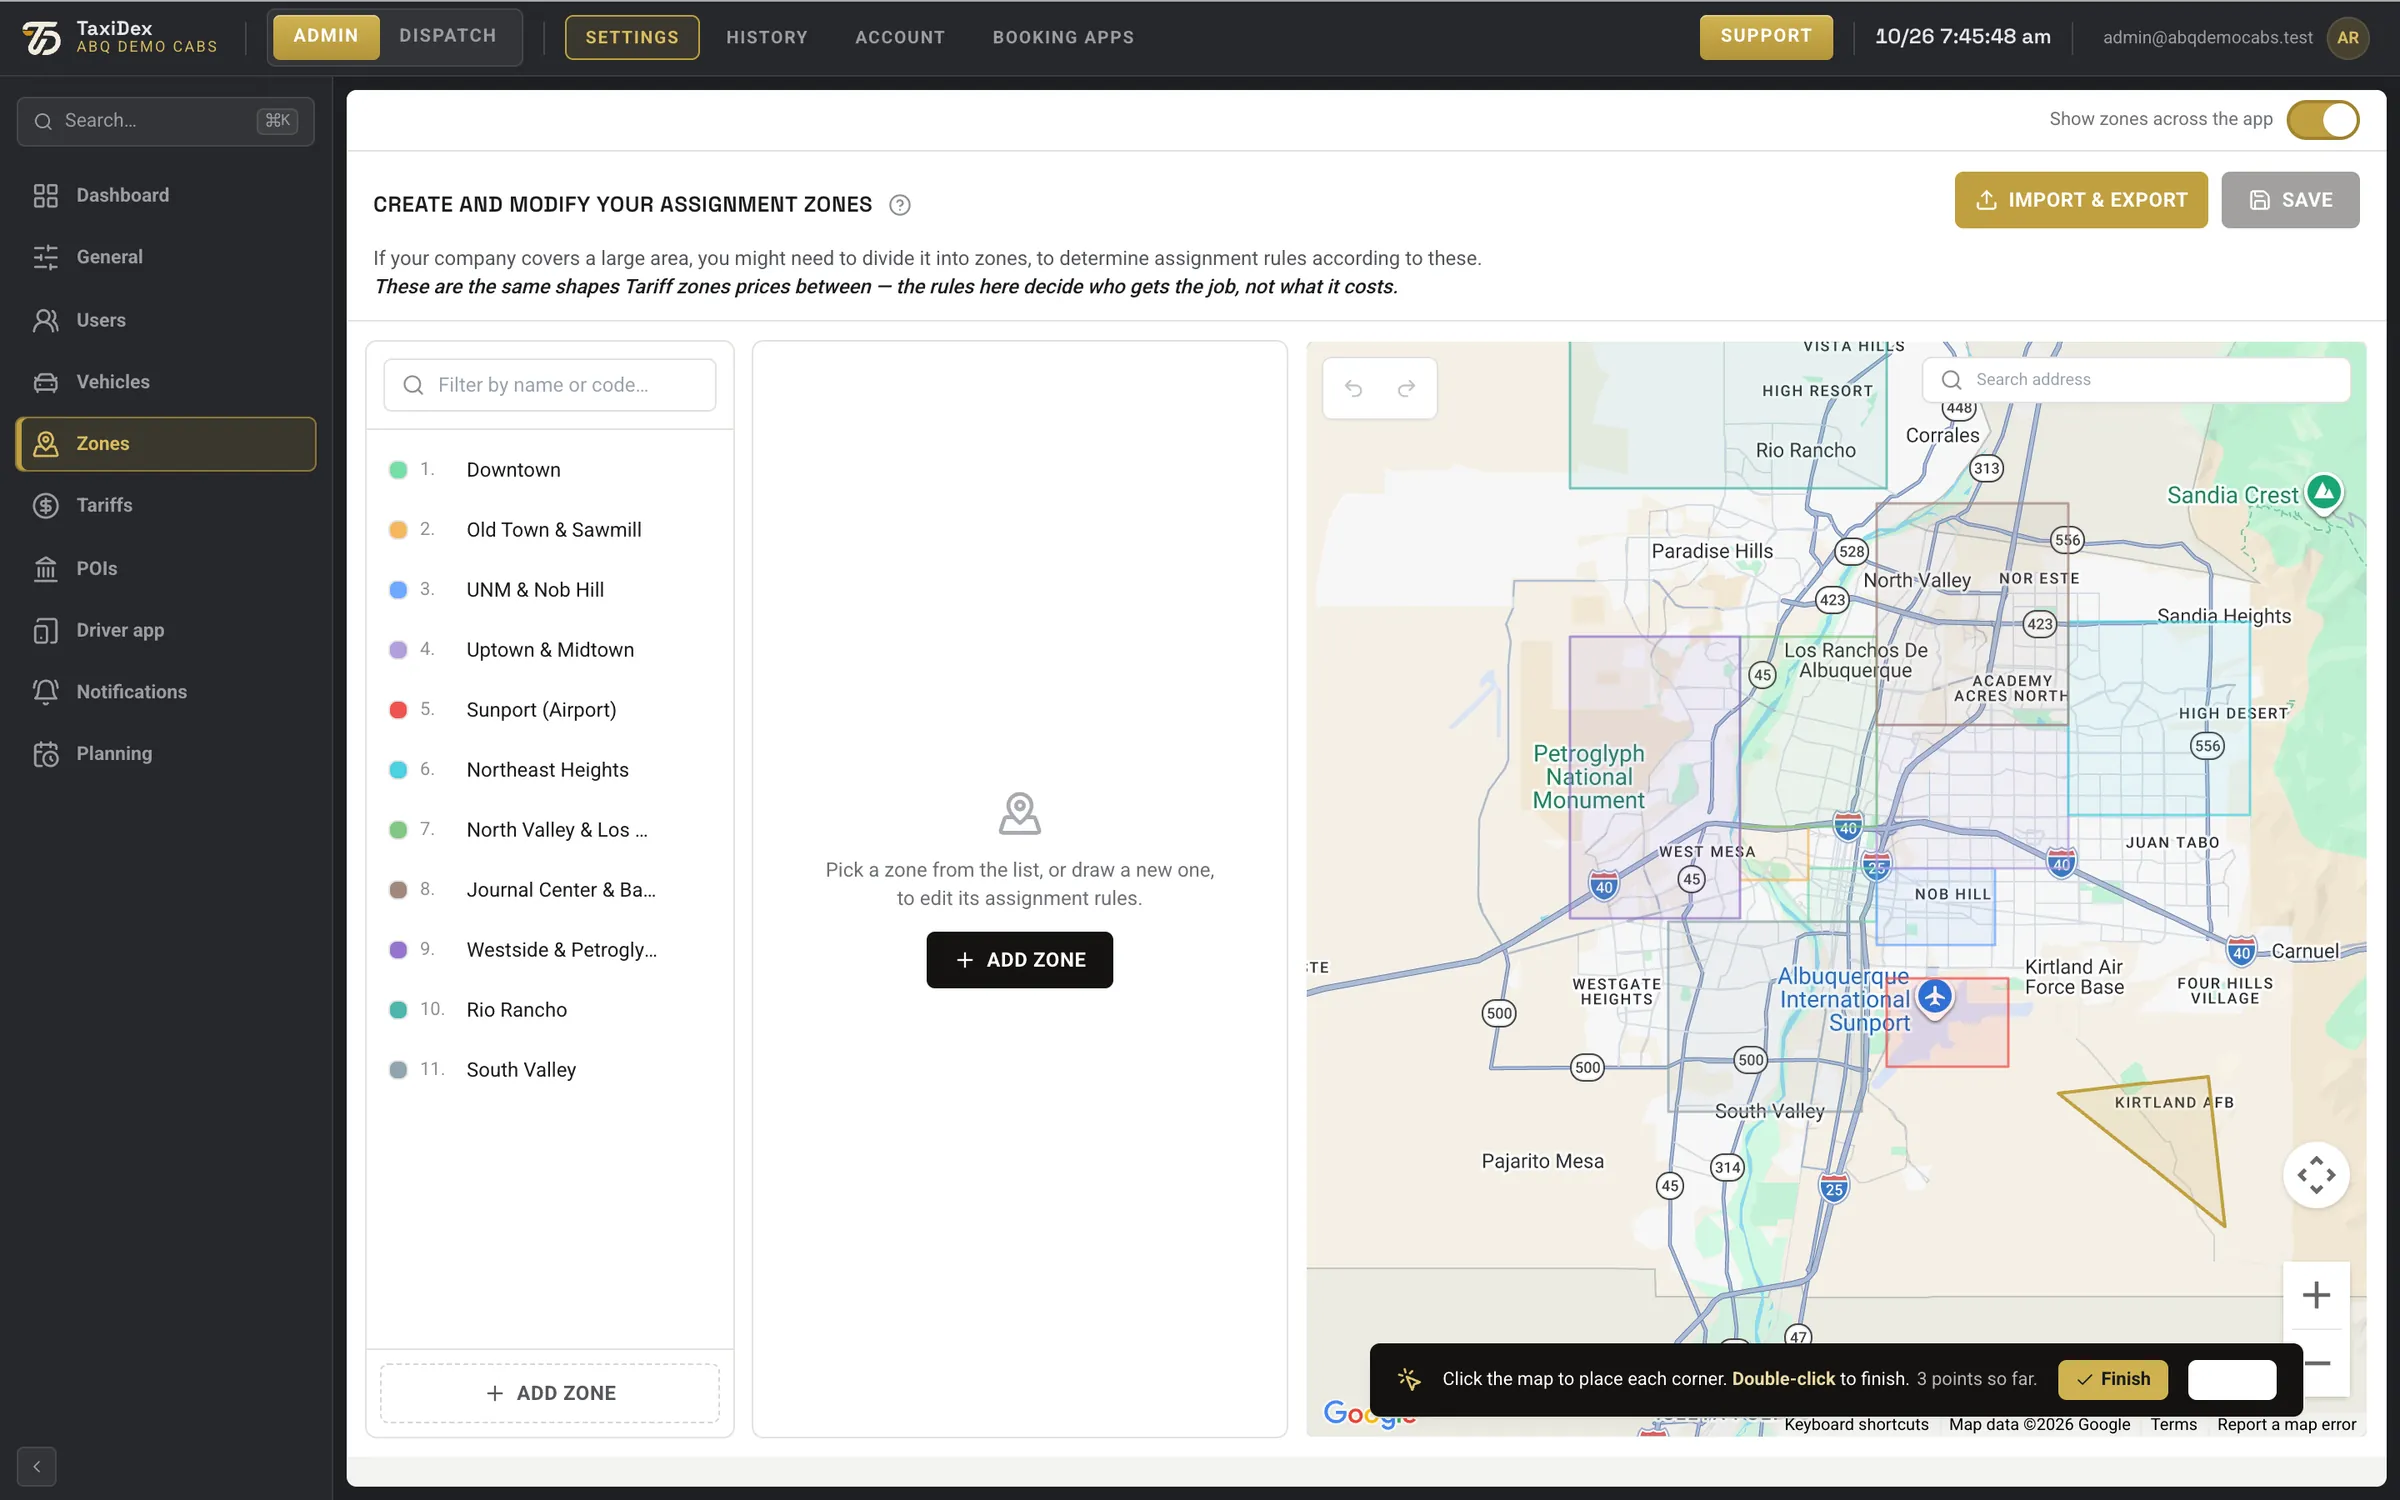
Zones divide your area so dispatch rules can differ per area. The same shapes are used under Tariffs to price trips between them: the rules here decide who gets a job, not what it costs. The example fleet has eleven zones, from Rio Rancho in the north to the South Valley.
Settings ▸ Zones.
Click a number or a line to spotlight it
1Show zones across the app Show or hide zones in the rest of the portal.
2What are assignment zones? (help) Explains what assignment zones are.
3Import & Export Bring zones in from a file, or send them out.
4Save Saves your zone changes.
5Filter zones Find a zone by name or code.
6Zone list (colour · number · name) Every zone with its colour and number.
7Add zone Draw a new zone.
8Zone editor (empty until you pick a zone) Pick a zone to edit its details here.
9Undo · Redo Undo or redo a drawing step.
10Search address Jump the map to an address.
11Zones drawn on the map The same shapes are used to price trips under Tariffs.
12Zoom Zoom in and out.
How to
Add a zone
Open Settings ▸ Zones and press ADD ZONE.
Click the map to place each corner of the area.
Double-click, or press Finish, to close the shape.
Give it a code and a name in the editor, then press DONE.
Press SAVE at the top. The zone now also appears under Tariffs, ready to be priced.
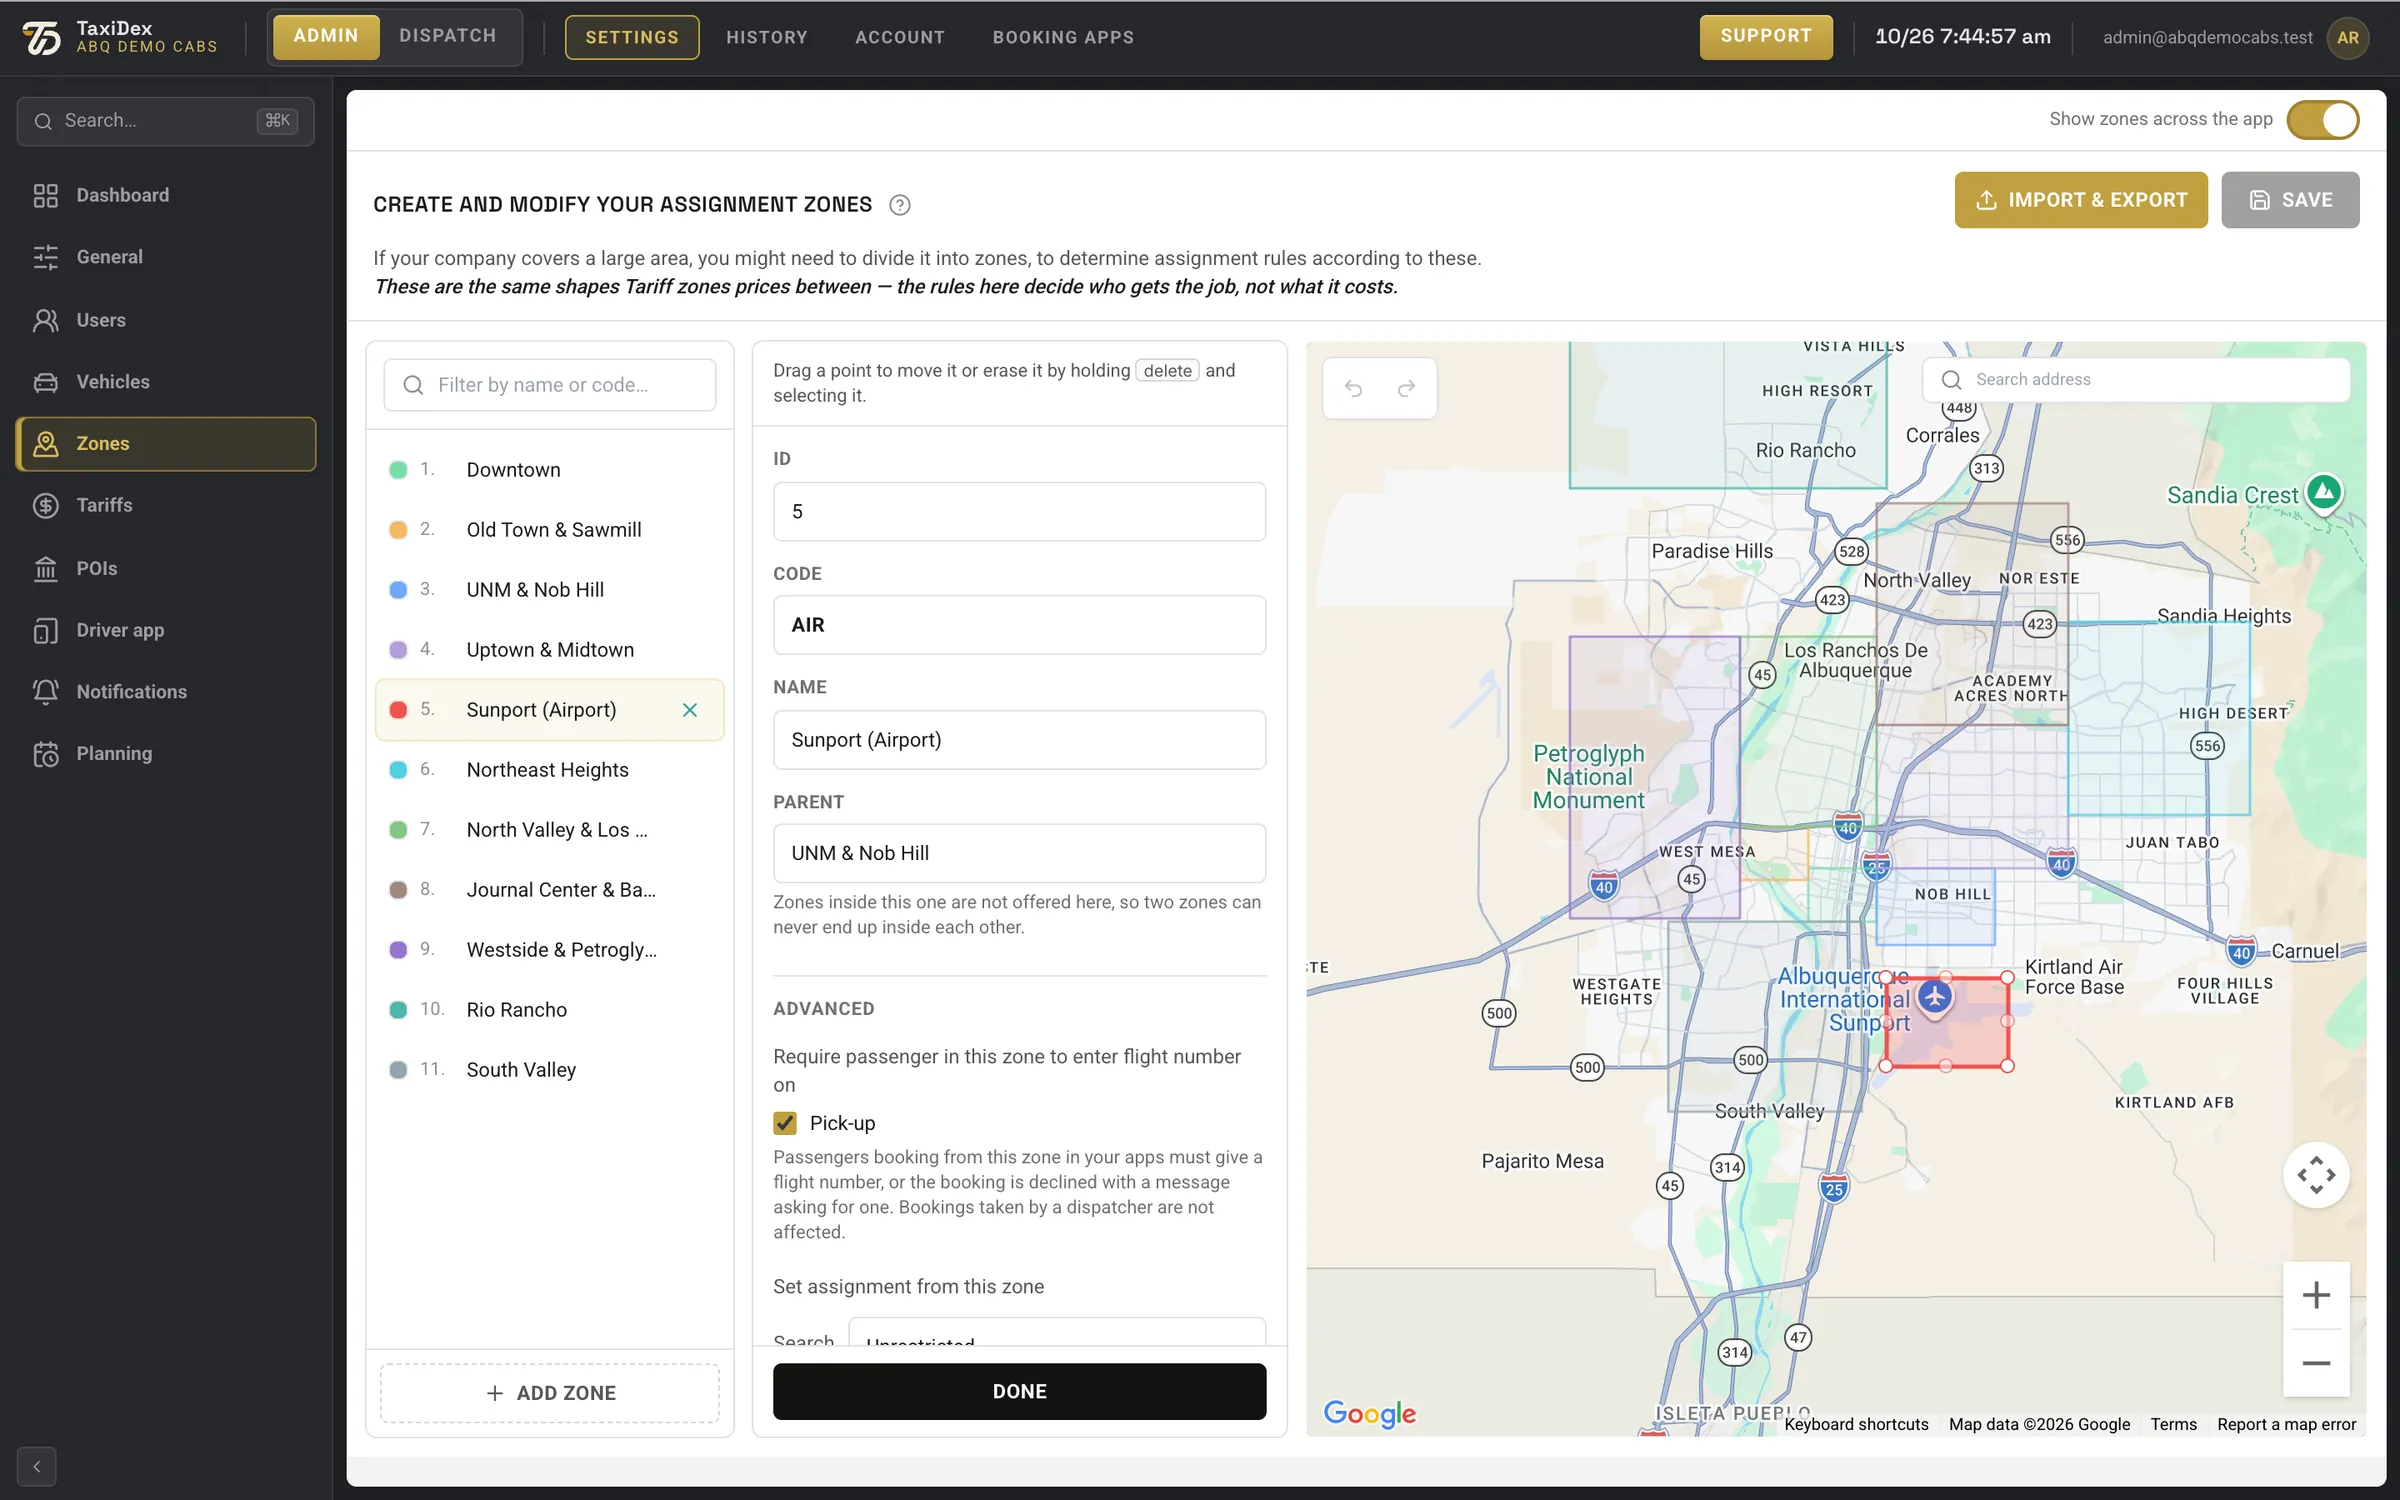
Editing the Sunport (Airport) zone.
Click a number or a line to spotlight it
1Selected zone The zone you picked: Sunport (Airport).
2Editing tip: drag points, hold delete to erase one Drag a corner to move it; hold Delete and click a corner to erase it.
3ID A number for the zone.
4Code A short code, here AIR.
5Name The name dispatchers see.
6Parent zone Zones inside a parent are not offered there, so two zones never sit inside each other.
7Advanced: require a flight number for pick-ups here Ask passengers booking from this zone in your apps for a flight number.
8Scroll for more: assignment radius, zone chain, taxi rank, assign time, clearing Who may be sent to jobs from this zone, the fallback order of zones, rank queue, assign time for pre-bookings, and the clearing distance.
9Done Closes the editor. Press SAVE at the top to keep the change.
10The zone outline with draggable corner points Corners you can drag.
Drawing a new zone (not saved).
Click a number or a line to spotlight it
1Add zone Starts drawing.
2Click the map to place each corner Each click places a corner.
3Hint · Finish (or double-click) Shows how many corners you have. Finish, or double-click, closes the shape.
4Undo · Redo a corner Take back the last corner, or put it back.
5Cancel throws the drawing away Stops drawing and throws the shape away.
5.6 Tariffs (3 steps)
Tariffs sets what rides cost, in three steps that can be done in any order: 1. Zones (the areas you price), 2. Schedule (the hours each set of prices applies, such as a night band) and 3. Tariffs (the prices themselves: flat zone fares, zone-to-zone prices, per-vehicle prices and the taximeter).
A tariff set is a whole price card with its own currency, prices, time bands and extras. Hours no band covers are priced at your standing prices, the Every other hour column in step 3.
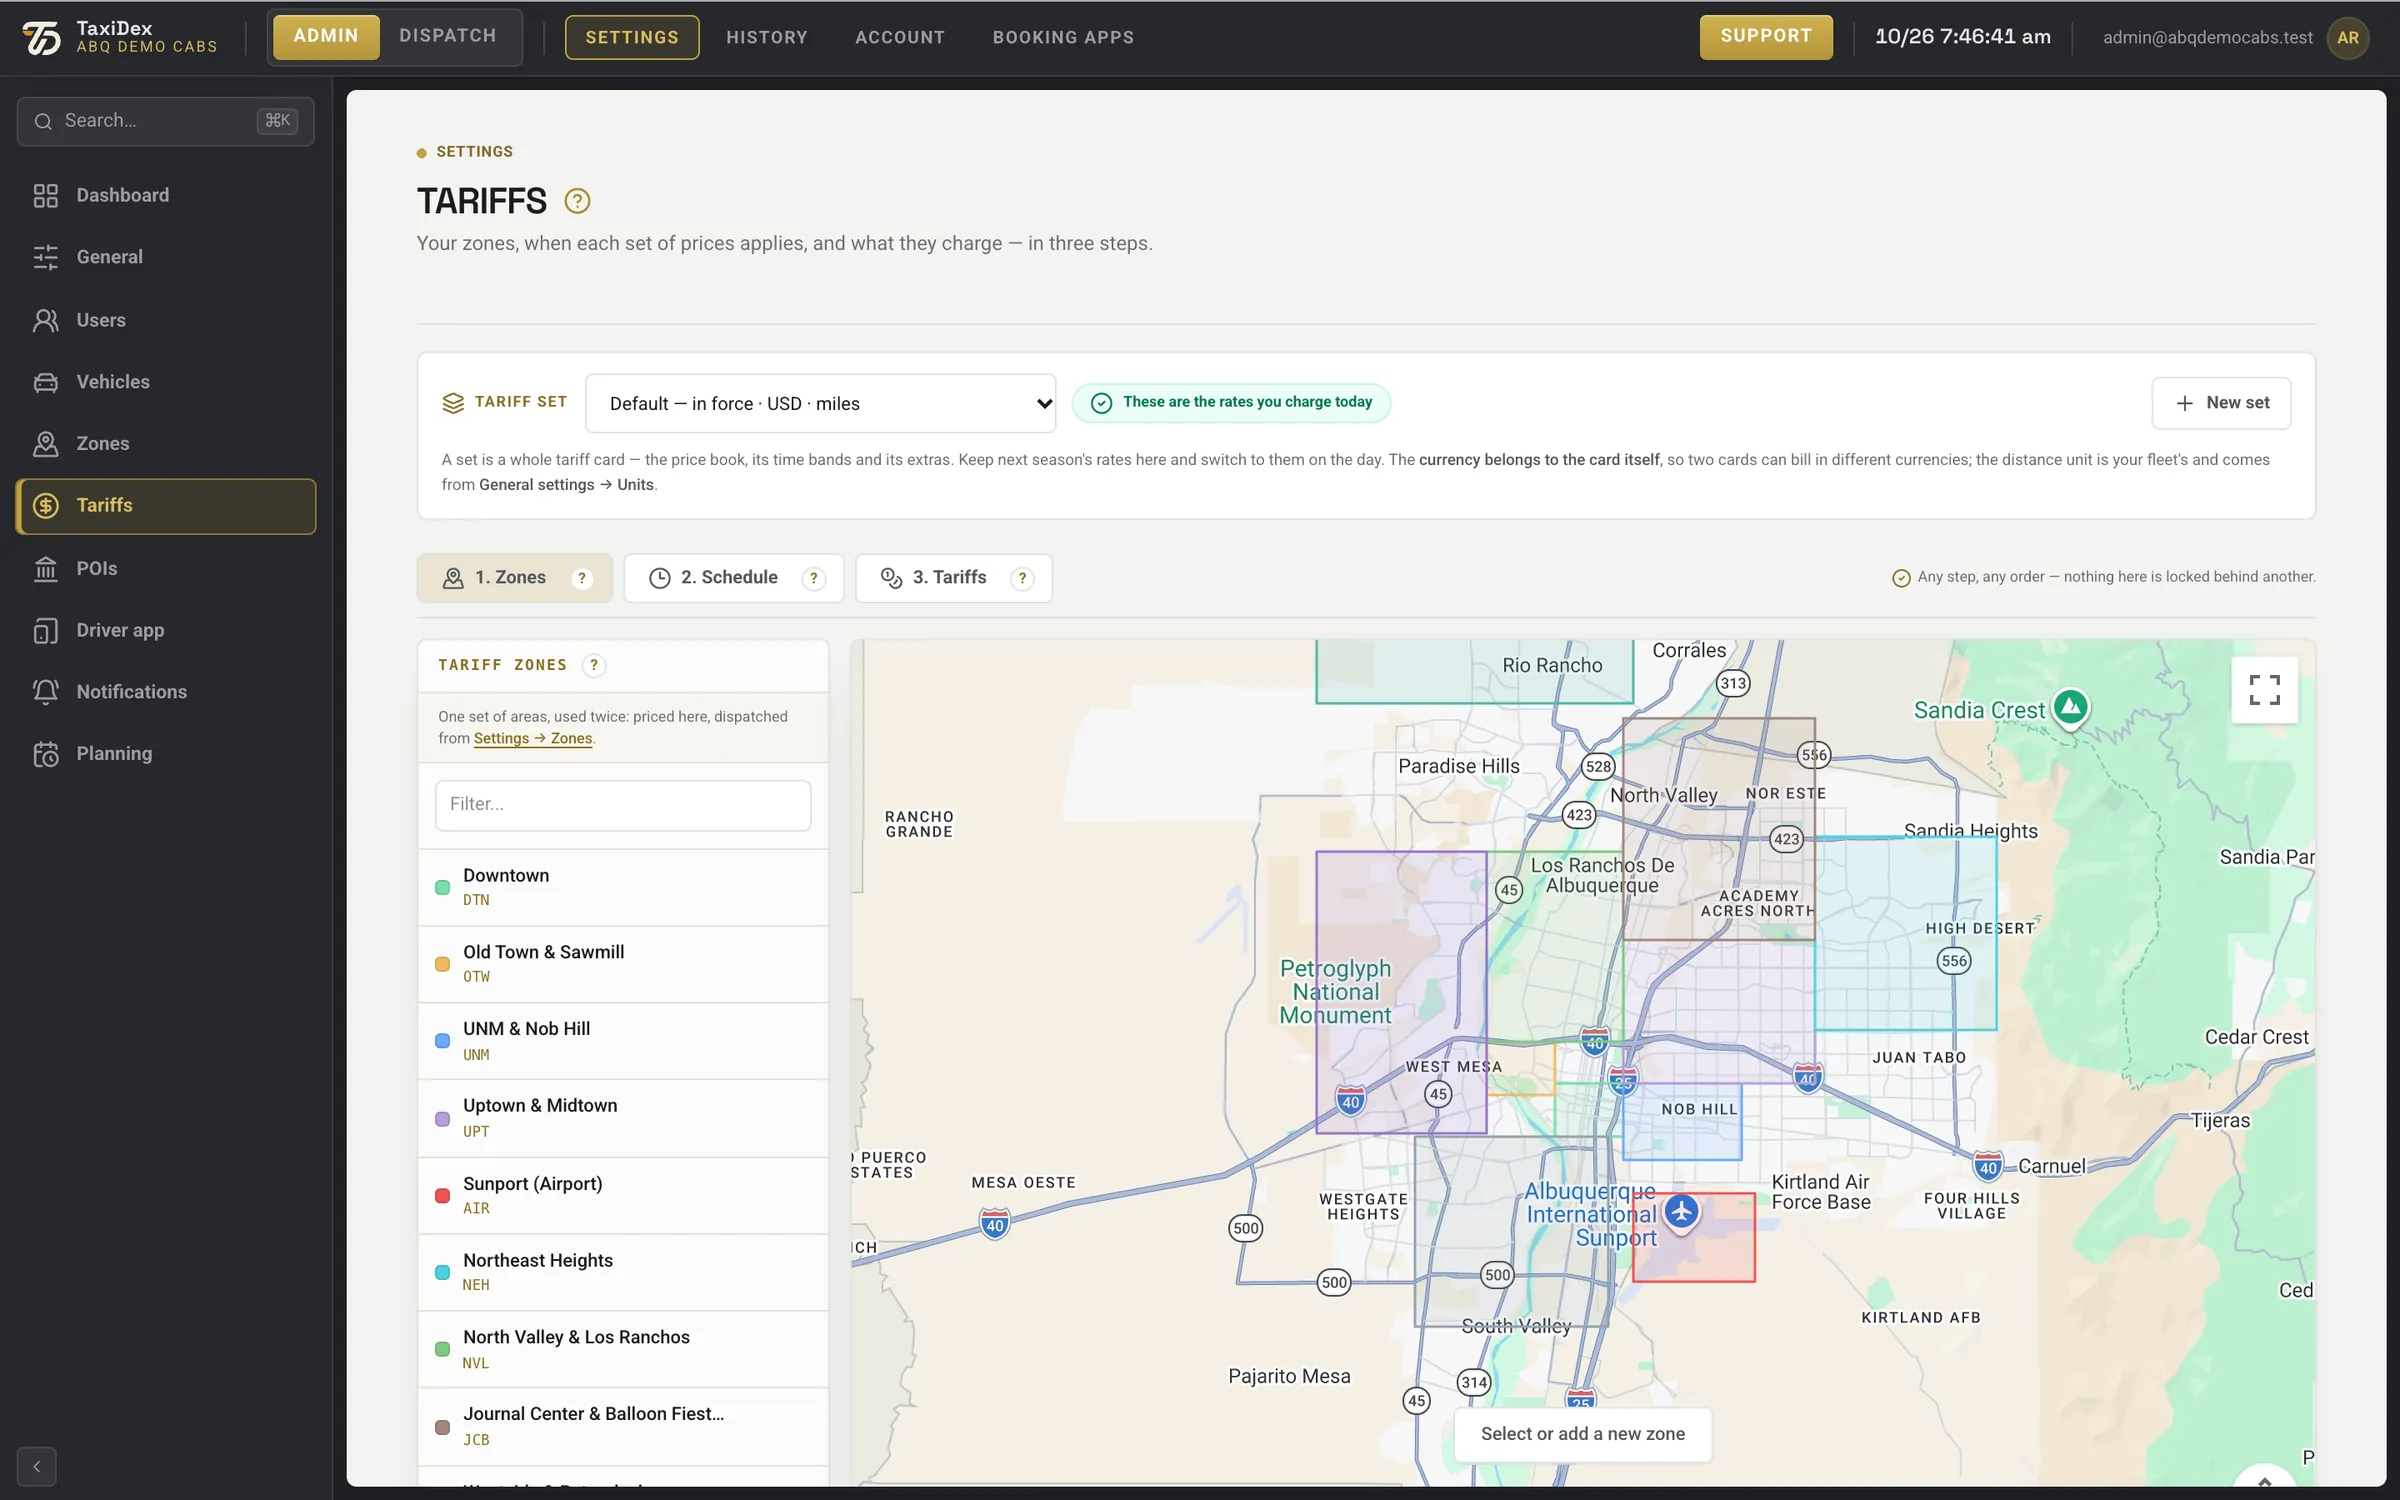
Tariffs, step 1: Zones.
Click a number or a line to spotlight it
1Help for this page Explains the page.
2Tariff set (which price card) Which price card you are editing. A card holds its own currency, prices, time bands and extras.
3In force today The card in force today.
4New set Start another card, for example next season's prices.
5Step 1 · Zones The areas you price between.
6Step 2 · Schedule When each set of prices applies.
7Step 3 · Tariffs What each zone, route and vehicle type costs.
8Tariff zones (same shapes as Settings → Zones) The same shapes as Settings ▸ Zones.
9Zones on the map The zones on the map.
10Select or add a new zone Pick a zone, or draw a new one.
11Full-screen map Make the map fill the screen.
How to
Price a zone
Open Settings ▸ Tariffs and go to 3. Tariffs.
Under Add a zone rate, choose the zone and leave When on Every hour.
Type the fixed rate in dollars and press Add. It appears under Saved zone rates.
How to
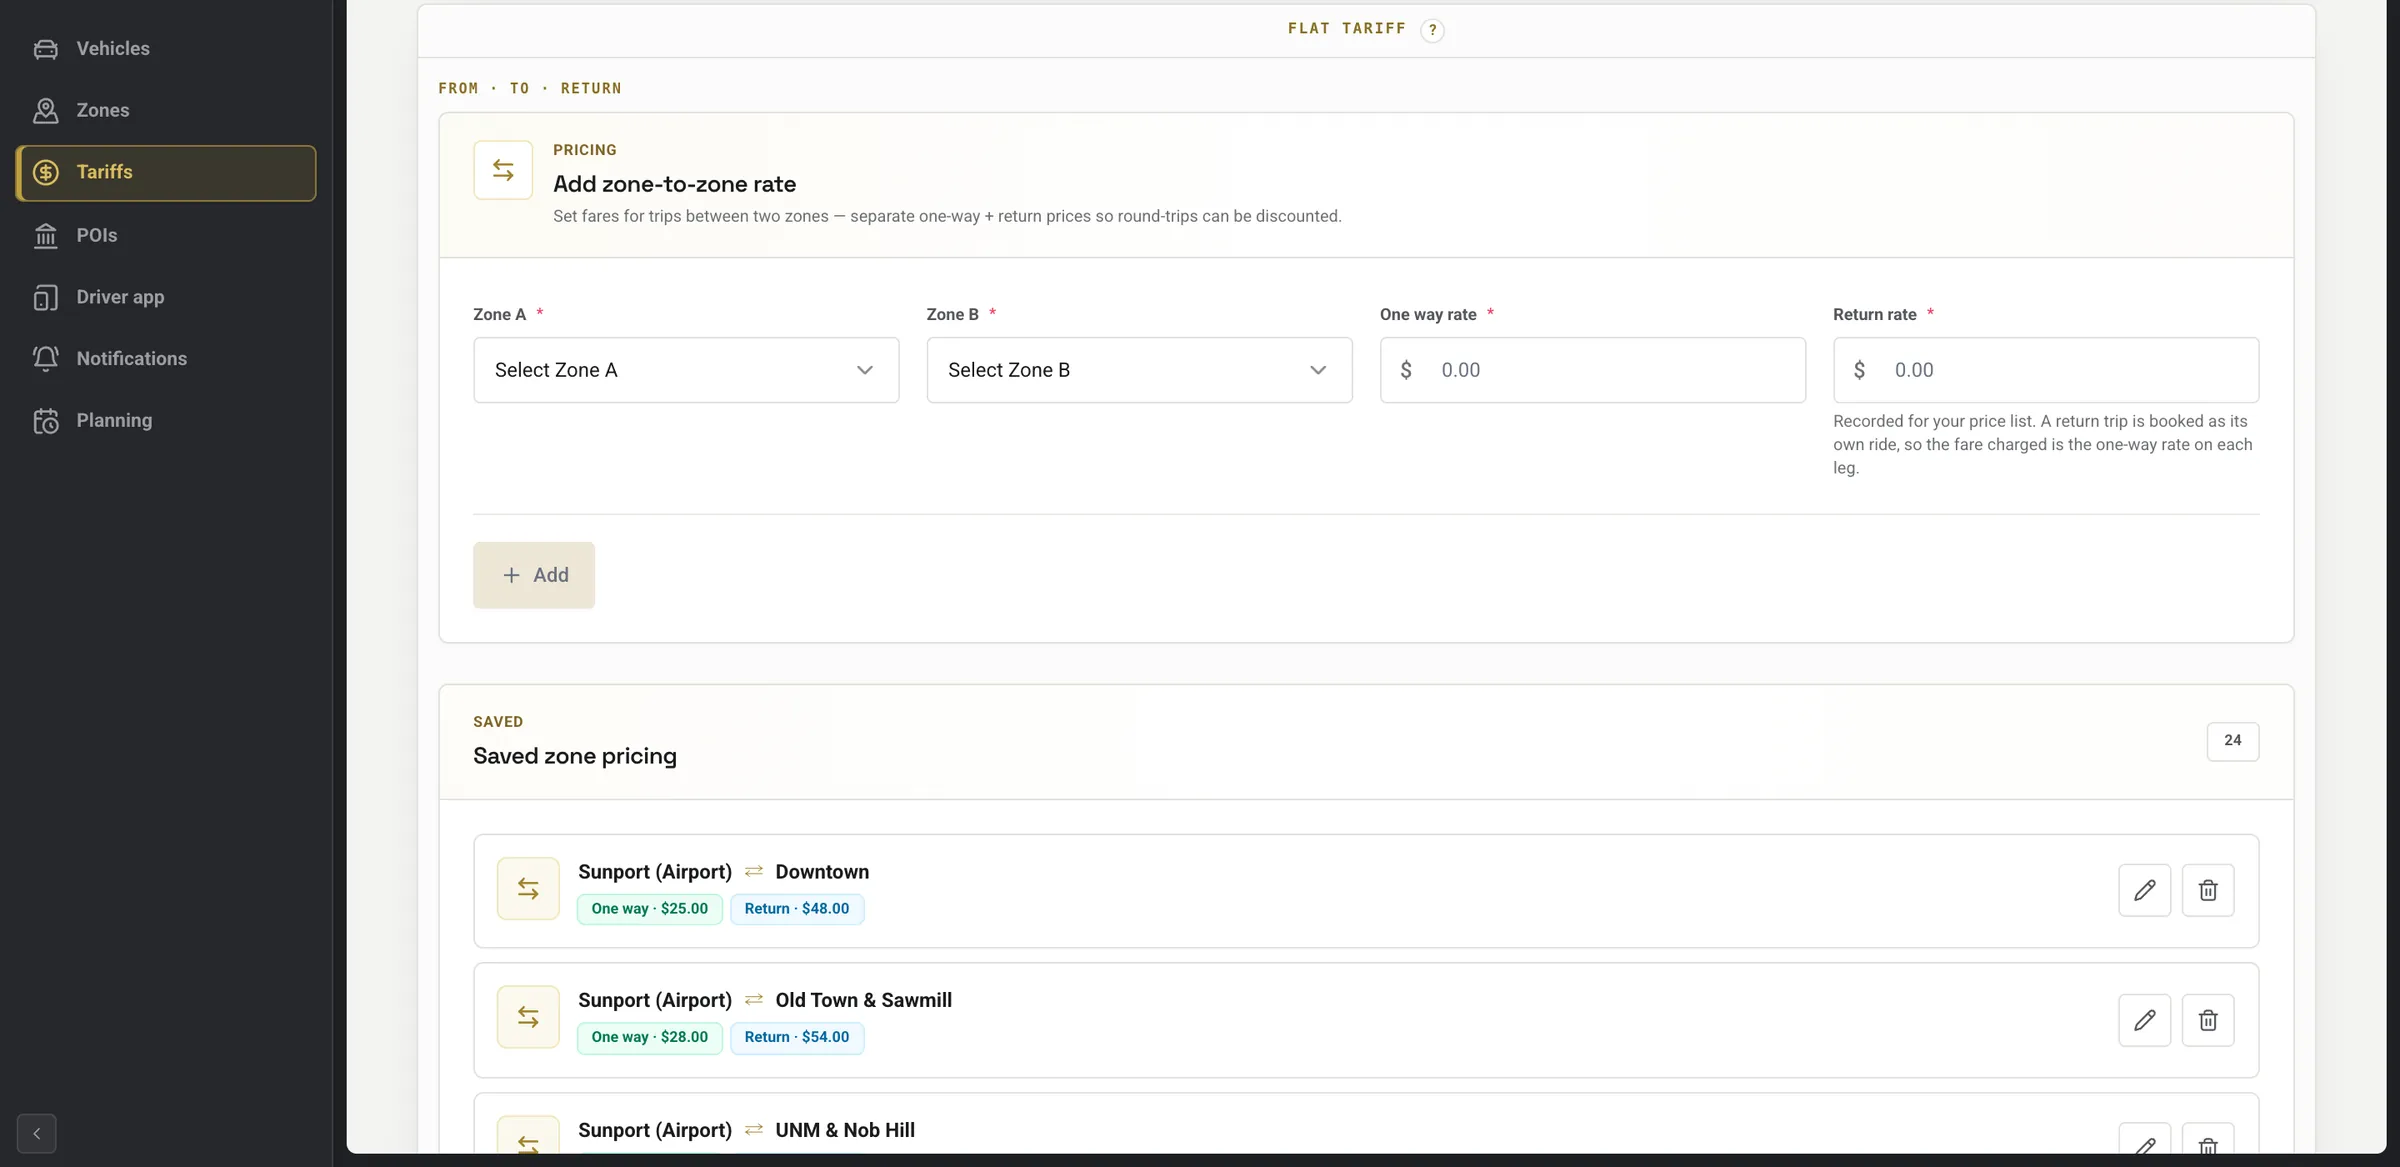
Set a price between two zones
In step 3, scroll to Add zone-to-zone rate.
Choose Zone A and Zone B and type the one-way rate (and the return rate for your price list).
Press Add.
How to
Change the tariff for nights
In step 3, scroll to Taximeter and choose the vehicle type at the right.
In the Night (10 pm – 5 am) column press edit.
Change the start price, price per mile, price per minute or minimum price. The sample trip at the bottom shows the effect.
Press OK. Repeat for each vehicle type you price.
How to
Make a new time band
Go to 2. Schedule and press create.
Give the band a name, for example Weekend.
Drag across the grid to paint the hours and days it covers, then save.
Back in step 3, give the new band its prices.
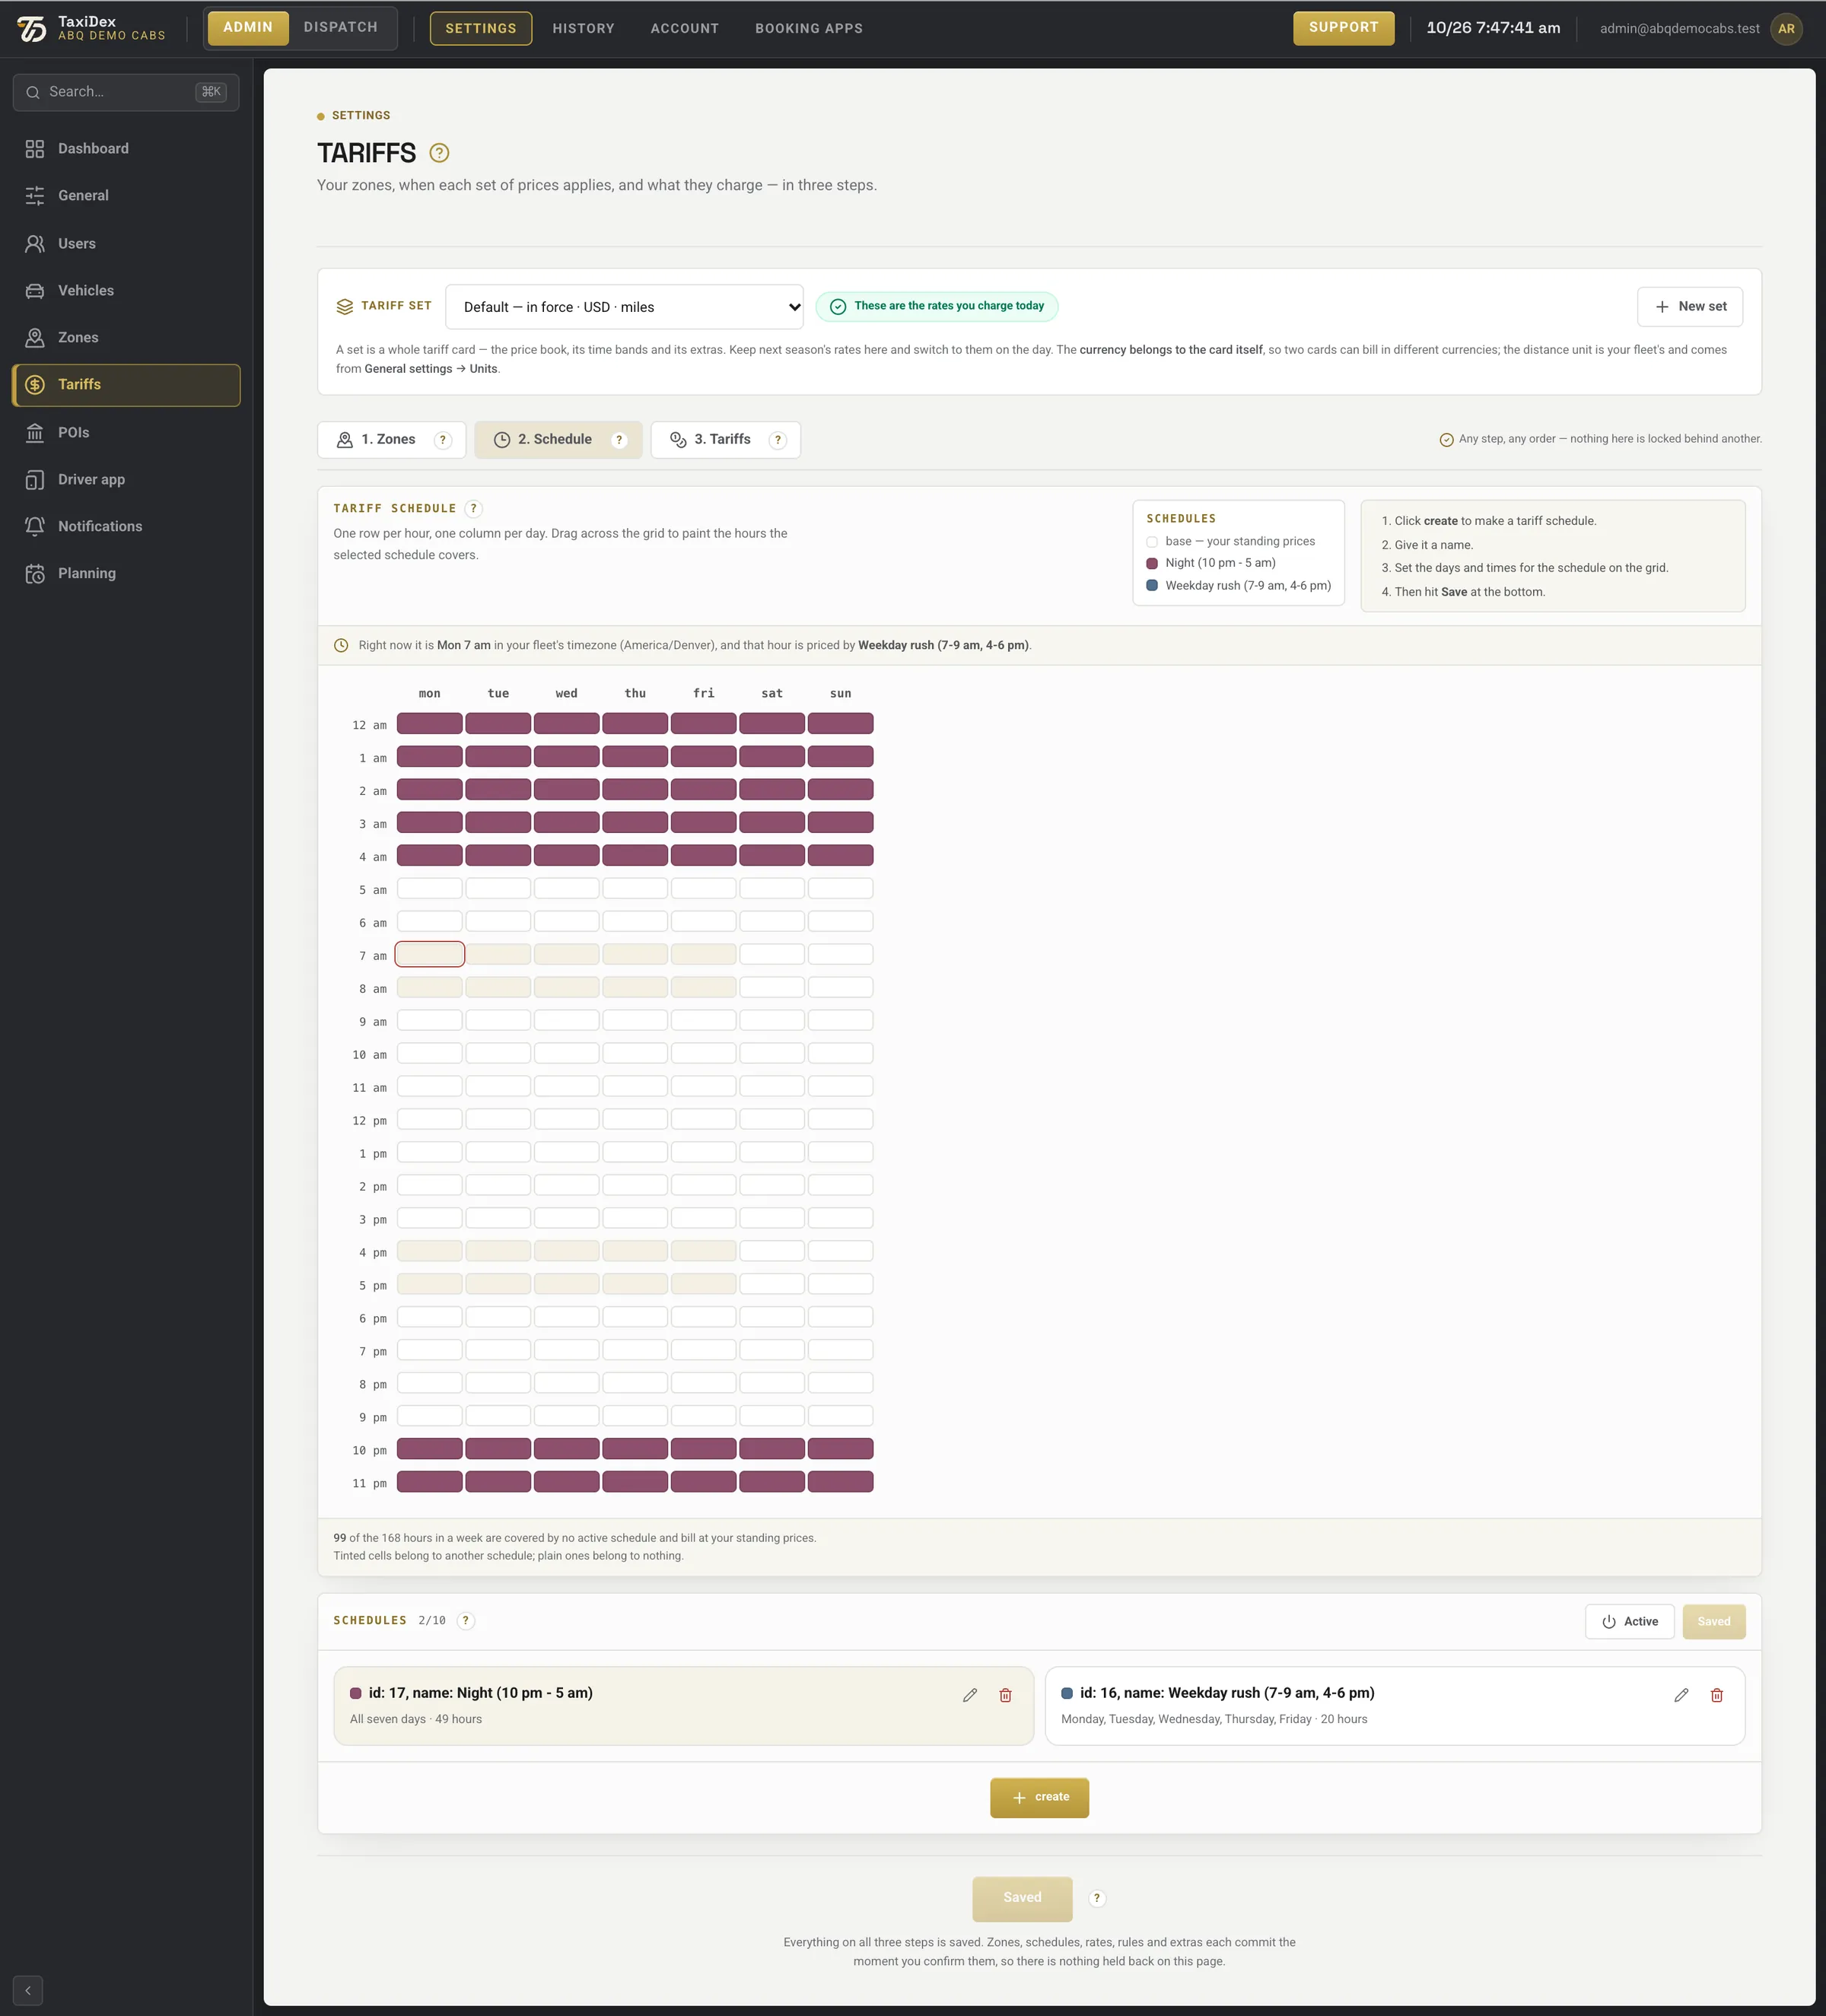
Tariffs, step 2: Schedule.
Click a number or a line to spotlight it
1Step 2 · Schedule Step 2 of 3.
2Schedules legend (base = standing prices) Base is your standing price; each colour is a time band.
3How to make a schedule (4 steps) Create, name, paint the hours, then Save.
4Which prices apply right now Which band prices the current hour in your fleet's time zone (here Mon 7 am: Weekday rush).
5Hour × day grid — drag to paint One row per hour, one column per day. Drag across cells to paint a band.
6Night band painted (10 pm – 5 am) Night covers 10 pm to 5 am, every day.
7Schedule list: rename · delete Rename (pencil) or delete (bin) a band.
8create (new schedule) Makes a new band.
9Save state Shows when everything is saved.
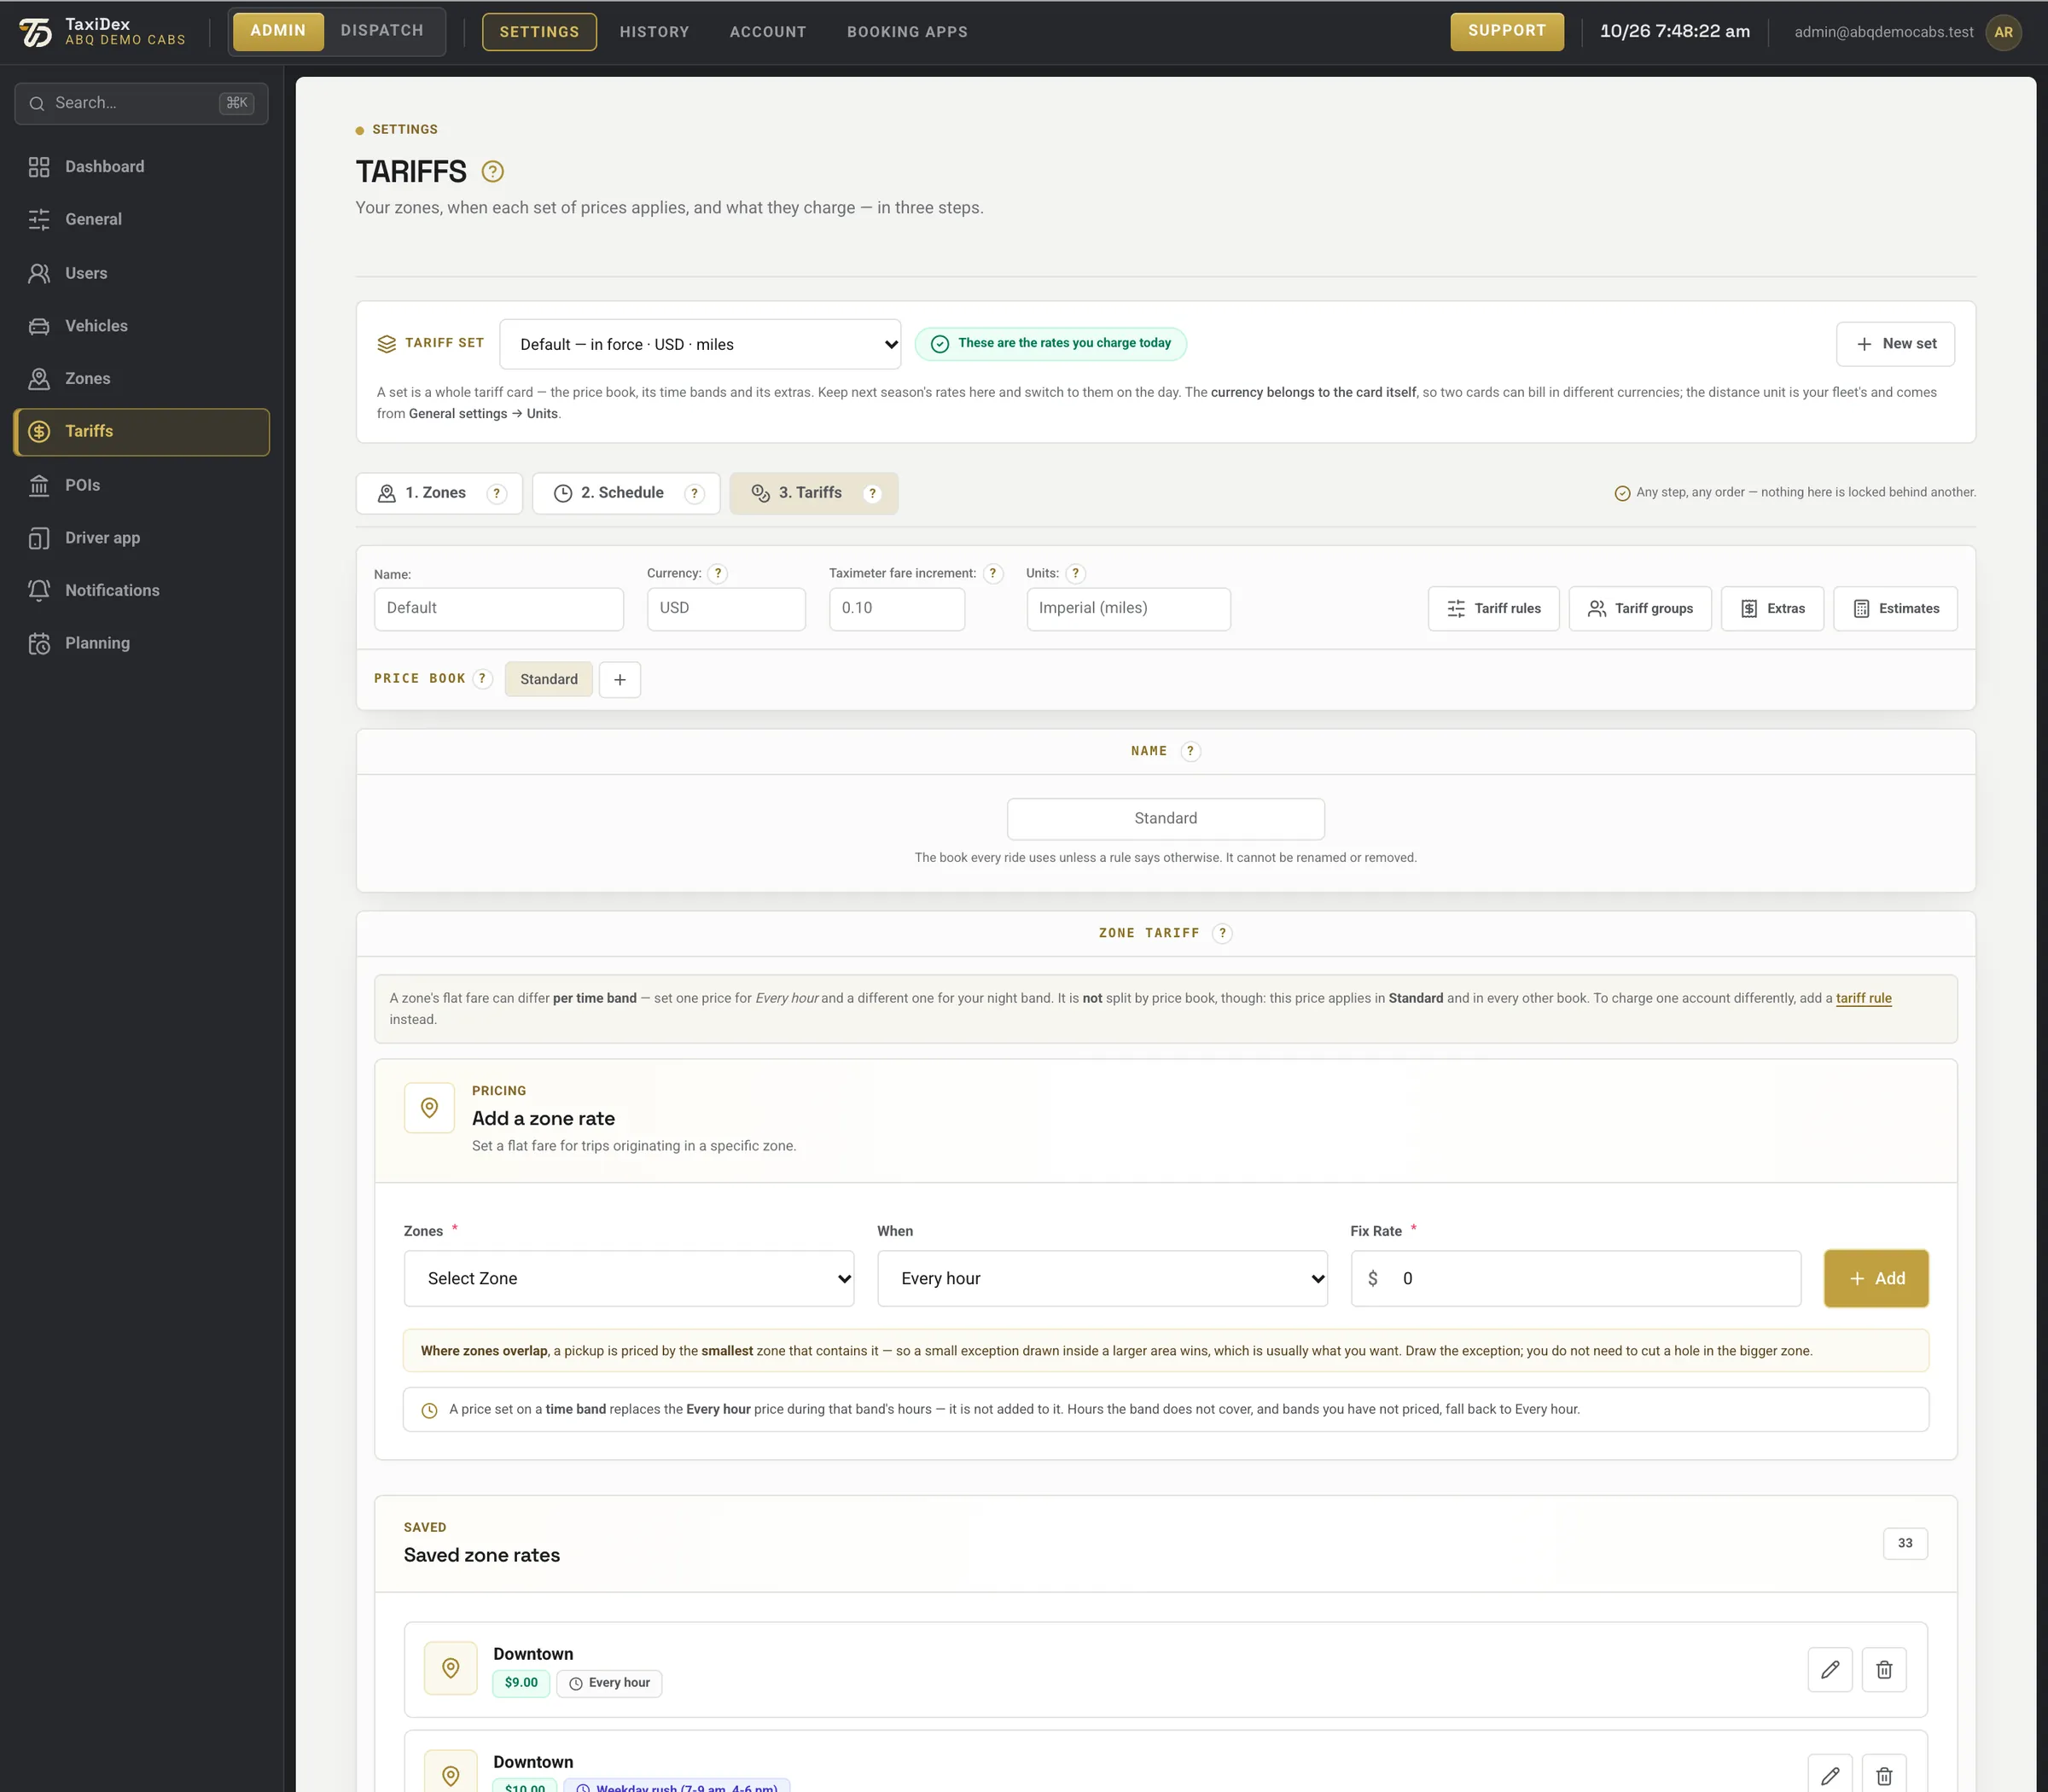
Tariffs, step 3: zone tariff.
Click a number or a line to spotlight it
1Step 3 · Tariffs Step 3 of 3.
2Card name · currency · meter increment · units The card's name, its currency (USD), how much the taximeter fare goes up in at a time, and the distance unit (miles).
3Tariff rules · Tariff groups · Extras · Estimates Rules, groups, extras and the estimate checker.
4Price book (Standard + add another) Standard is the book every ride uses unless a rule says otherwise.
5Zone tariff: a flat fare per pick-up zone One flat fare for trips that start in a zone. It can differ per time band.
6Zone Choose the zone.
7When: every hour or one of your bands Every hour, or one of your bands.
8Fixed rate (in $) The flat fare in dollars.
9Add Saves the rate into the list below.
10Saved zone rates: edit · delete Every saved zone rate (Downtown $9.00 every hour, $10.50 in the rush, $11.50 at night) with edit and delete.
Tariffs, step 3: zone-to-zone prices.
Click a number or a line to spotlight it
1Flat tariff: zone A → zone B Fares between two zones.
2Zone A · Zone B Pick both zones.
3One-way rate The price one way, for example Sunport → Downtown $25.00.
4Return rate (for your price list) Recorded for your price list ($48.00 here). A return trip is booked as its own ride, so each leg is charged the one-way rate.
5Add Saves the price.
6Saved zone-to-zone prices Every saved zone-to-zone price.
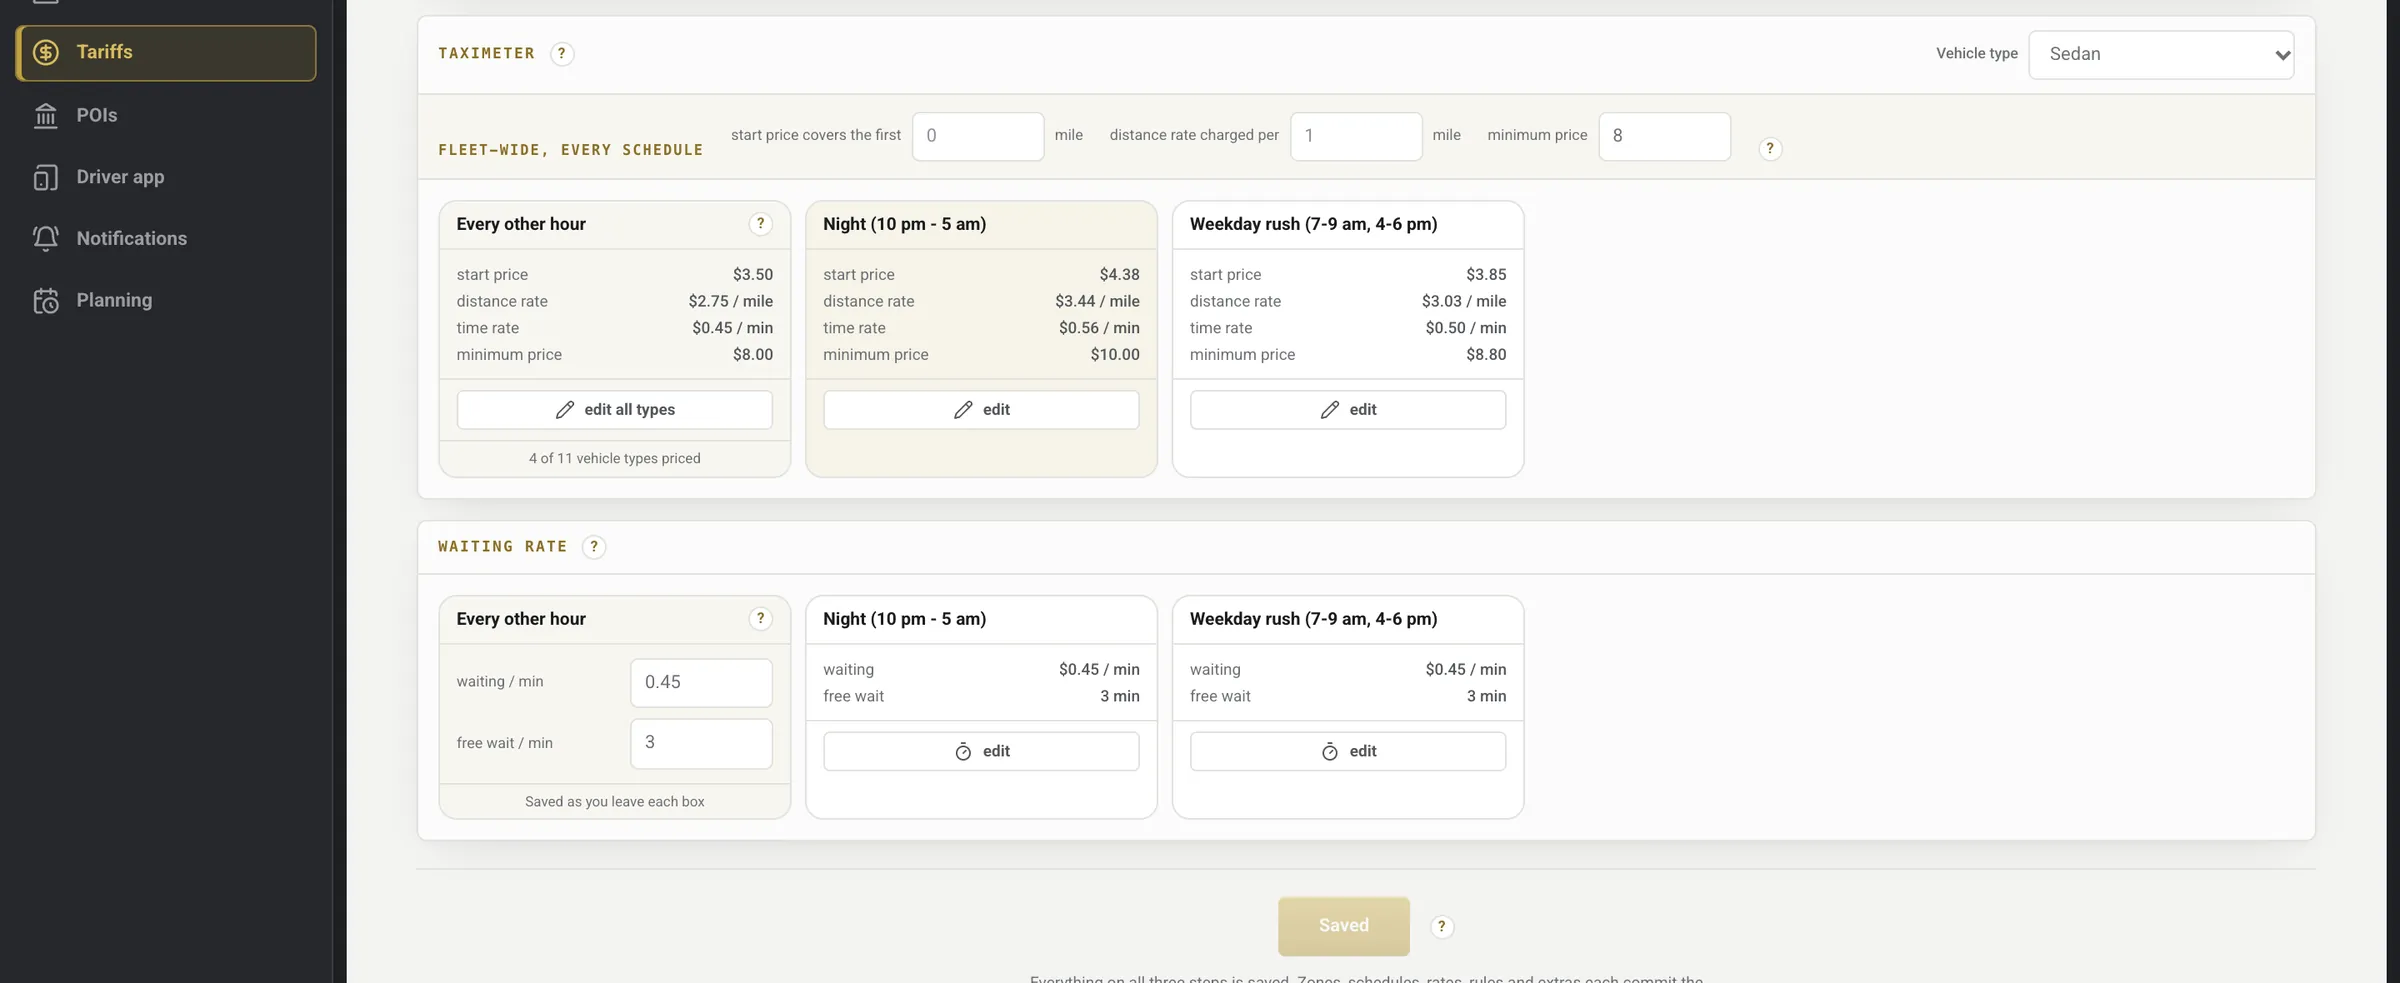
Tariffs, step 3: taximeter and waiting prices for a Sedan.
Click a number or a line to spotlight it
1Taximeter prices for this vehicle type Prices are kept per vehicle type. Pick the type here (Sedan).
2Fleet-wide: miles in start price · distance step · minimum How many miles the start price covers, the distance step, and the minimum price ($8).
3Every other hour (standing prices) Hours no band covers: $3.50 start, $2.75 a mile, $0.45 a minute, minimum $8.00.
4Night band prices The night band: $4.38 start, $3.44 a mile, $0.56 a minute, minimum $10.00.
5edit (one band) Opens the editor for that band (next picture).
6Weekday rush band The weekday rush band.
7Waiting rate: per minute · free minutes Waiting price per minute ($0.45) and free waiting minutes (3).
8Saved — everything commits as you confirm it Everything on all three steps is saved as you confirm it.
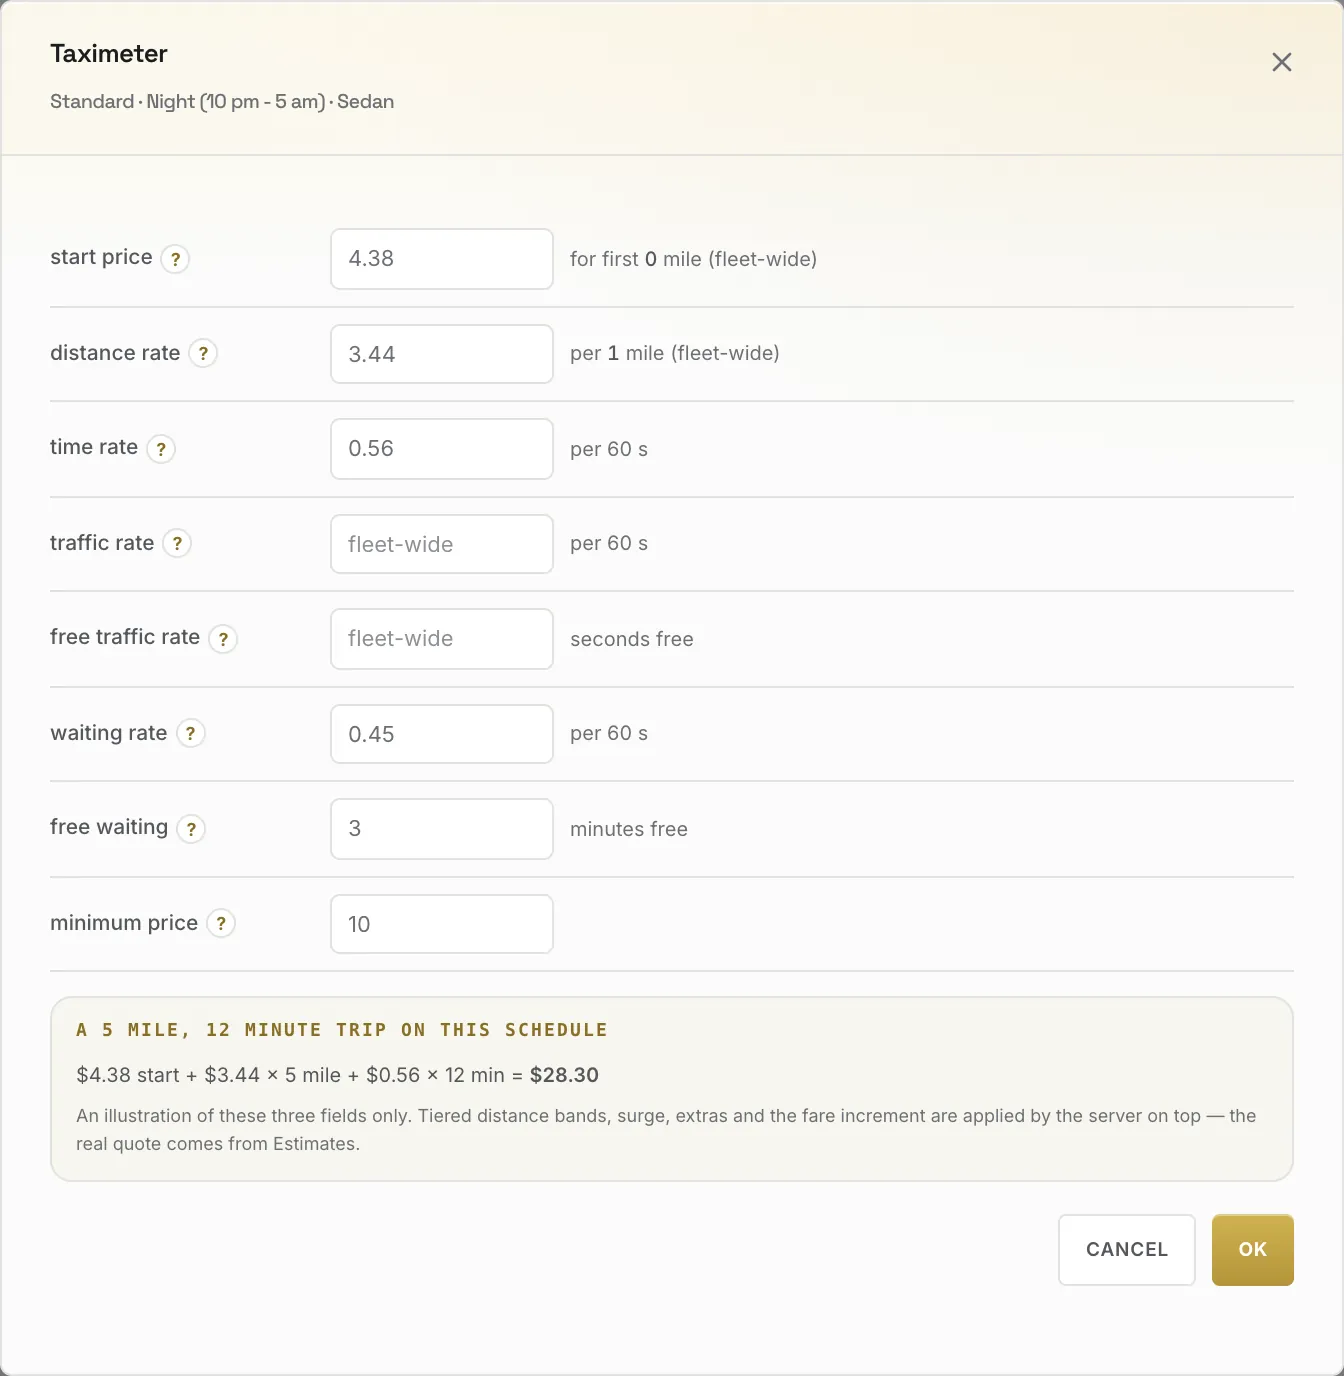
Editing the night band for the Sedan.
Click a number or a line to spotlight it
1Which price book · band · vehicle type Price book, time band and vehicle type you are changing.
2Start price What the meter starts at.
3Distance rate per mile Price per mile.
4Time rate per minute Price per minute of driving time.
5Traffic rate (blank = fleet-wide) Leave blank to use the fleet-wide value.
6Waiting rate · free waiting minutes Price per minute of waiting, and how many minutes are free.
7Minimum price The lowest fare this band charges.
8Worked example for this band A sample 5-mile, 12-minute trip, worked out with the numbers above: $28.30.
9Cancel · OK Cancel throws the edit away; OK keeps it.
Good to knowWhen zones overlap, a pick-up is priced by the smallest zone that contains it. Draw the exception inside the larger zone; there is no need to cut a hole.
Good to knowUnticking Enable tariffs under Settings ▸ General ▸ Payments switches tariff pricing off everywhere.
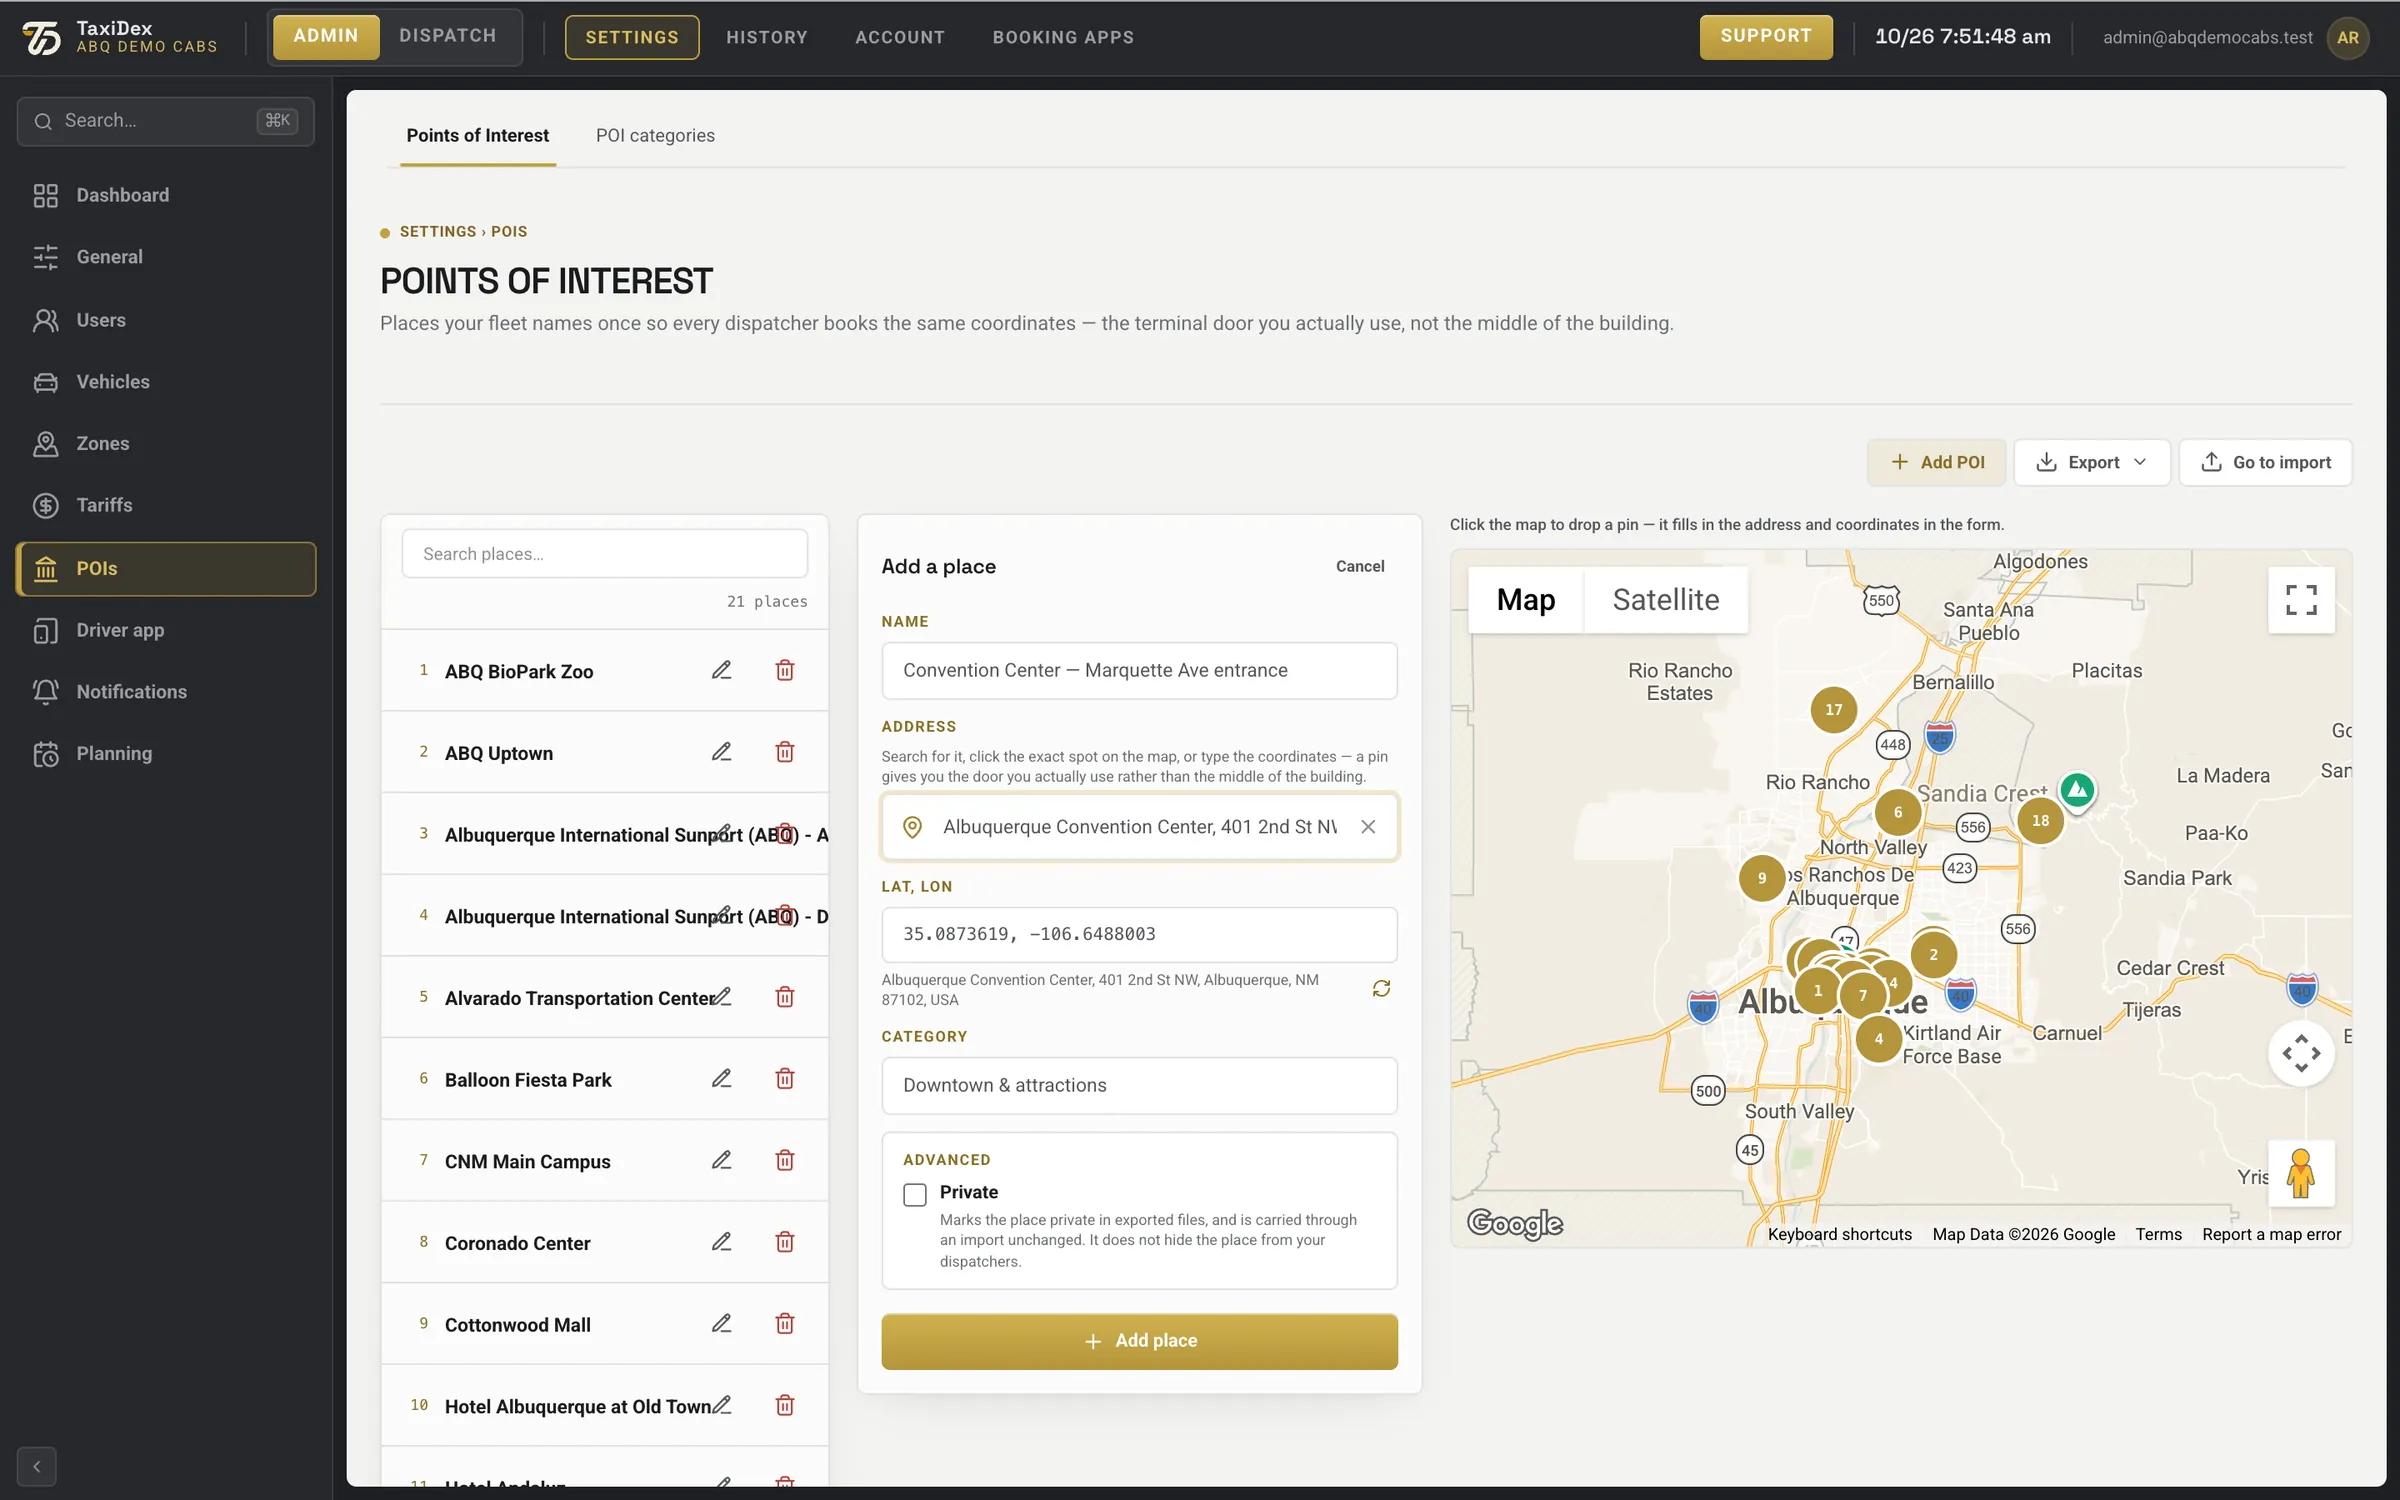
5.7 POIs
Points of interest are places your fleet names once so every dispatcher books the same spot: the right entrance rather than the middle of a building.
Settings ▸ POIs, with a place filled in (not saved).
Click a number or a line to spotlight it
1Points of Interest · POI categories Your places, and the categories you sort them into.
2Add POI · Export · Go to import Add a place, export your places, or import a list.
3Search places (your saved list) Your saved places.
4Name What dispatchers will see, for example the exact entrance.
5Address (search, or click the map) Search, or click the map.
6Lat, lon (filled from the pin) Filled in from the pin.
7Category Sort places into your categories.
8Private (advanced) Marks the place private in exported files.
9Add place Saves the place.
10Click the map to drop a pin A click drops a pin and fills in the address.
How to
Add a place
Open Settings ▸ POIs.
Search the address, or click the exact spot on the map; the coordinates fill in.
Type a clear name, for example the entrance or door, and pick a category.
Press Add place.
5.8 Driver app
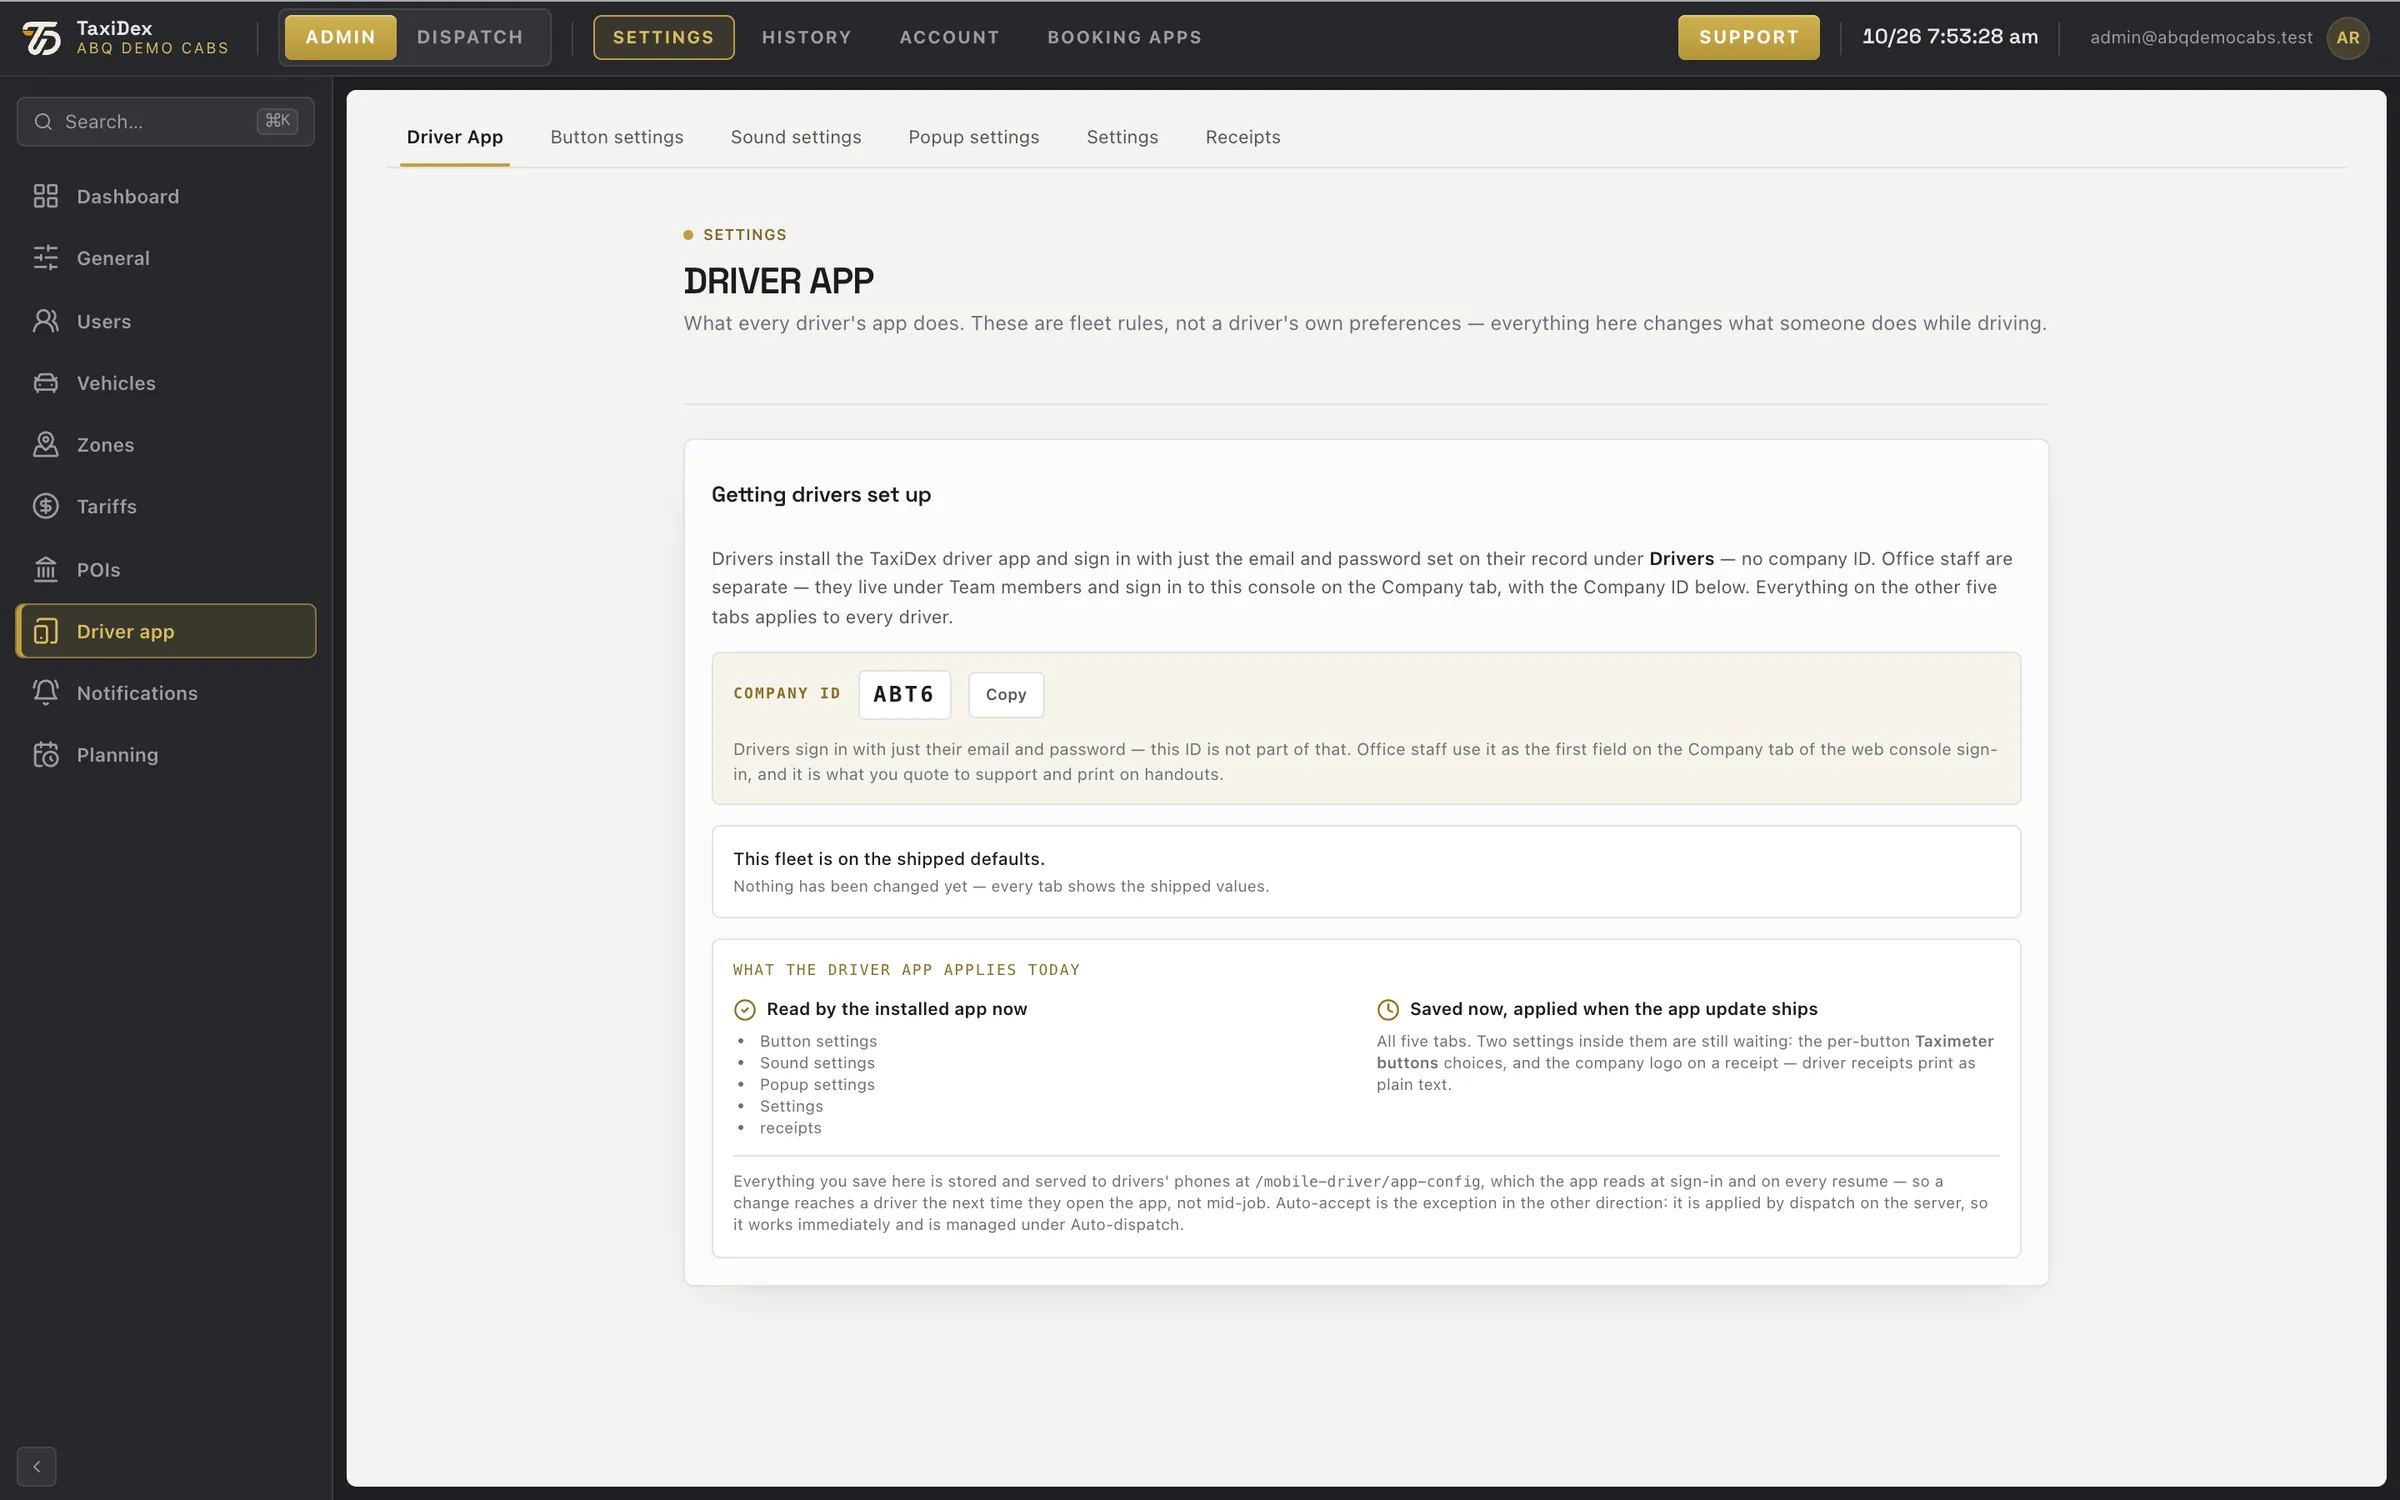
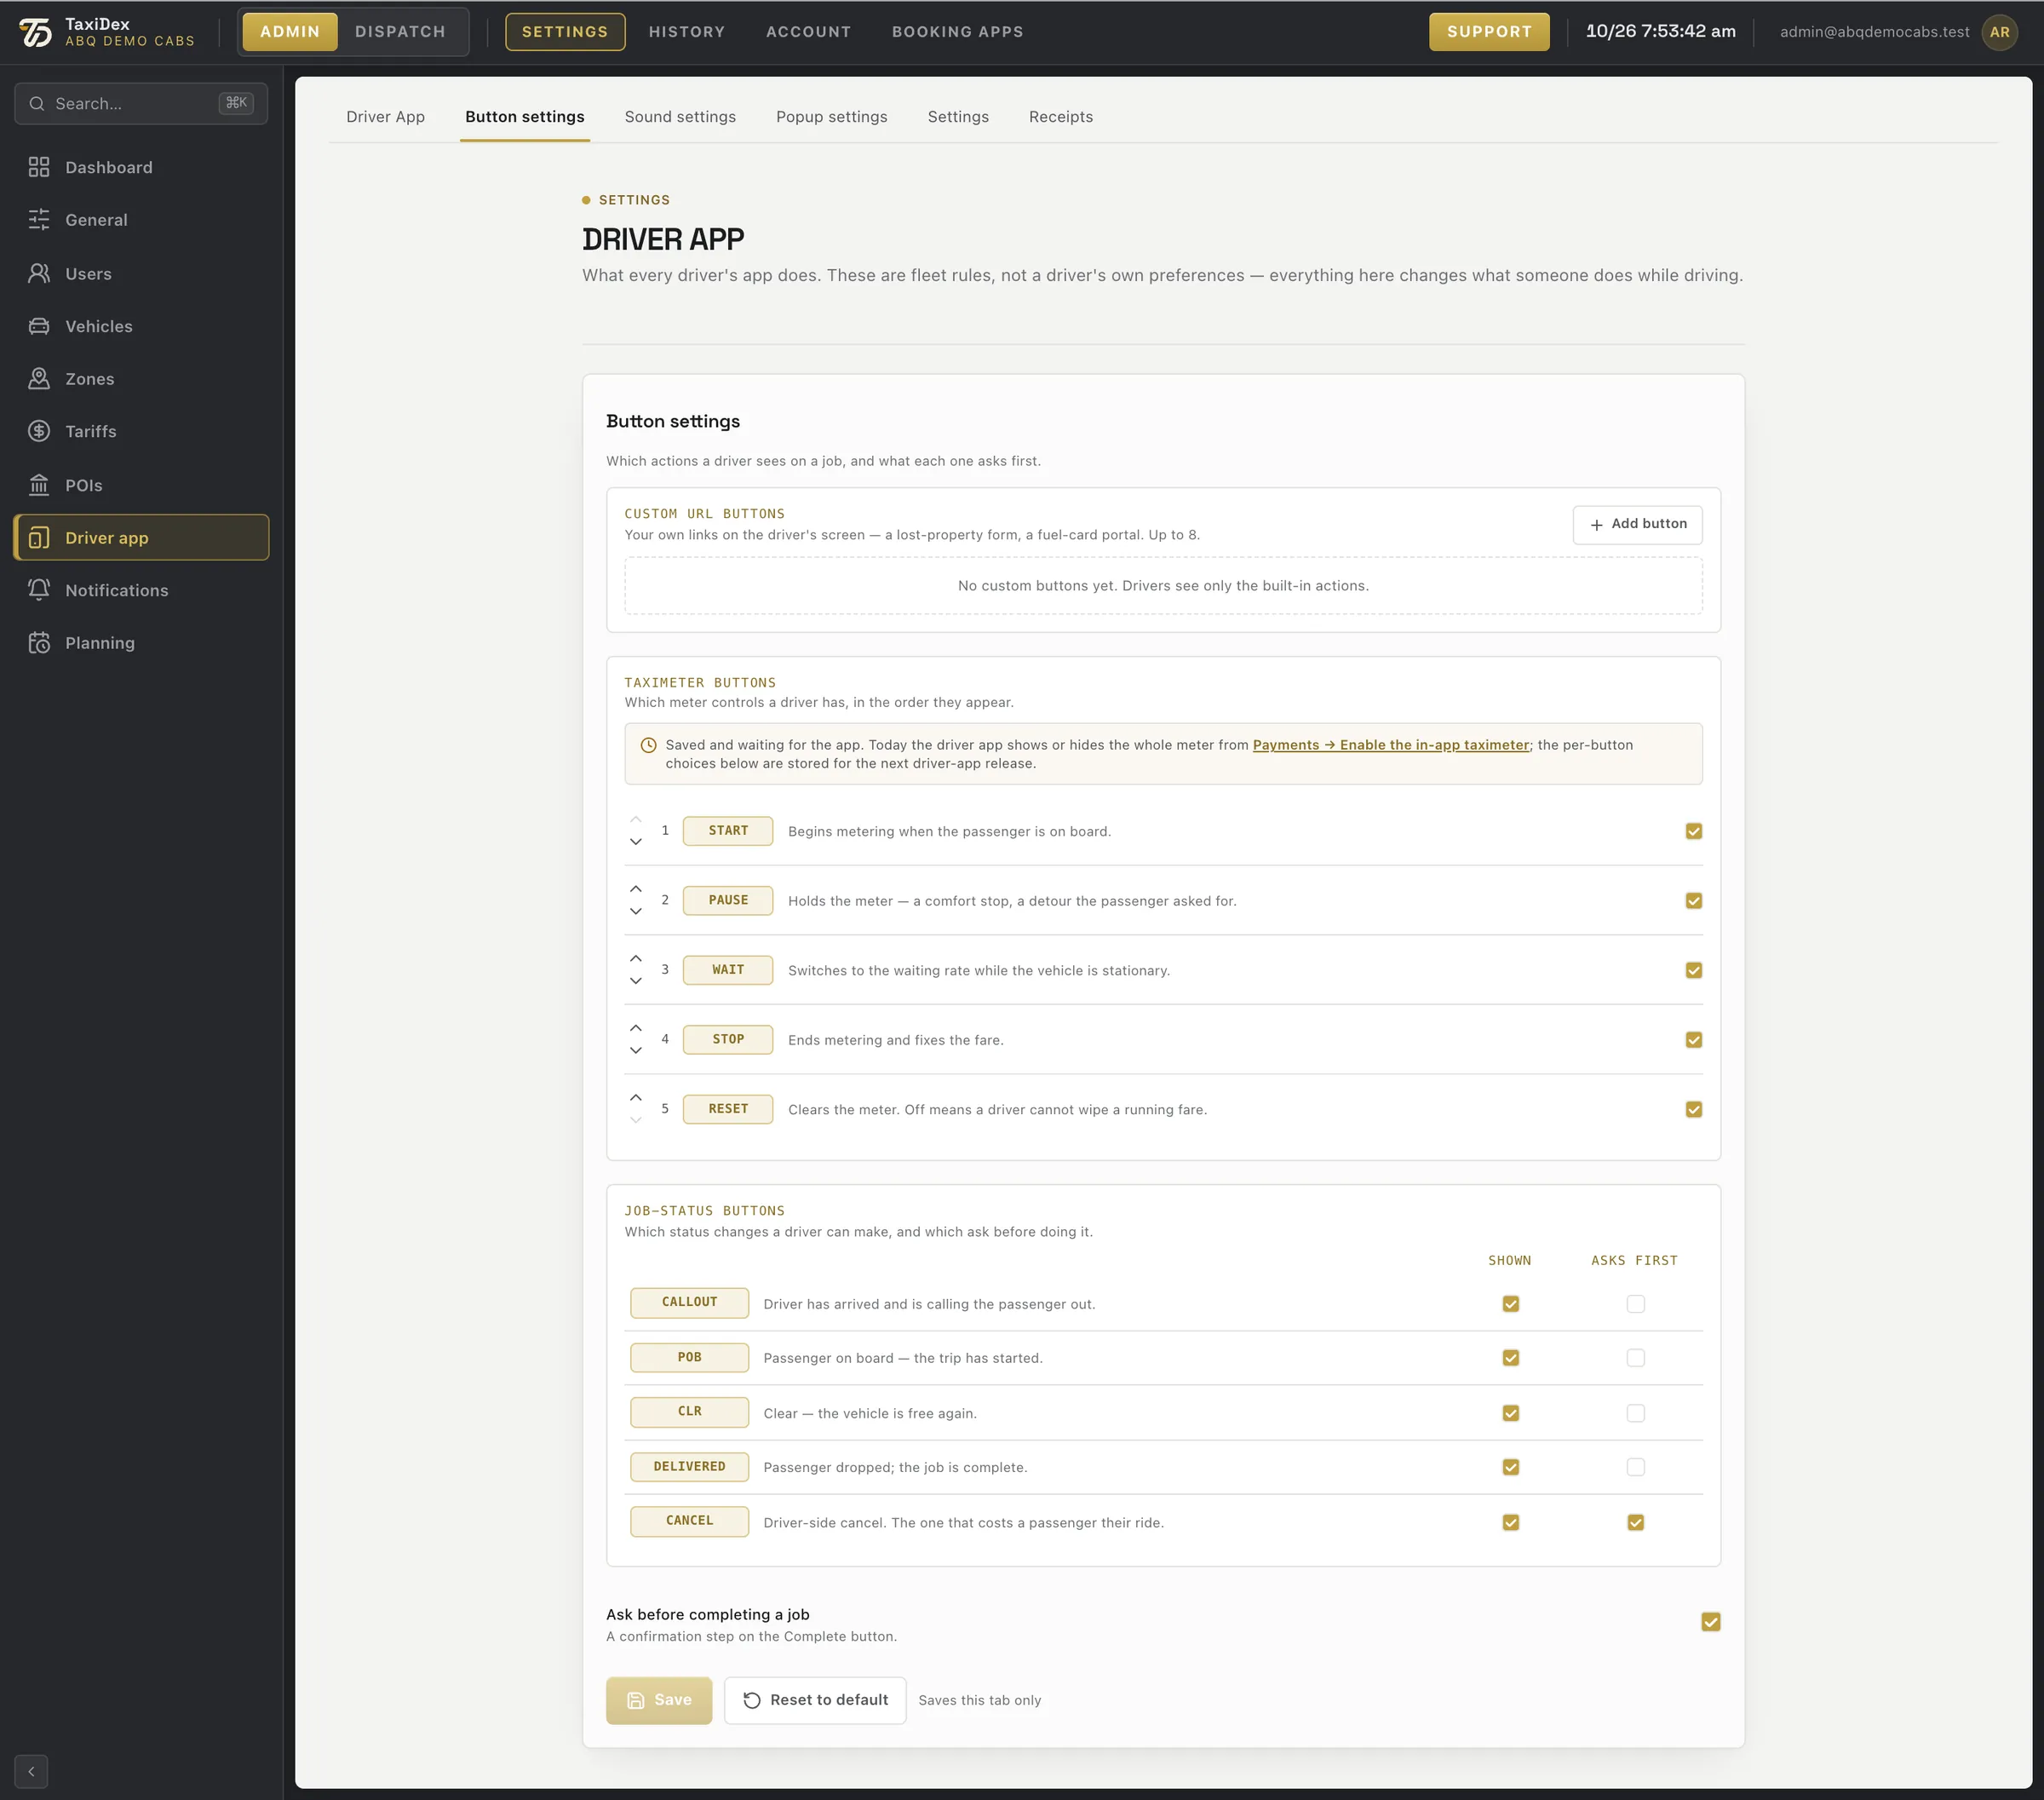
Driver app sets what every driver's app does. These are fleet rules, not a driver's own preferences. The tabs are Overview, Button settings, Sound settings, Popup settings, Settings and Receipts. A change reaches a driver the next time they open the app.
Drivers sign in to the app with the e-mail and password set for them under Users. The Company ID is only for office staff.
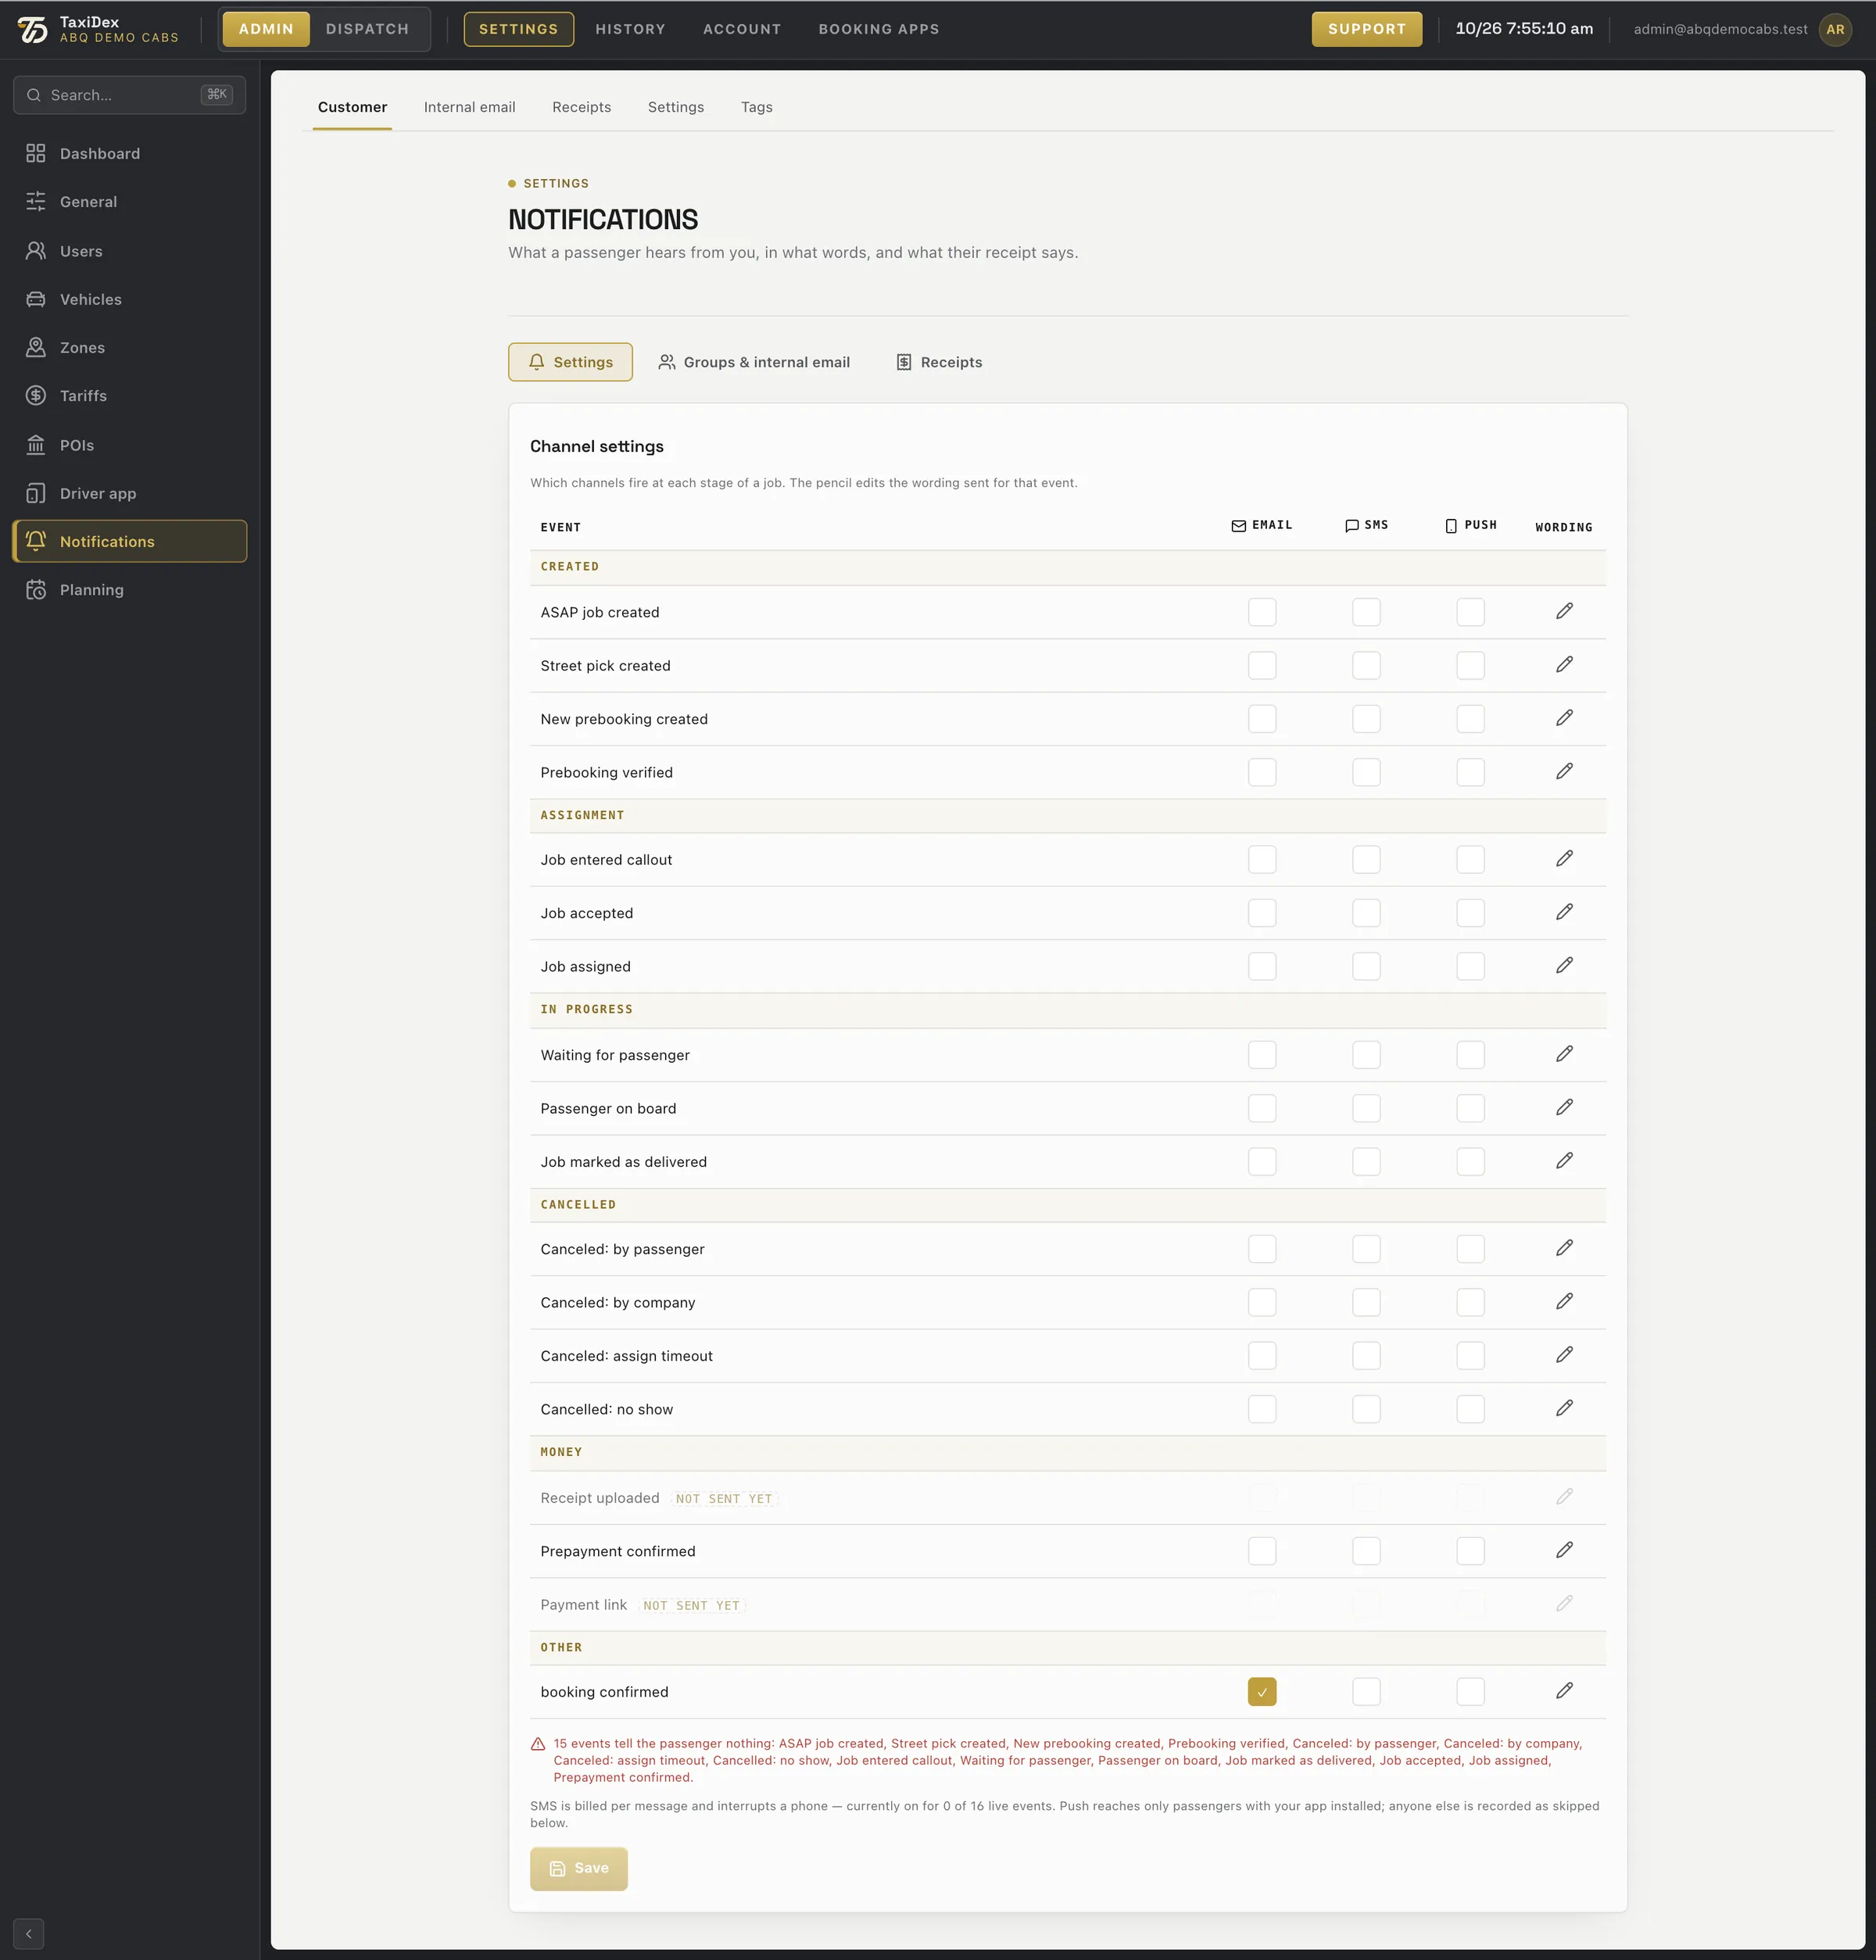
2Settings · Groups & internal email · Receipts Channel settings, groups and internal e-mail, and receipts.
3Events, grouped by stage of the job Created, Assignment, In progress, Cancelled, Money and Other.
4Email column Send this event by e-mail.
5SMS column Send it by text message. SMS is billed per message.
6Push column Send it as a push to your passenger app.
7Edit the wording (pencil) Edit the words sent for this event.
8Ticked = sent on that channel A tick means the passenger gets this event on that channel.
9Not sent yet (event not wired) The event is listed but not sent by TaxiDex yet.
10Warning: events that tell the passenger nothing Events that currently tell the passenger nothing.
11Save Saves your ticks.
How to
Change the text a passenger receives
Open Settings ▸ Notifications.
Tick the channels for the event, for example Job accepted by e-mail.
Press the pencil on that row.
Edit the subject and body. Click into a field, then click a tag such as {driverName} to insert it. The preview shows the result.
Press SAVE WORDING, then Save on the channel table.
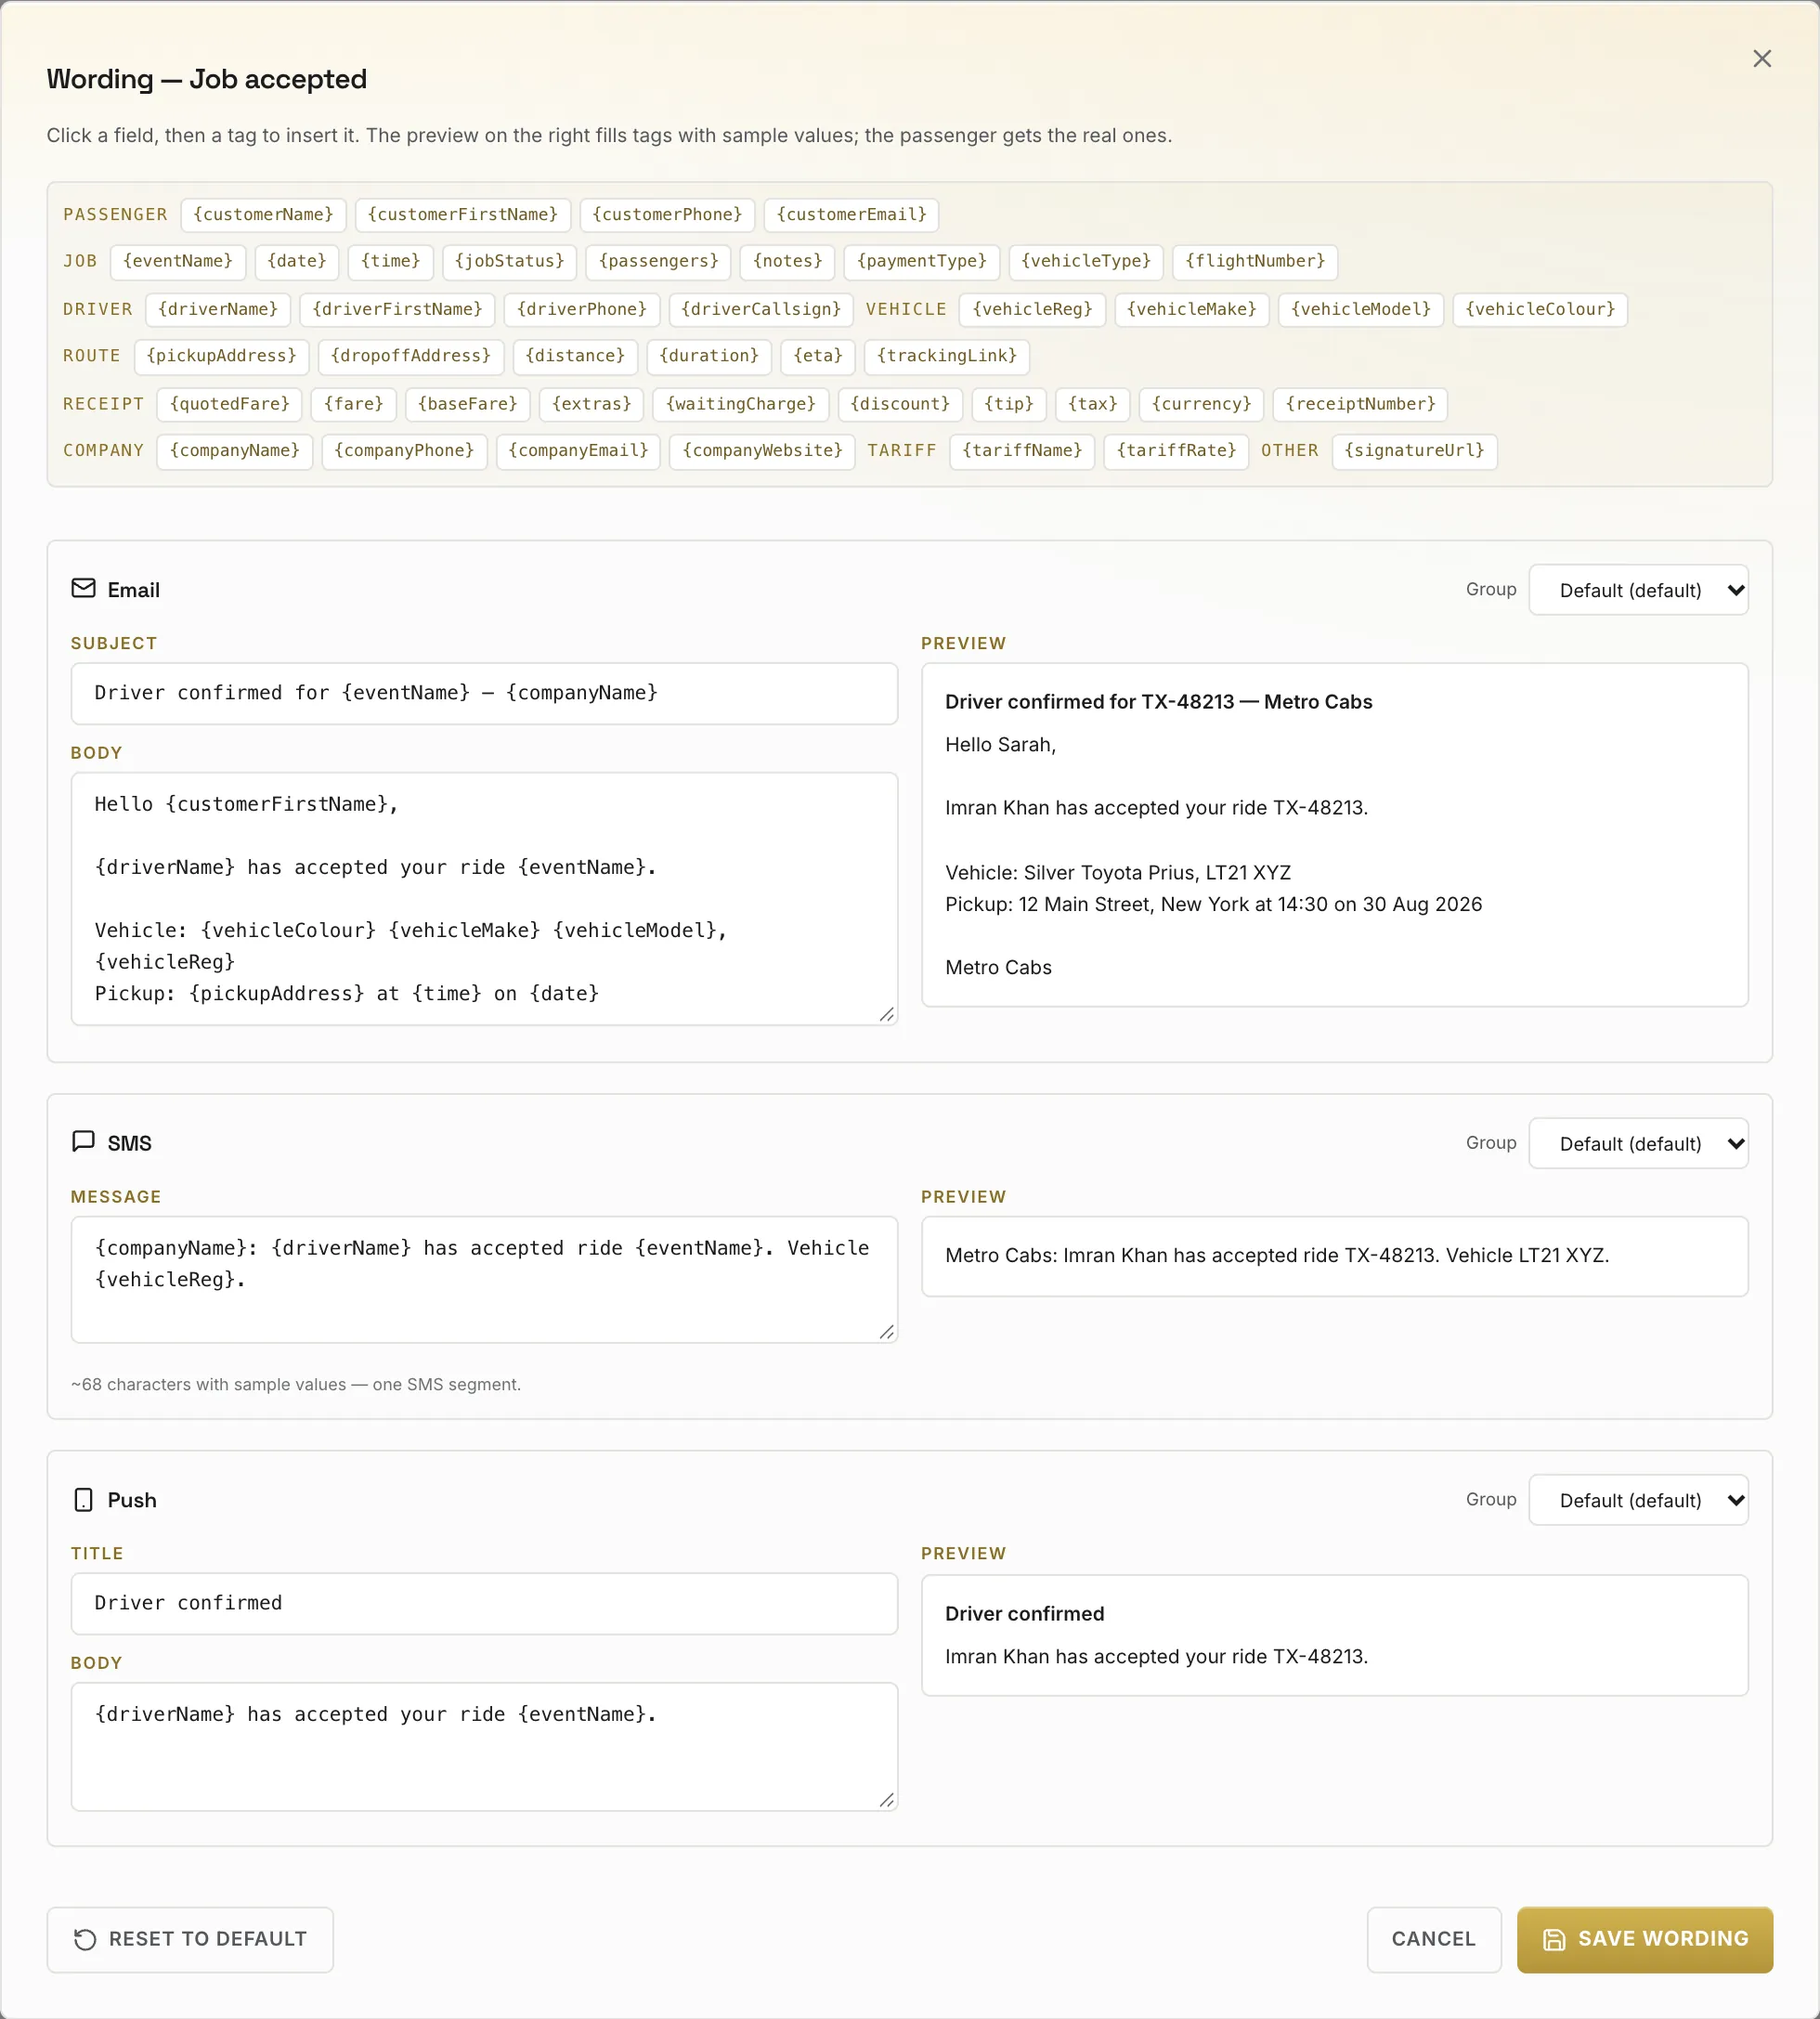
Wording for Job accepted.
Click a number or a line to spotlight it
1Tags — click a field, then a tag Click into a field, then click a tag to insert it.
2E-mail subject and body Subject and body of the e-mail.
3Live preview with sample values Shows the message with sample values.
4Message group Different wording per notification group.
5SMS text · segment count The text message, and how many SMS segments it will take.
6Push title and body Title and body of the push.
7Reset to default Back to the shipped wording.
8Cancel · Save wording Keep or throw away your changes.
Good to knowSMS is billed per message and interrupts a phone. Push reaches only passengers who have your app installed.
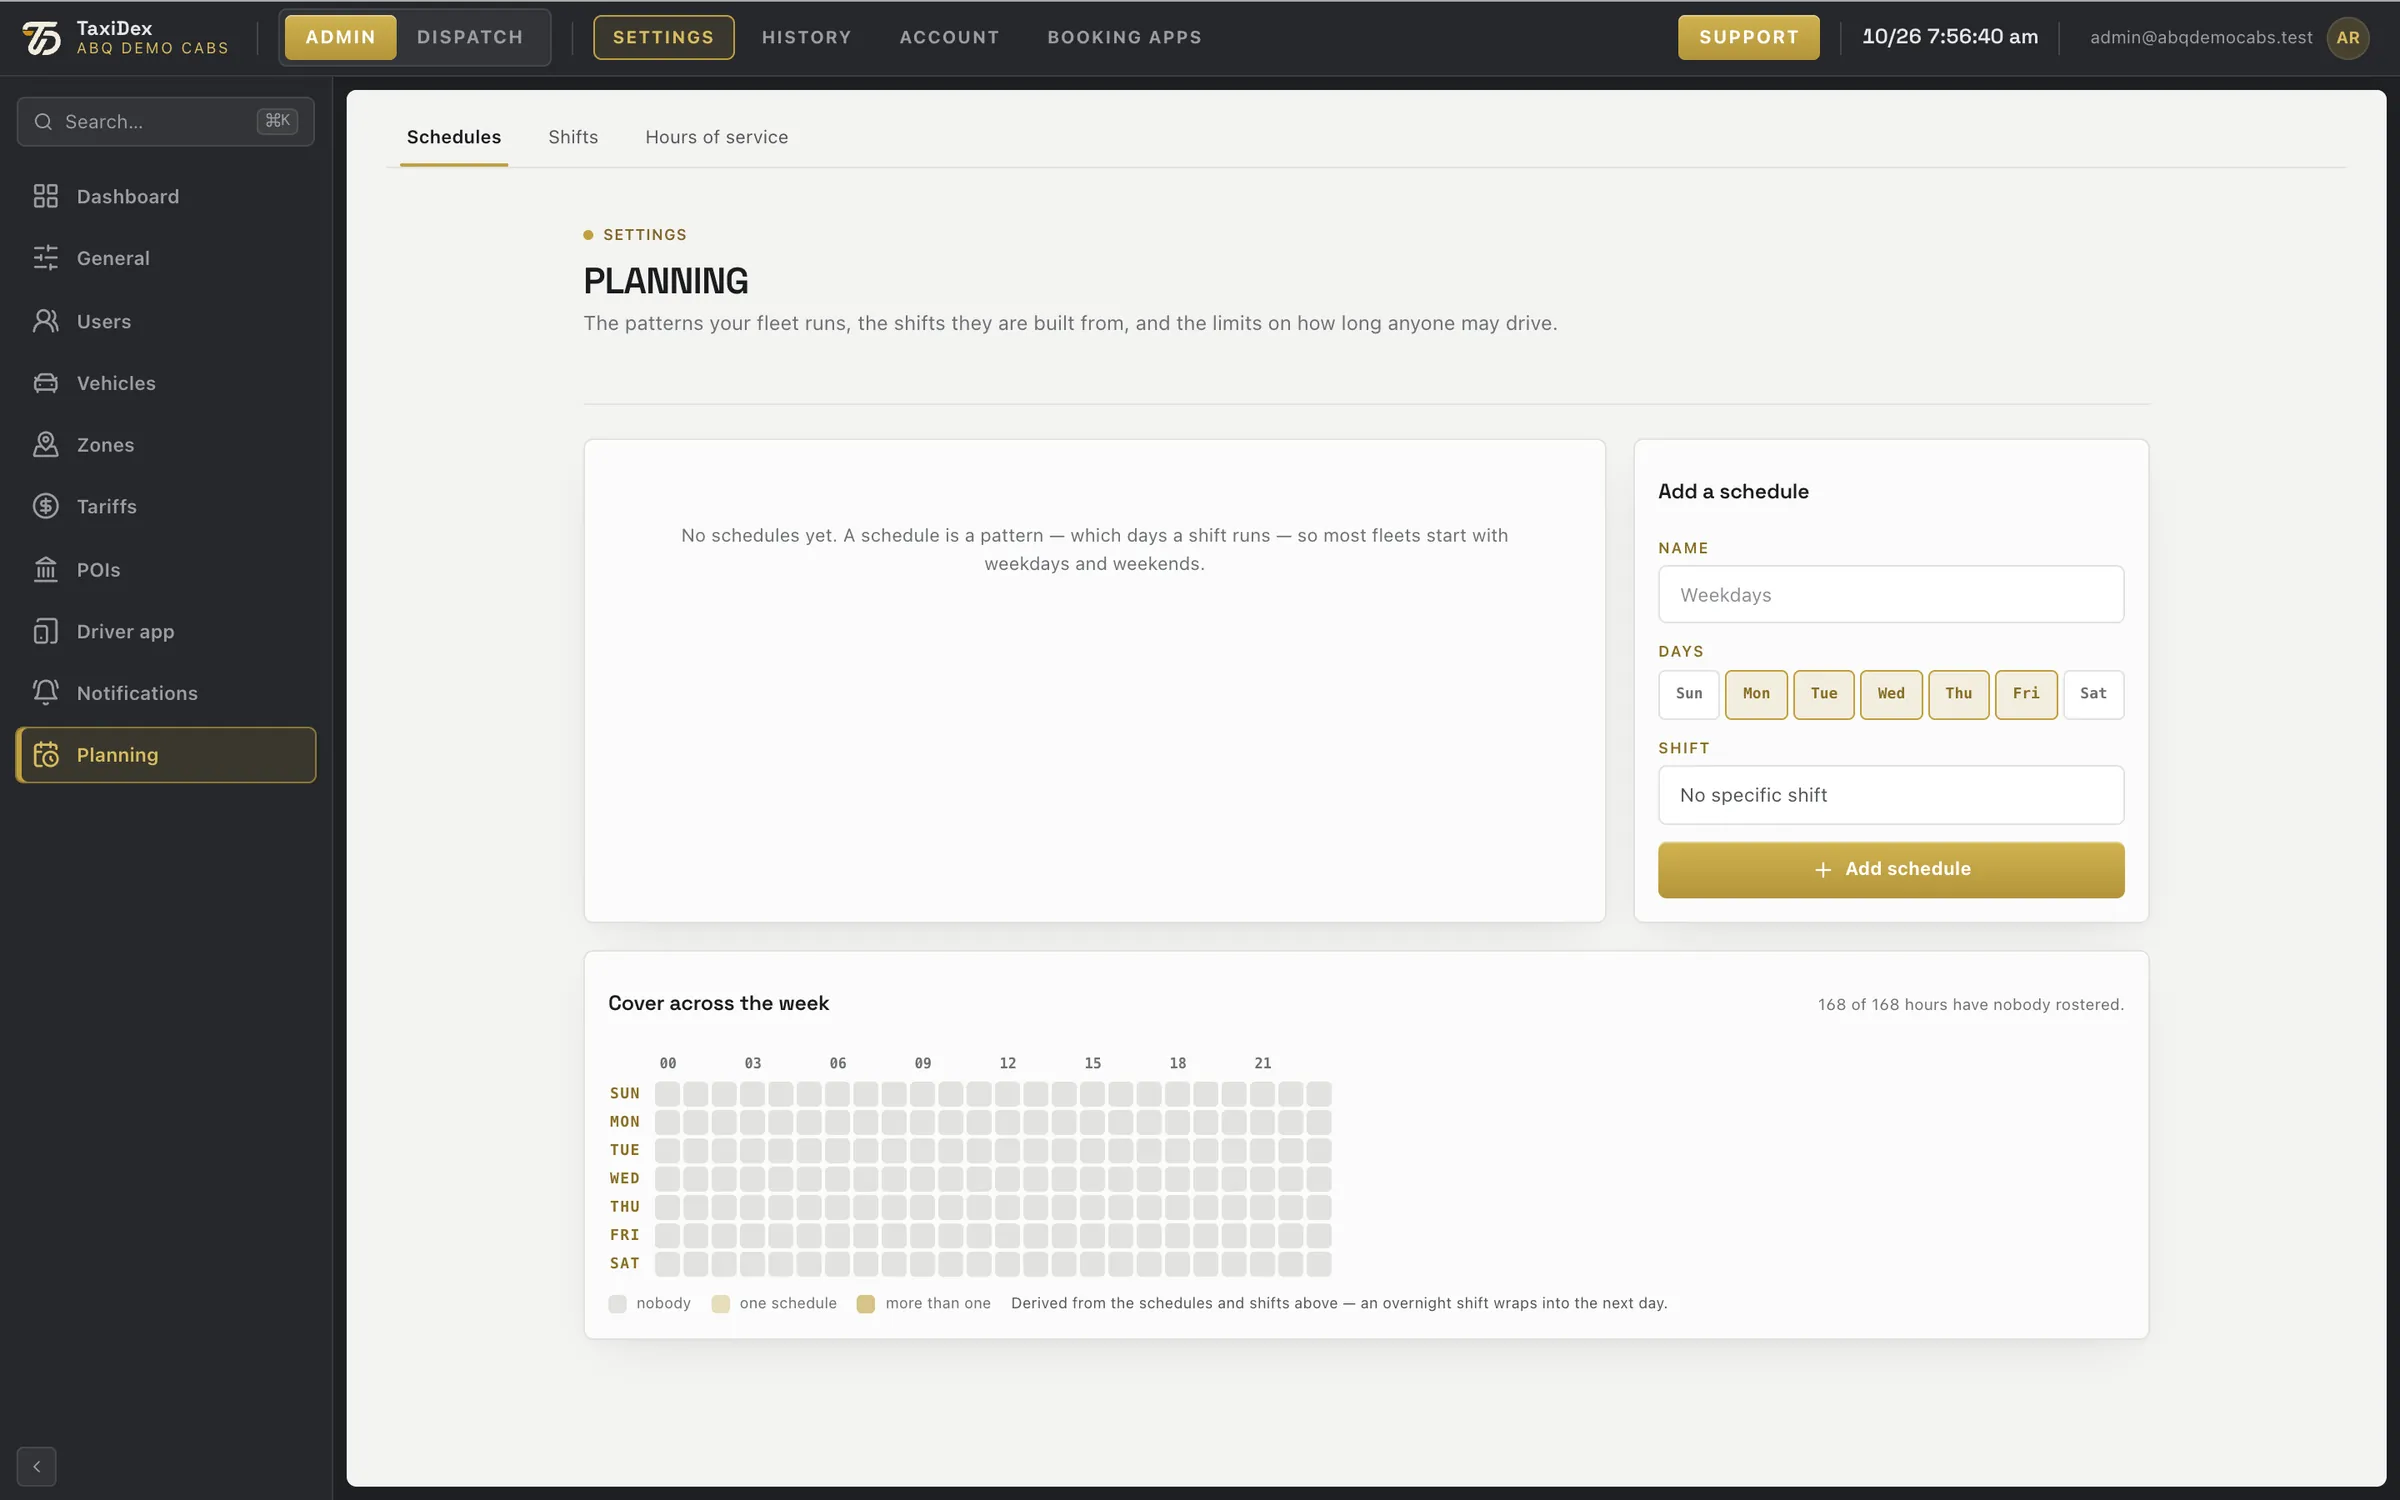
5.10 Planning
Planning holds the patterns your fleet runs: Schedules (which days a shift runs), Shifts (the hours) and Hours of service (limits on how long anyone may drive). The grid shows which hours of the week are covered.
Settings ▸ Planning.
Click a number or a line to spotlight it
1Schedules · Shifts · Hours of service Schedules, Shifts and Hours of service.
2Your schedules (empty here) Patterns of days a shift runs. Empty here.
3Schedule name For example Weekdays.
4Days it runs The days it runs.
5Shift it uses No specific shift, or Morning, Evening, Night and others from the Shifts tab.
6Add schedule Saves the schedule.
7Cover across the week (hours × days) Which hours of the week are covered.
8Hours nobody is scheduled Hours nobody is scheduled for.
06
Chapter 6 · 5 screens · 2 how-tos
History and reports
WhereADMIN ▸ HISTORY
What happened: reports you can shape and save, a replay of where cars went, statistics and driver ratings.
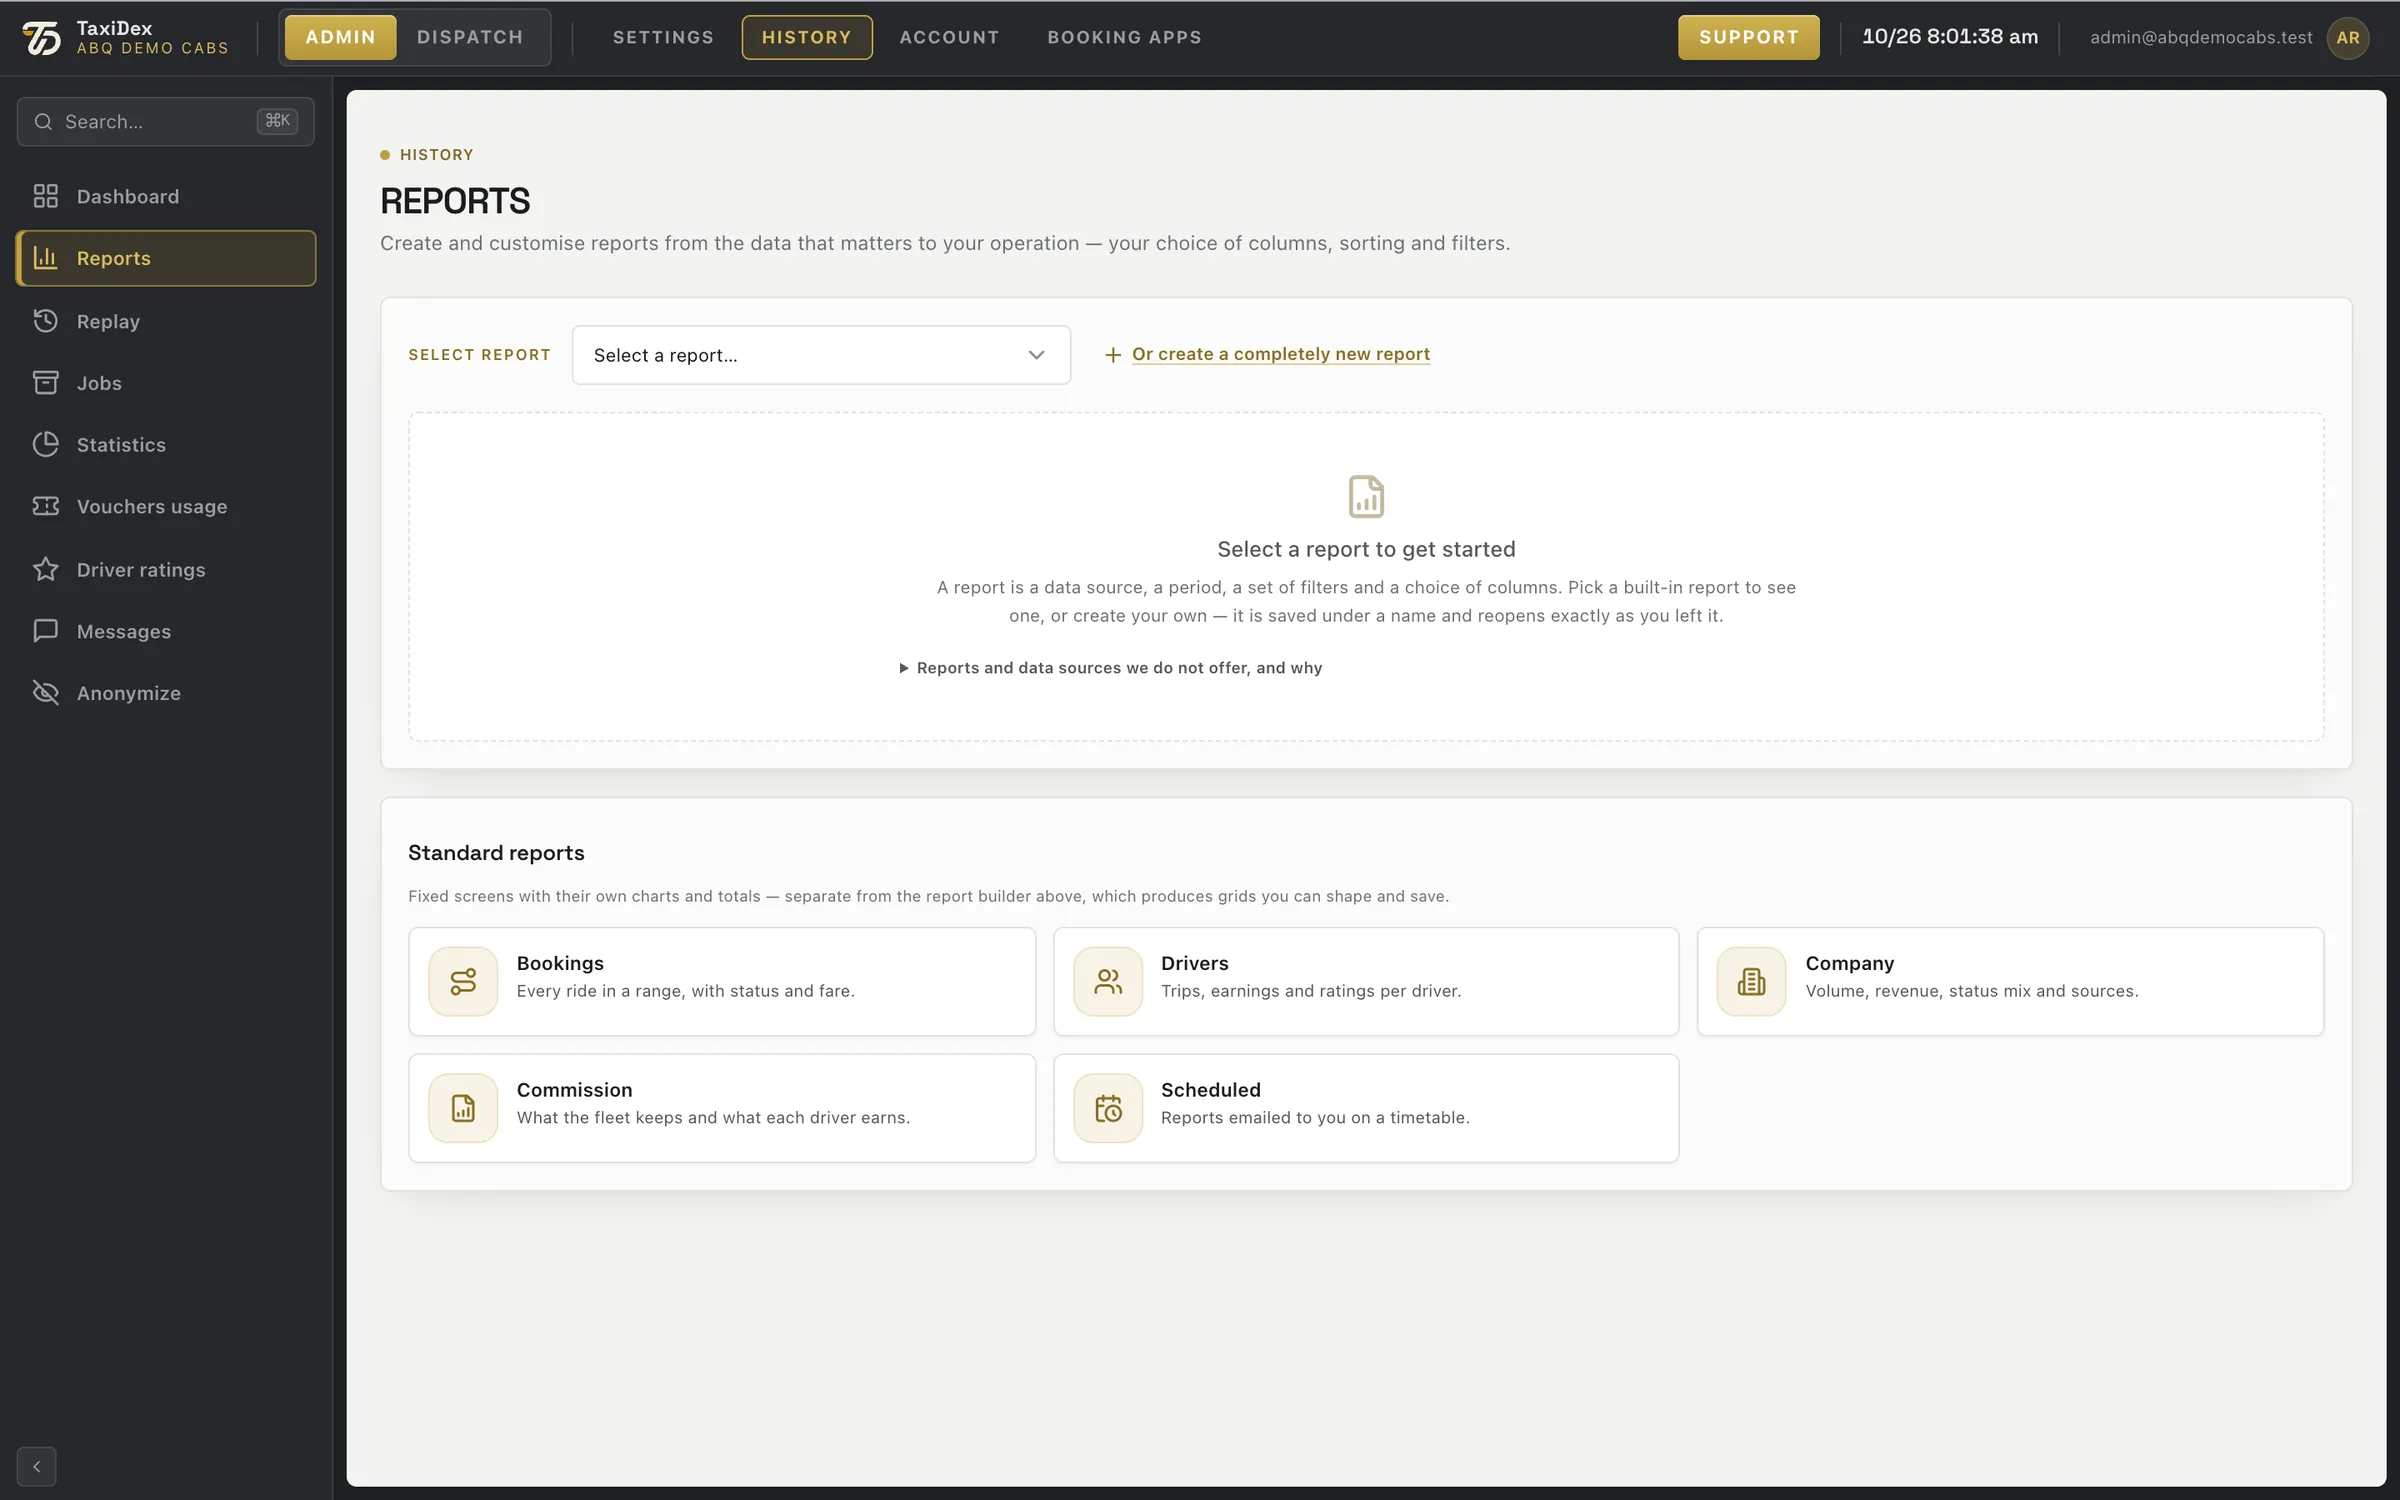
6.1 Reports
Reports has a report builder at the top and fixed standard reports below: Bookings, Drivers, Company, Commission and Scheduled. The builder picks a data source, a period, filters and columns; a saved report reopens exactly as you left it.
2Select a saved or built-in report Open a built-in or saved report.
3Create a completely new report Build your own: a data source, a period, filters and columns.
4What we do not offer, and why Reports TaxiDex does not offer, and why.
5Standard reports: Bookings · Drivers · Company · Commission · Scheduled Fixed screens with their own charts and totals.
How to
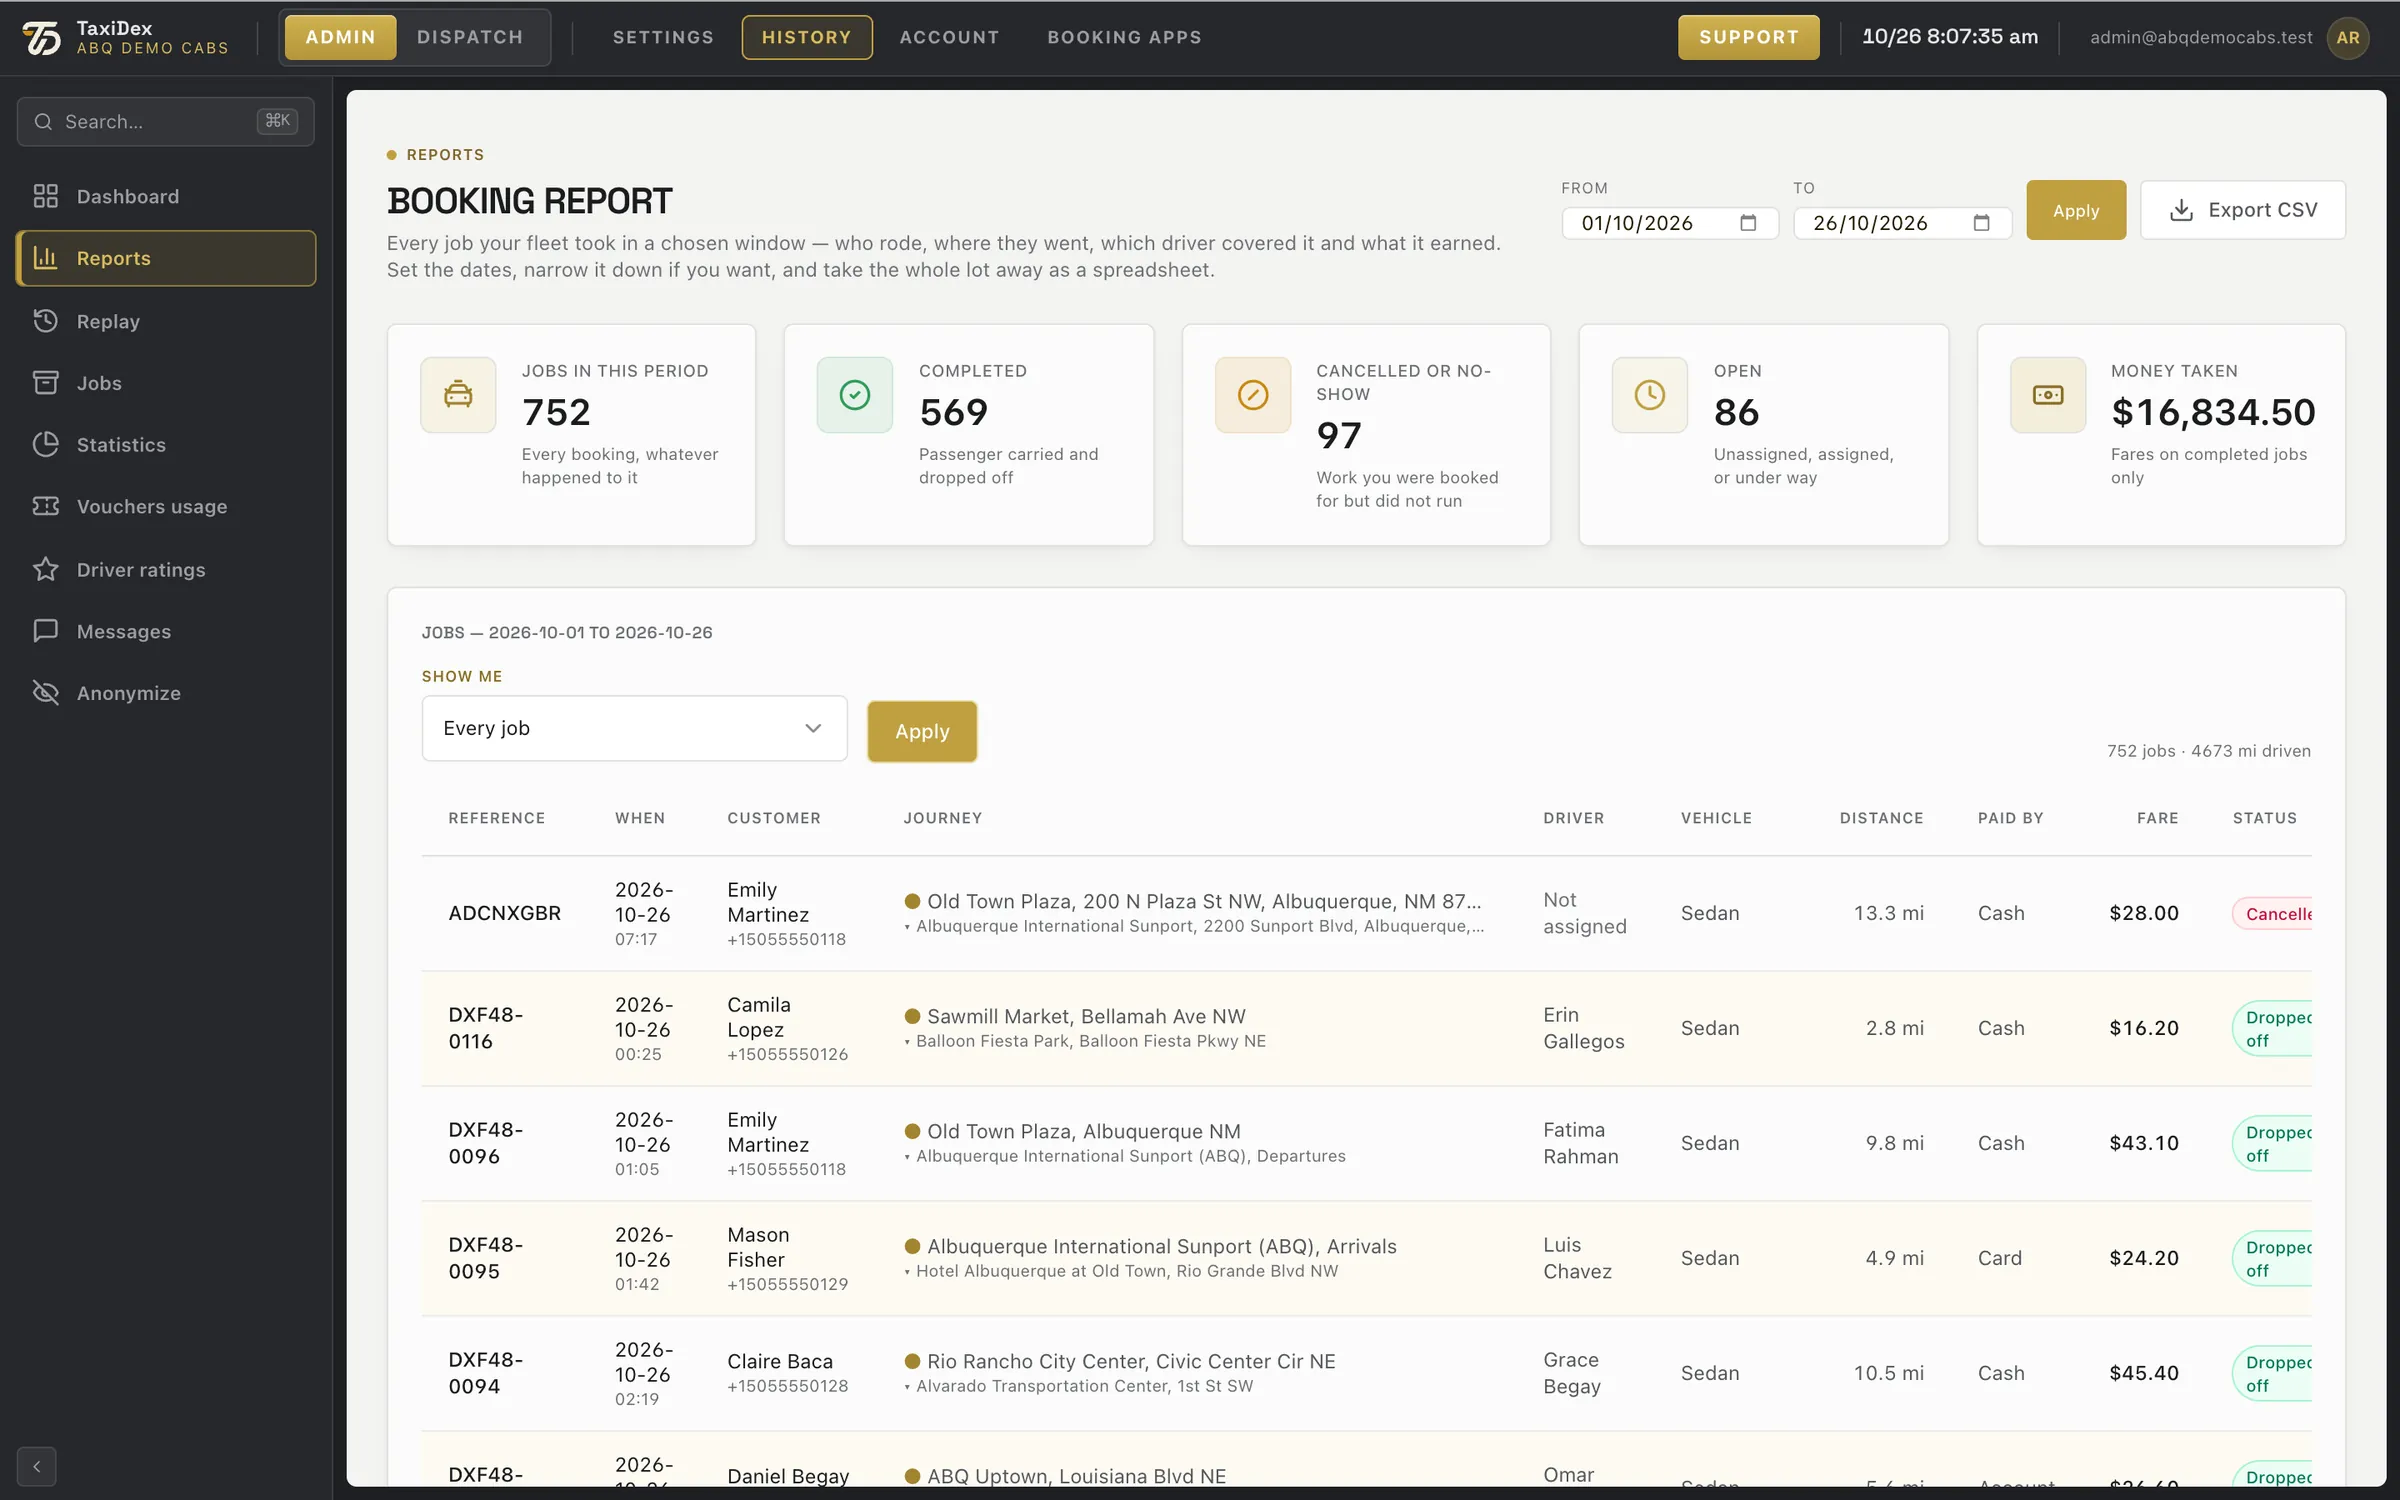
Run the bookings report
Open HISTORY ▸ Reports and click Bookings under Standard reports.
Set From and To and press Apply.
Read the totals, narrow the list with Show me, and press Export CSV for a spreadsheet.
The Bookings report, 1 to 26 October. Date boxes follow the computer's own date format.
Click a number or a line to spotlight it
1From · To dates The window the report covers.
2Apply Refresh for the dates.
3Export CSV Take the whole list away as a spreadsheet.
4Totals for the period Jobs, completed, cancelled or no-show, still open, and money taken on completed jobs ($16,834.50 here).
5Show me: filter the list Every job, or only some.
6Jobs count and miles driven How many jobs and miles.
7One row per job: reference, time, customer, journey, driver, fare, status Reference, time, customer, journey, driver, vehicle, distance, payment, fare and status.
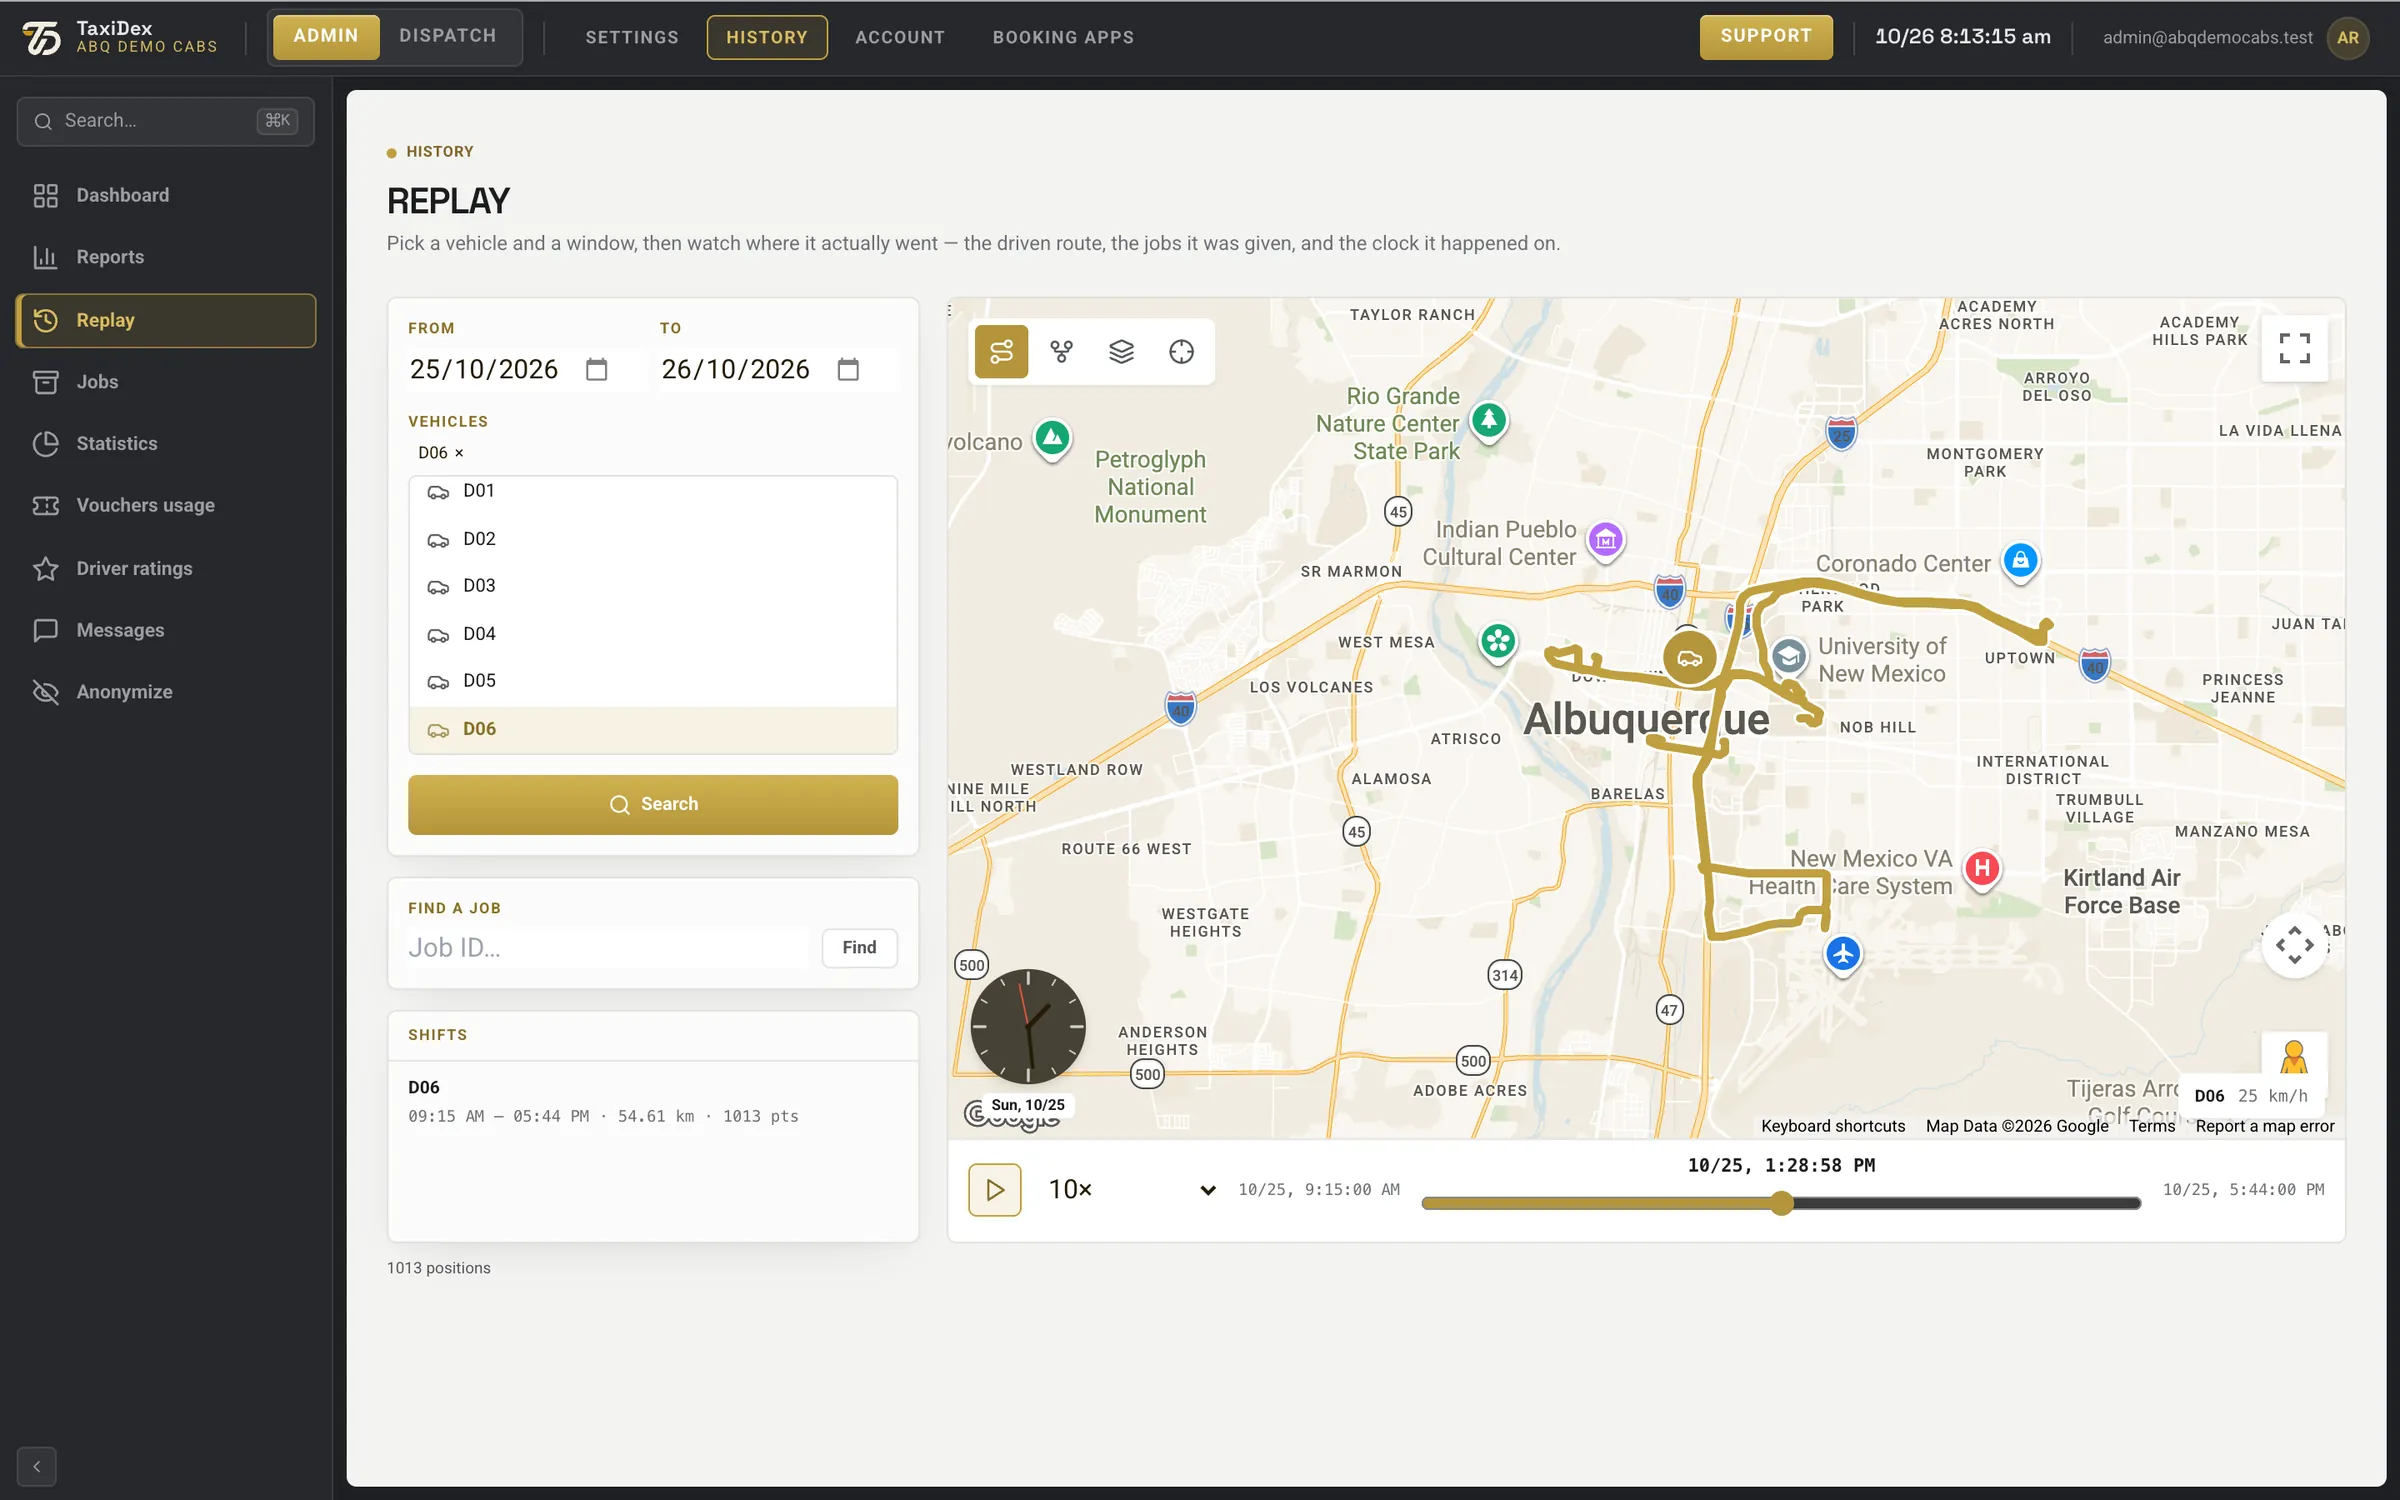
6.2 Replay
Replay shows where a car actually went: pick a vehicle and a window, load a shift and play it back. The map opens on your own area. In the example, car D06 drove four jobs between the Sunport, Old Town, the University area and Uptown.
Replay with one car's shift loaded. Date boxes follow the computer's own date format.
Click a number or a line to spotlight it
1From · To The dates to replay.
2Vehicles: pick one or more Pick one or more vehicles (D06 here).
3Search Finds their shifts in that window.
4Find a job by its ID Jump to one job by its number.
5Shifts found — click one to load it Click a shift to load it: 9:15 AM – 5:44 PM here.
6Map layers: routes · planned route · zones · focus vehicle Show routes, the planned route, zones, and follow the car.
7The car and its driven route Where the car drove, and where it is at the moment shown.
8Clock and date at the replay moment The time the replay is showing.
9Play · speed Play at 1× up to 1000×, or backwards.
10Time slider (scrub) Drag to any moment.
11Positions loaded (from the driver app) Replay uses the positions the driver app sends during a shift, plus the bookings.
How to
Replay a car's shift
Open HISTORY ▸ Replay and set From and To.
Click one or more vehicles and press Search.
Click a shift in the list, then press play or drag the time slider.
6.3 Statistics
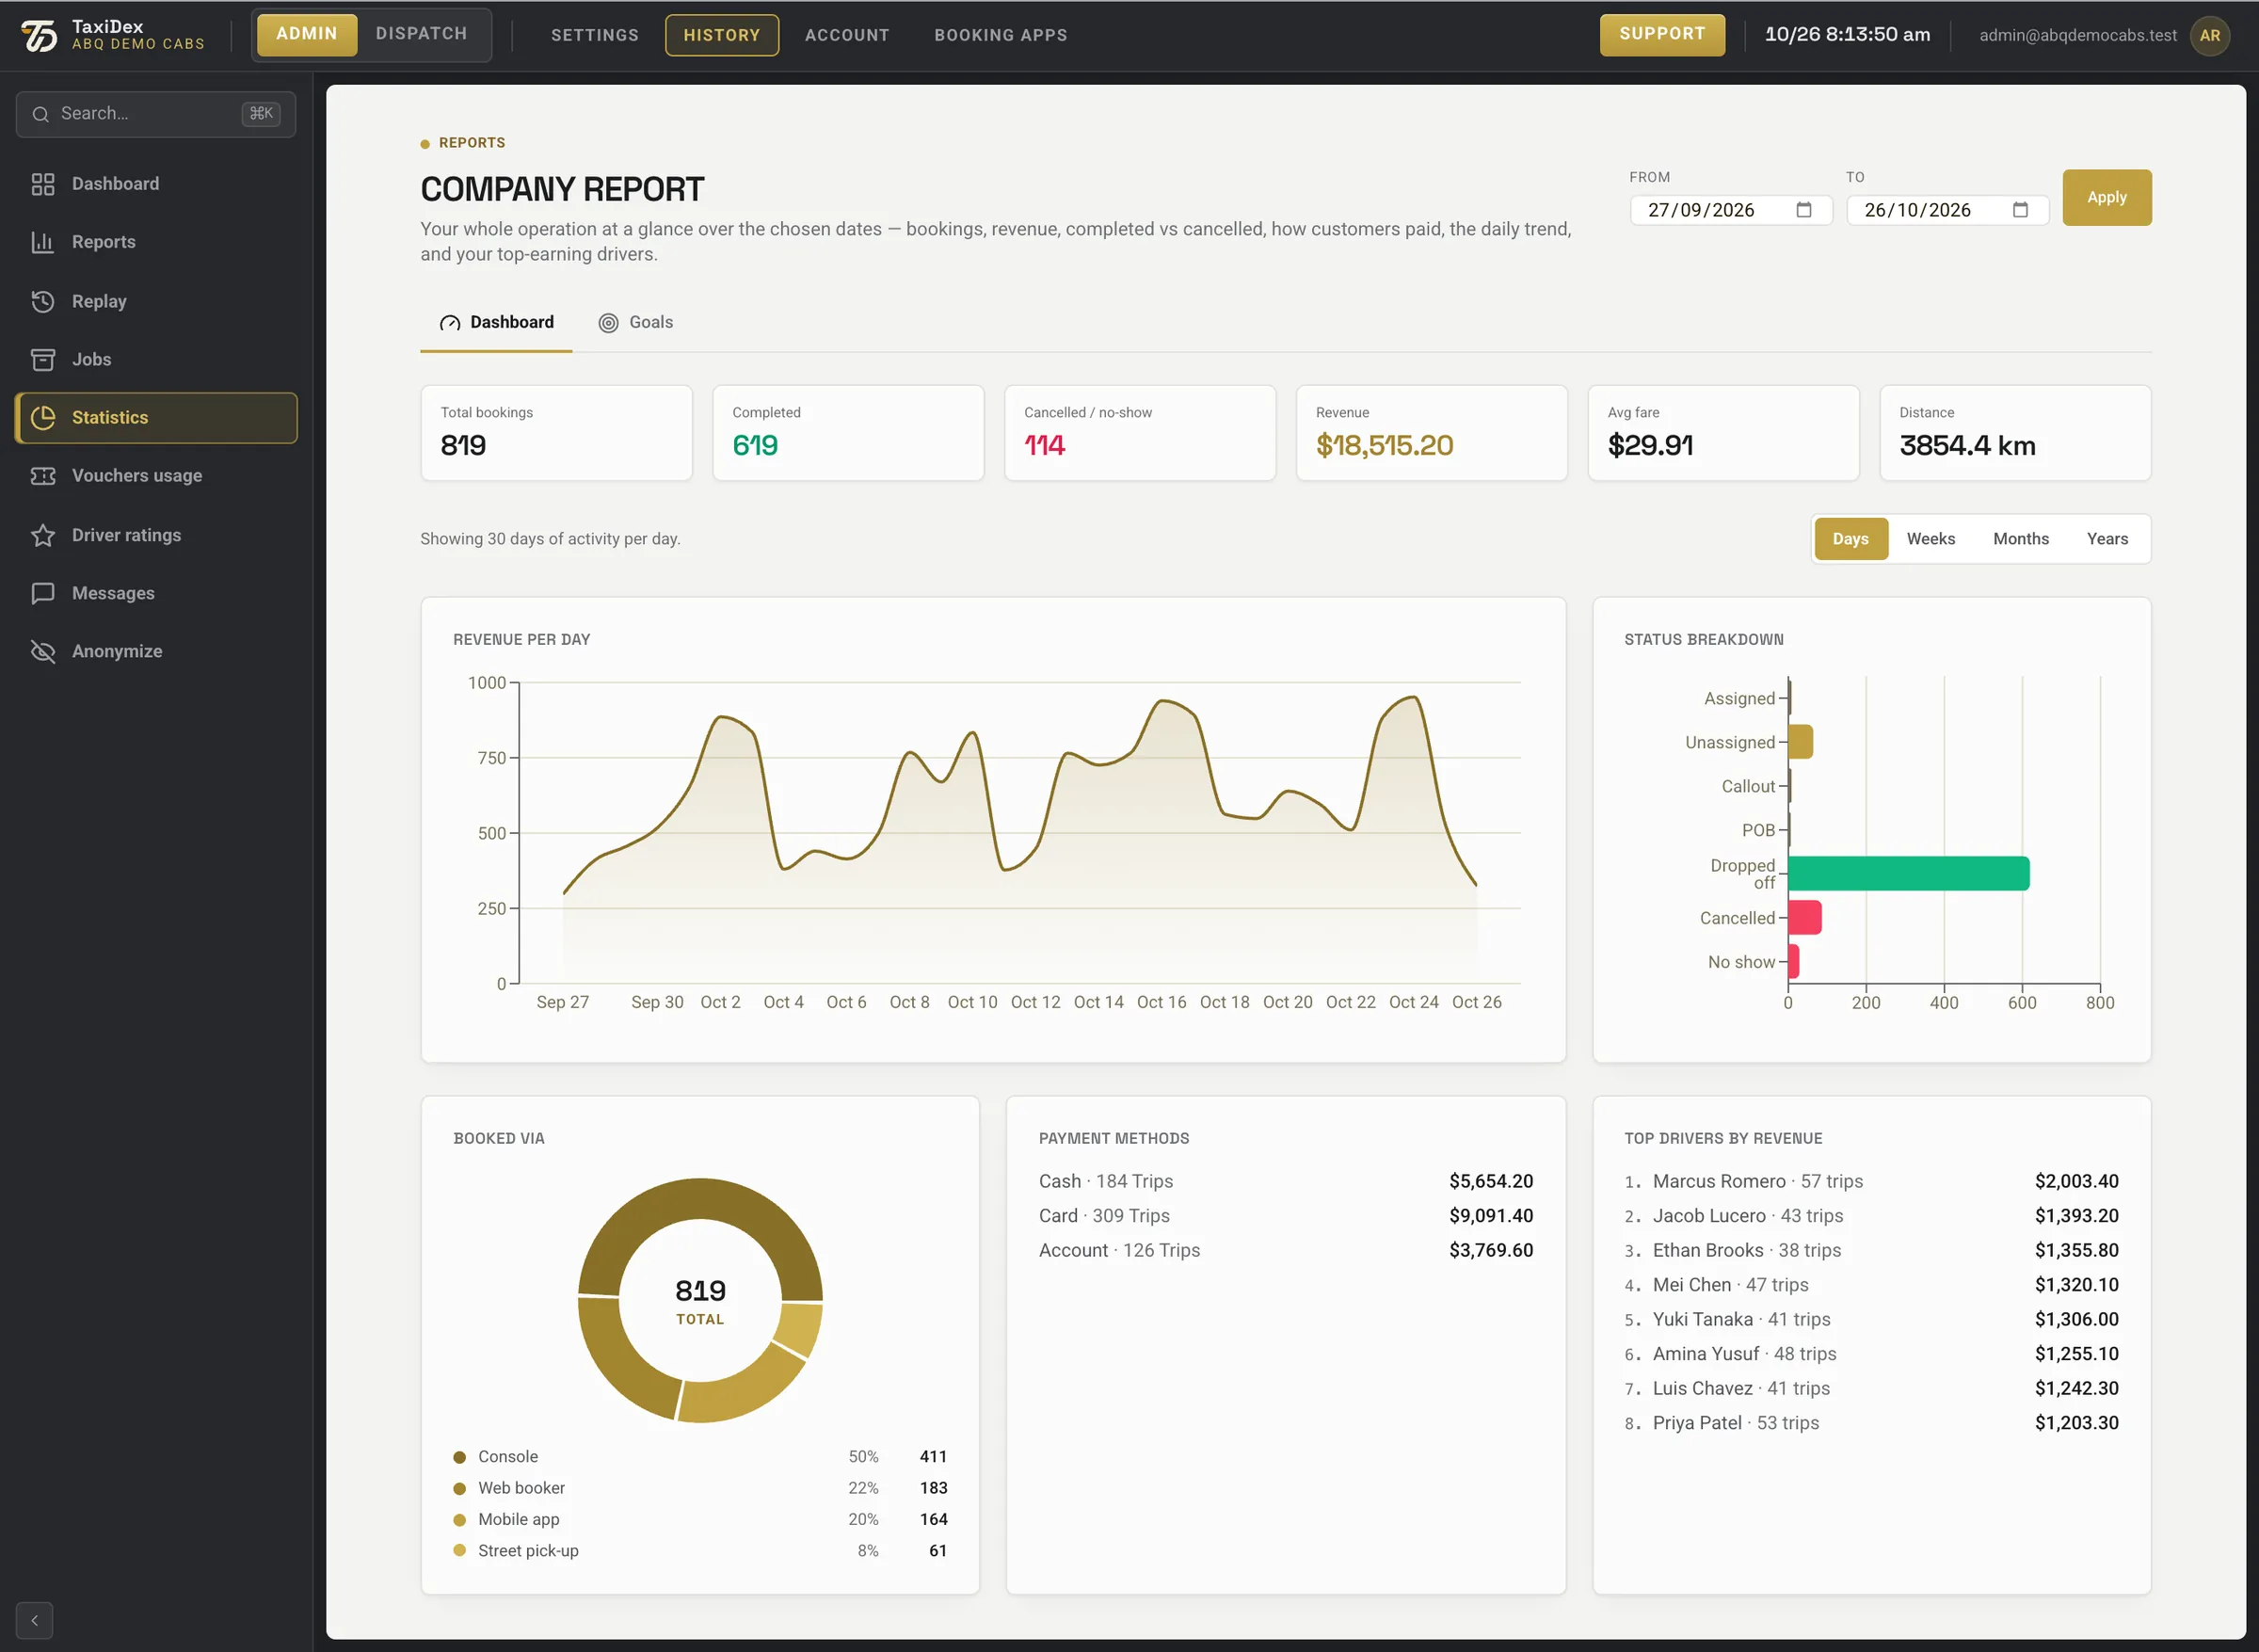
Statistics opens the company report: bookings, revenue, completed against cancelled, how customers paid, where bookings came from, the daily trend and your top drivers.
Statistics: the company report. Date boxes follow the computer's own date format.
Click a number or a line to spotlight it
1From · To · Apply Pick the dates and apply.
2Dashboard · Goals Totals, or progress against your goals.
3Totals: bookings, completed, cancelled, revenue, average fare, distance Bookings, completed, cancelled or no-show, revenue, average fare and distance.
4Group by Days · Weeks · Months · Years Group the chart by days, weeks, months or years.
5Revenue trend Revenue over time.
6Status breakdown How jobs ended.
7Booked via (source) Console, Web booker, Mobile app, Street pick-up.
8Payment methods Cash, Card and Account, with trips and amounts.
9Top drivers by revenue Who earned the most.
6.4 Driver ratings and the other History pages
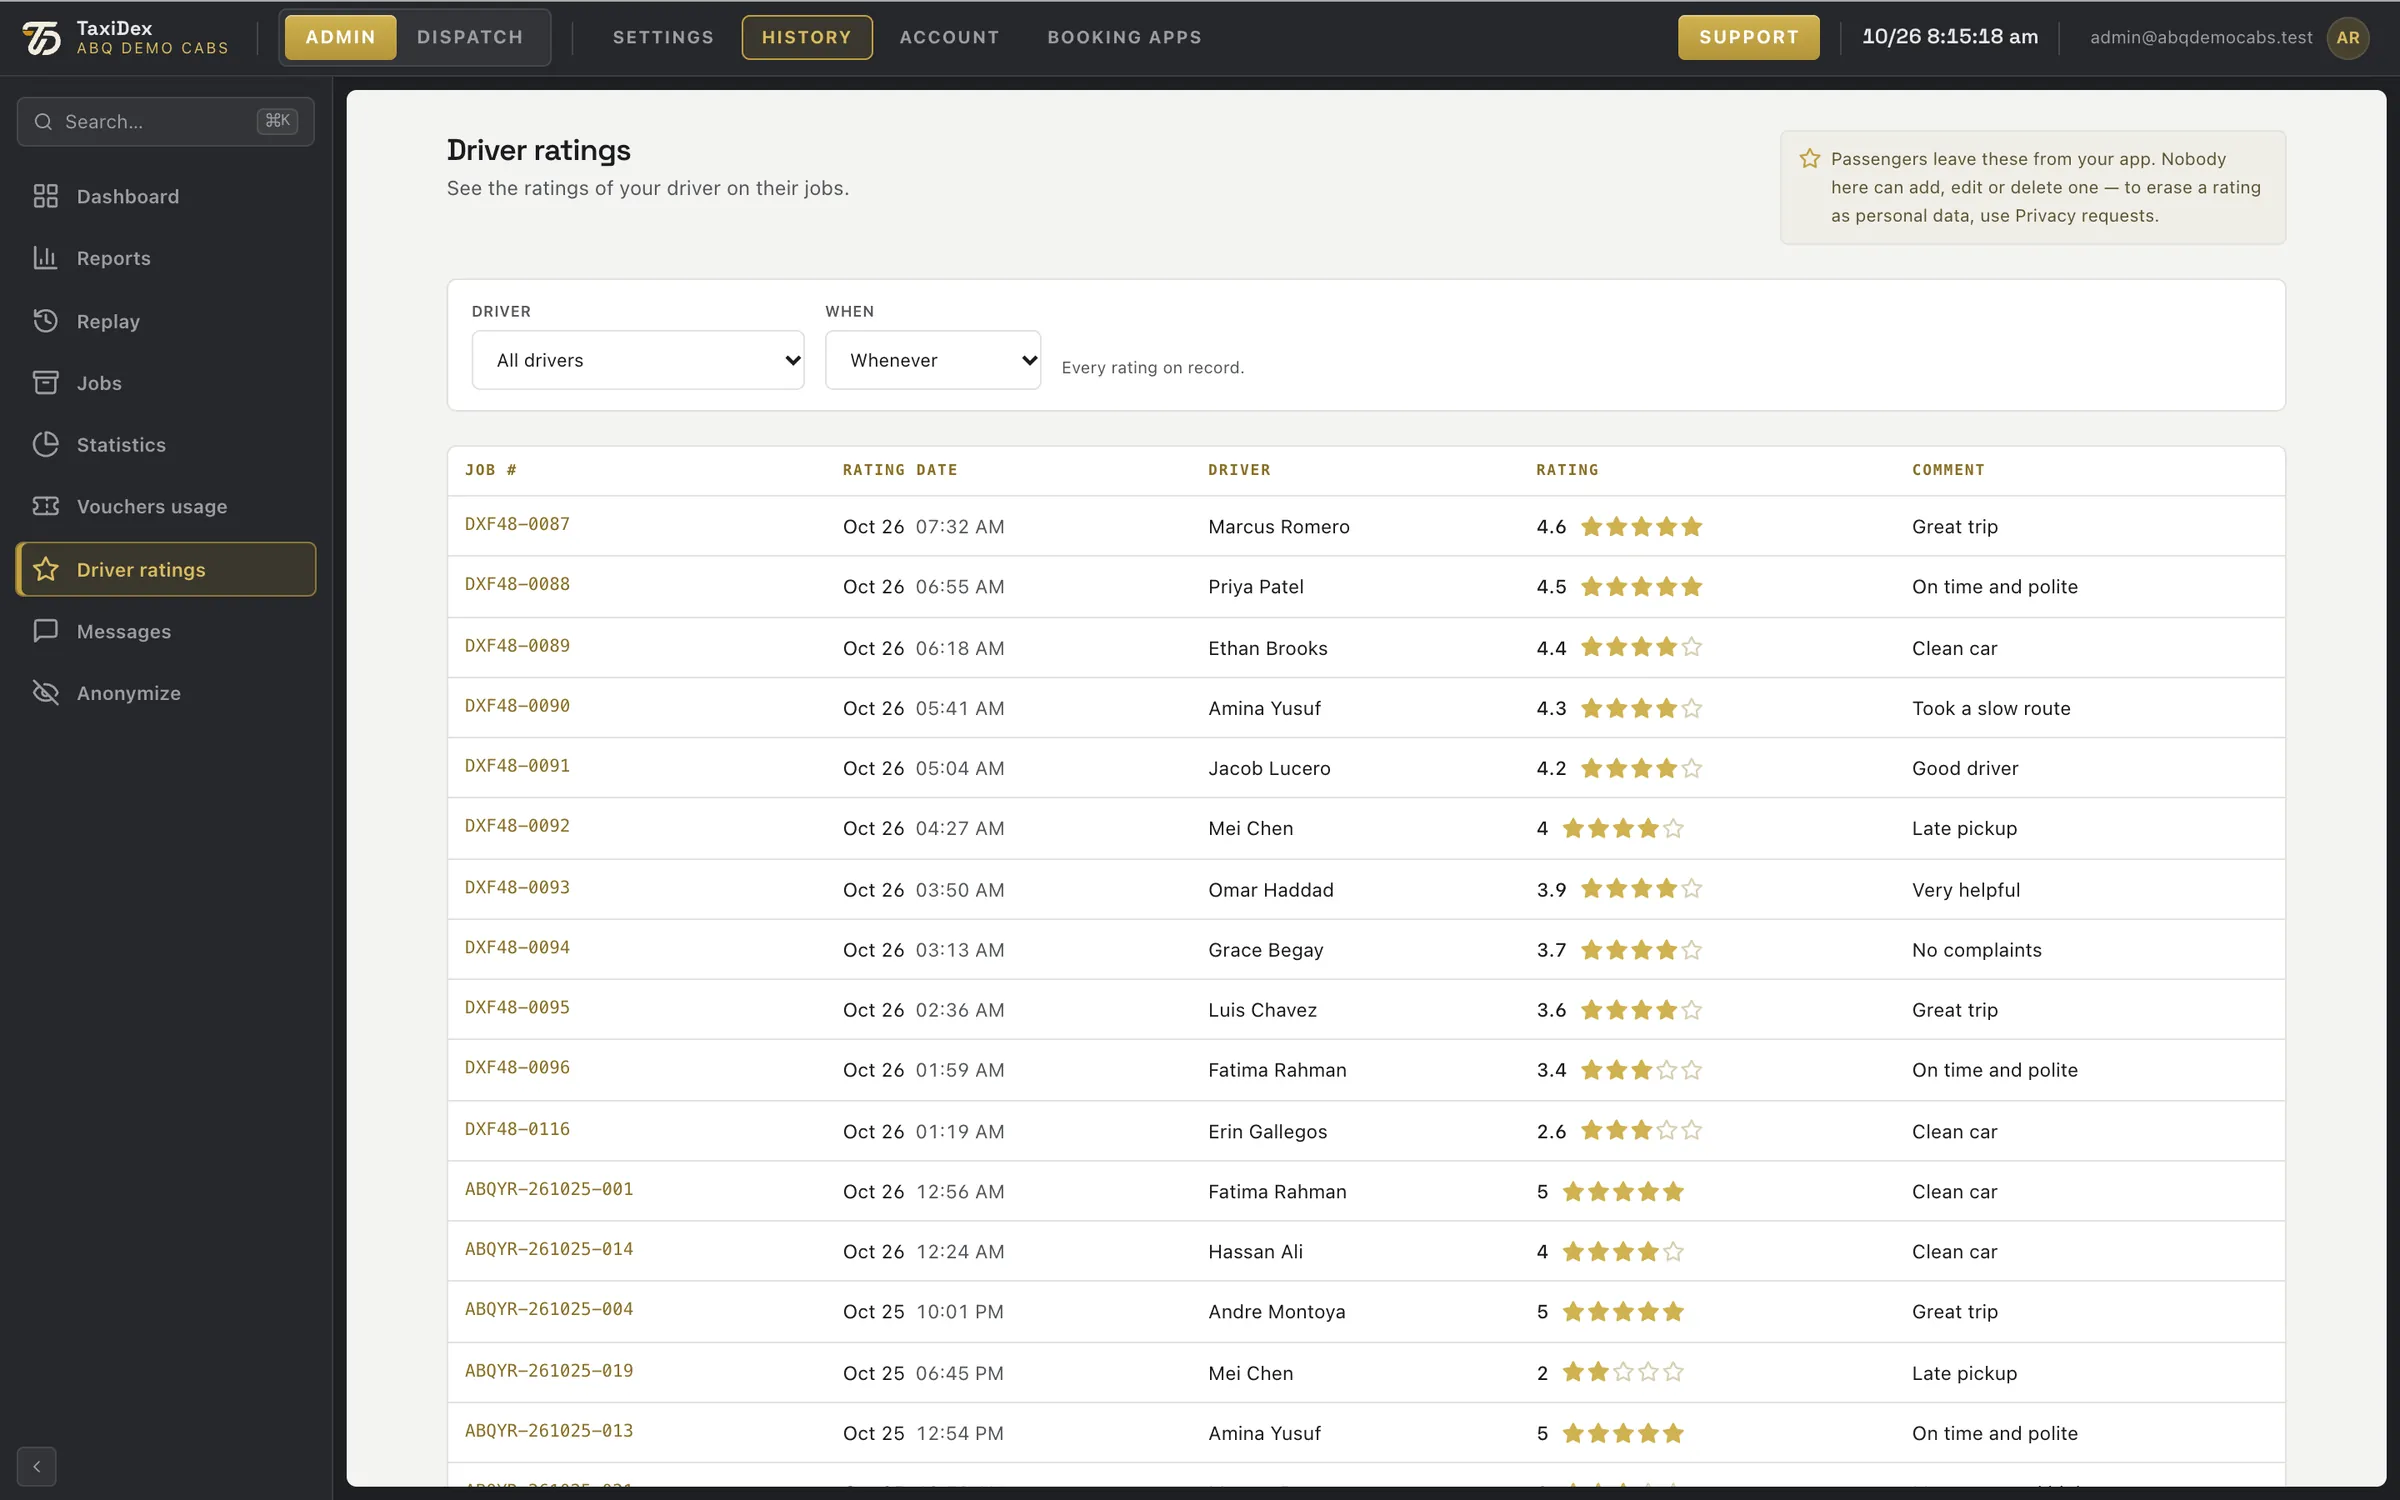
Driver ratings lists the stars and comments passengers left after their rides. Jobs opens the bookings list filtered to completed jobs. Vouchers usage shows redeemed vouchers, Messages is the log of messages, and Anonymize handles privacy requests that erase a person's data.
Driver ratings.
Click a number or a line to spotlight it
1Driver filter One driver or all.
2When: whenever · before · after · between Whenever, before, after or between dates.
3Ratings cannot be edited here (privacy note) Ratings come from passengers. Nobody in the office can add, edit or delete one.
4Job number The job that was rated.
5Date · driver When and which driver.
6Stars and comment 1 to 5 stars and the passenger's comment.
07
Chapter 7 · 3 screens · 2 how-tos
Account
WhereADMIN ▸ ACCOUNT
Your TaxiDex plan, what it costs, your invoices, and the passengers you no longer take bookings from.
7.1 Your plan
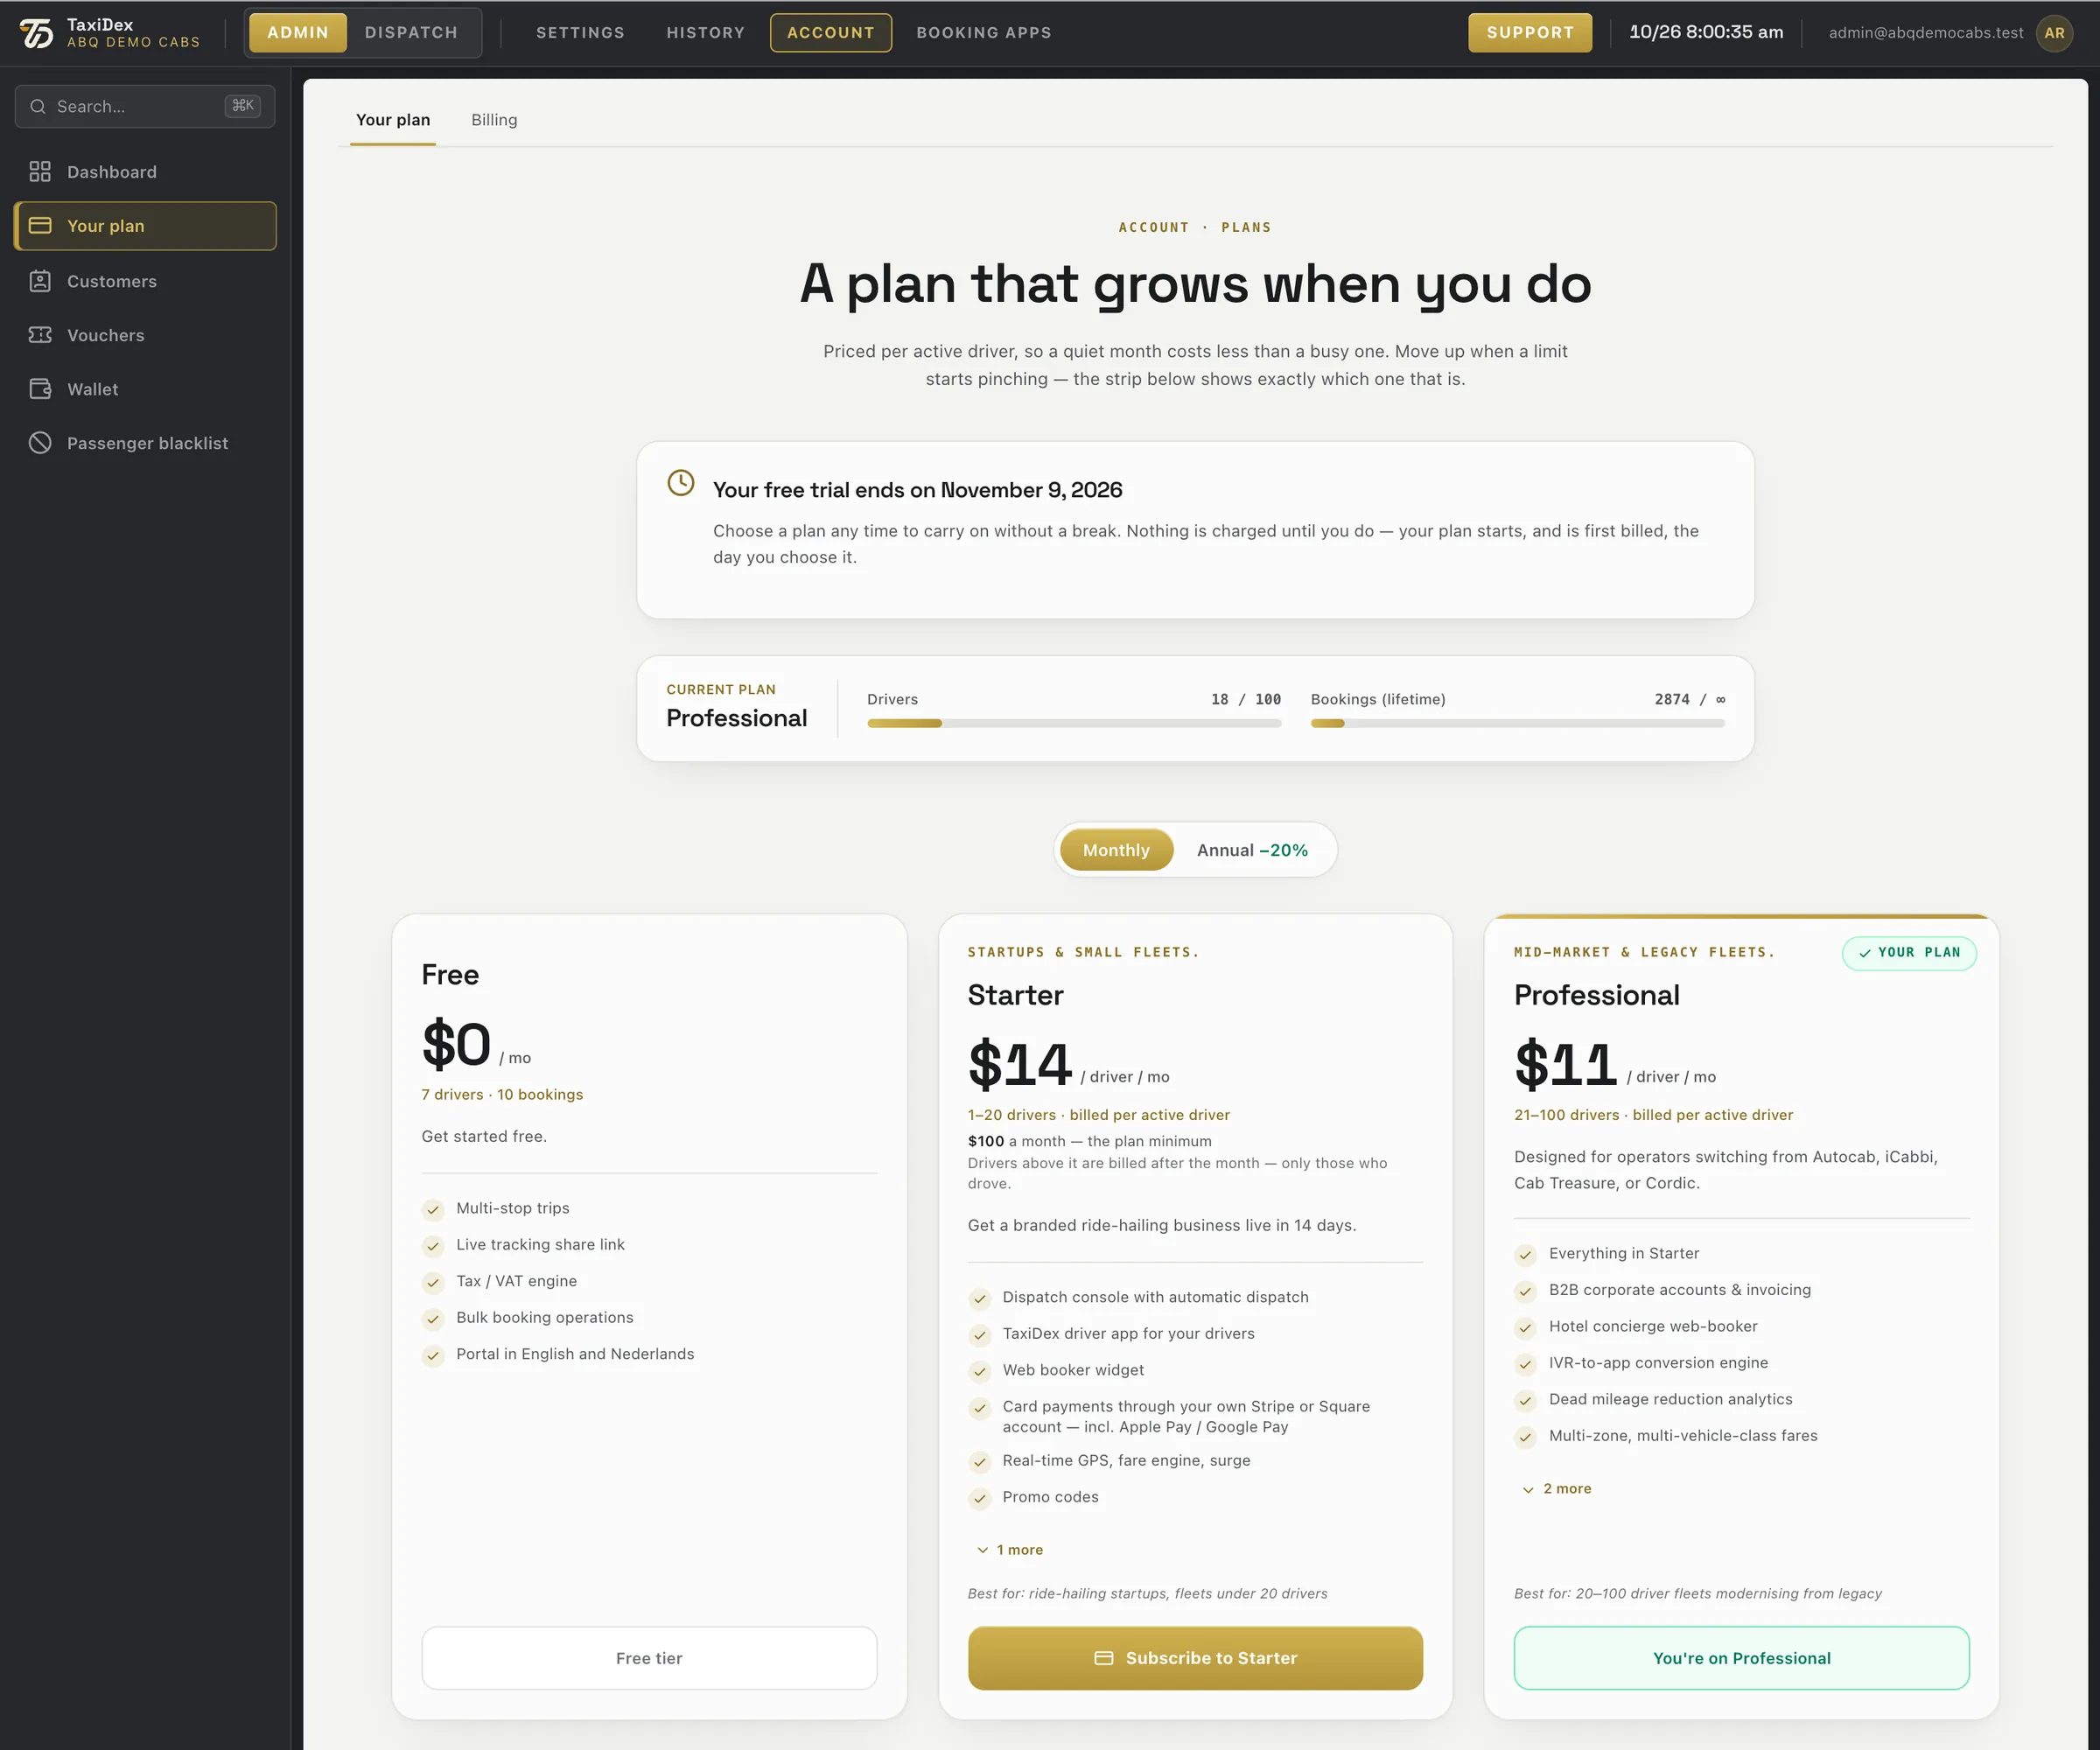
A new fleet starts on a free trial. Plans are priced per active driver, so a quiet month costs less than a busy one: Free, Starter ($14 a driver a month), Professional ($11) and Enterprise (from $9), with 20% off when you pay yearly. The usage strip shows which limit you are closest to. The Account menu also holds Customers, Vouchers, Wallet and the Passenger blacklist.
ACCOUNT ▸ Your plan.
Click a number or a line to spotlight it
1Account menu: Your plan · Customers · Vouchers · Wallet · Passenger blacklist Your plan, customers, vouchers, wallet and the passenger blacklist.
2Your plan · Billing Your plan and its usage, and Billing.
3Free trial: when it ends, nothing charged until you choose A new fleet starts on a free trial. Nothing is charged until you choose a plan.
4Current plan and usage against its limits The plan you are on and how many drivers and bookings it allows.
5Monthly · Annual (−20%) Pay monthly, or yearly for 20% less.
6Plan cards: price per active driver and limits Each plan is priced per active driver per month, with its limits and features.
7Your current plan Marks the plan you are on.
8Plan button: free tier · subscribe · your plan Free tier, Subscribe, or You're on this plan.
7.2 Billing
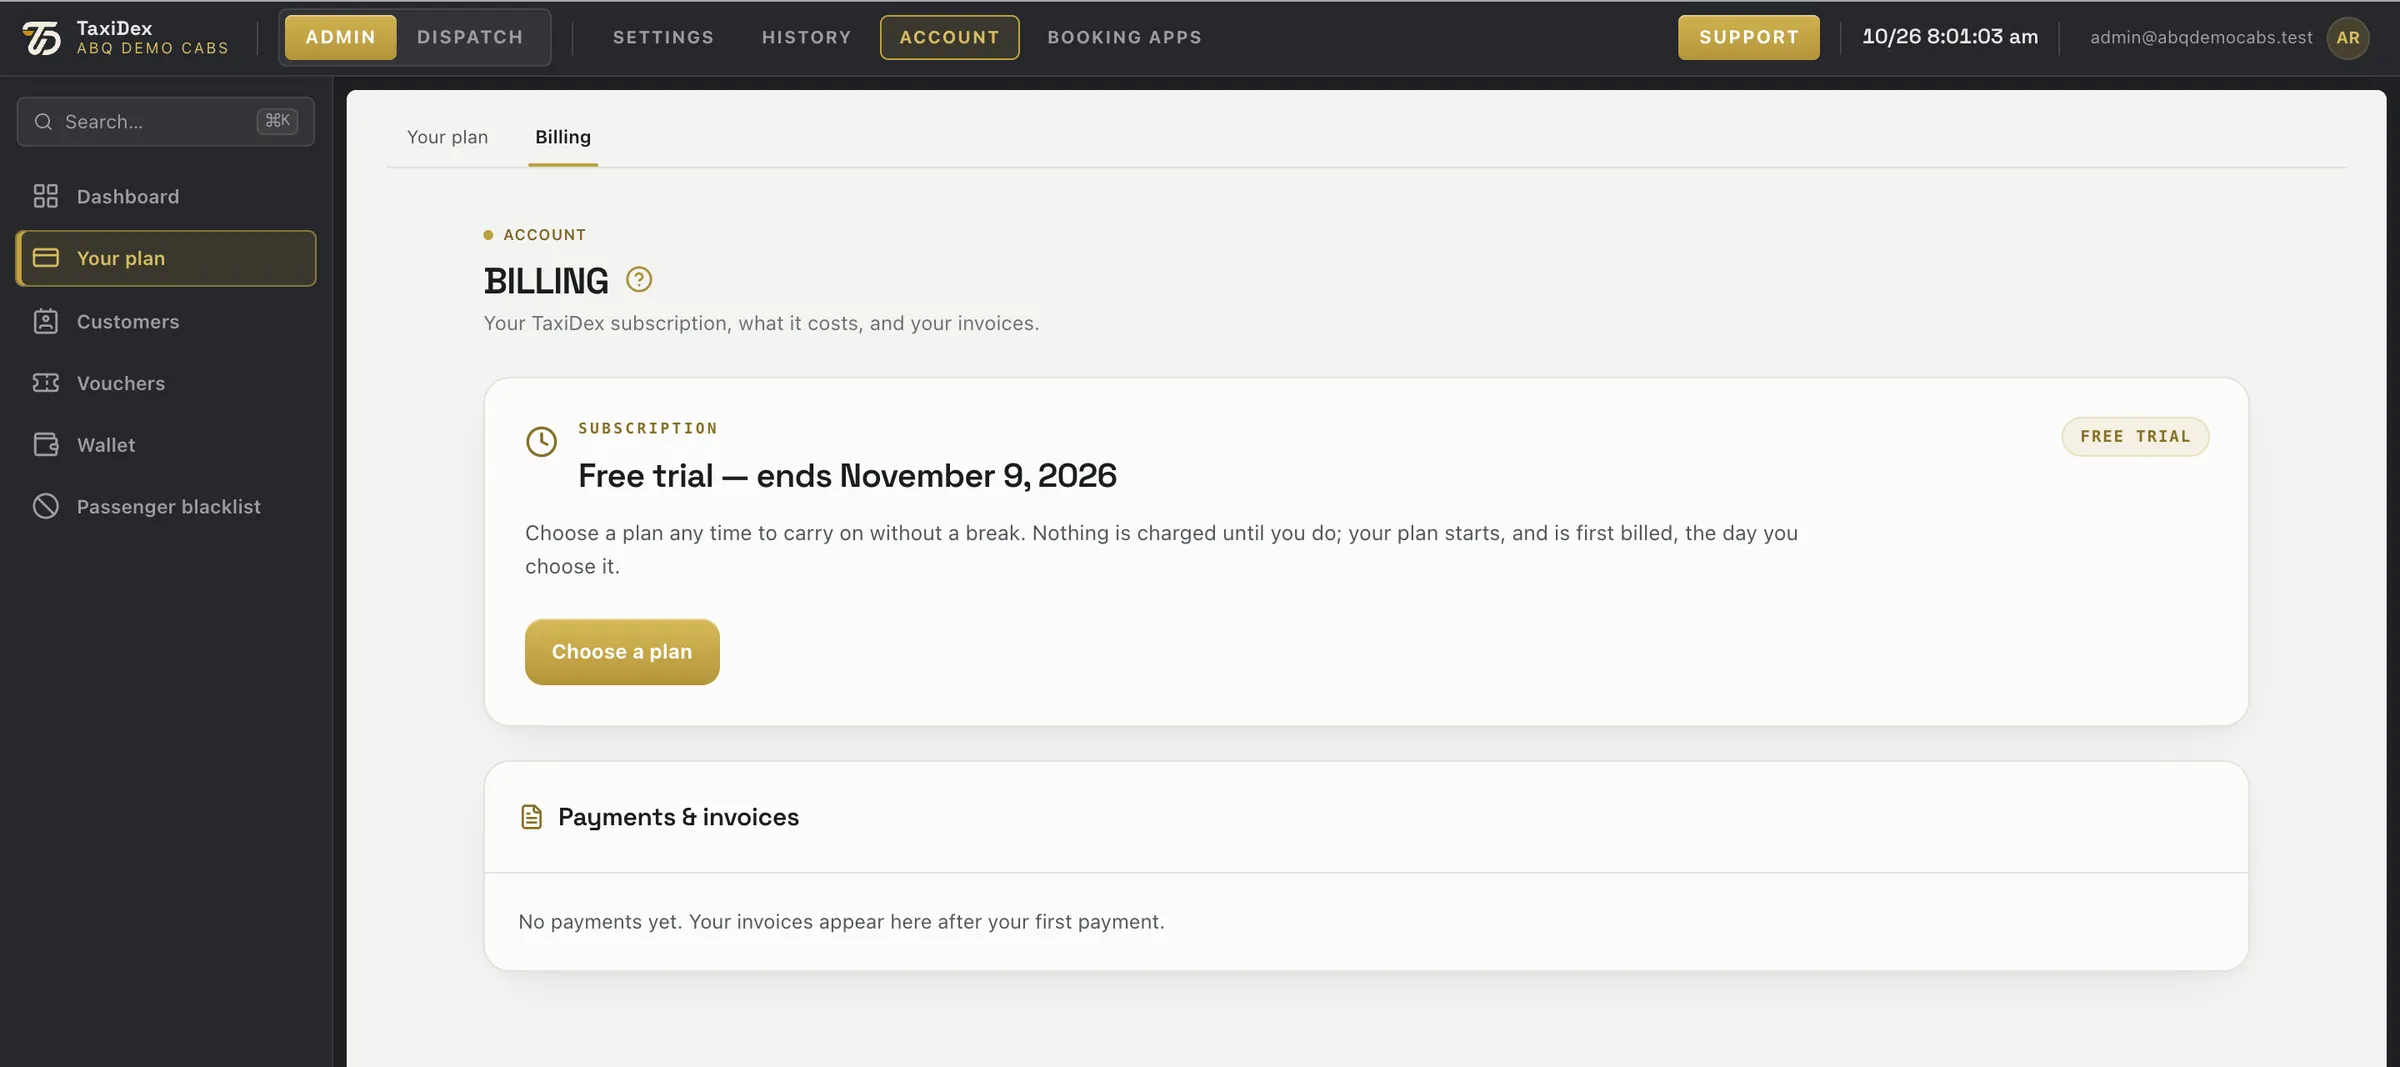
Billing shows your subscription and every payment and invoice. During the trial it shows the day the trial ends; after you subscribe it shows your plan, what you paid up front, how many drivers drove this period and when the next bill is due. Payment runs through Paddle by card.
ACCOUNT ▸ Billing, during the free trial.
Click a number or a line to spotlight it
1Help for this page Explains billing.
2Subscription: plan and status (here the free trial and its end date) Your subscription: here a free trial and the day it ends.
3Status badge Free trial, Active or Past due.
4Choose a plan Opens Your plan to subscribe.
5Payments & invoices Every payment and invoice, once you have paid.
How to
Choose a plan
Open ACCOUNT ▸ Your plan (or Choose a plan on Billing).
Pick Monthly or Annual.
Press Subscribe to … on the plan and pay by card. Your plan starts, and is first billed, that day.
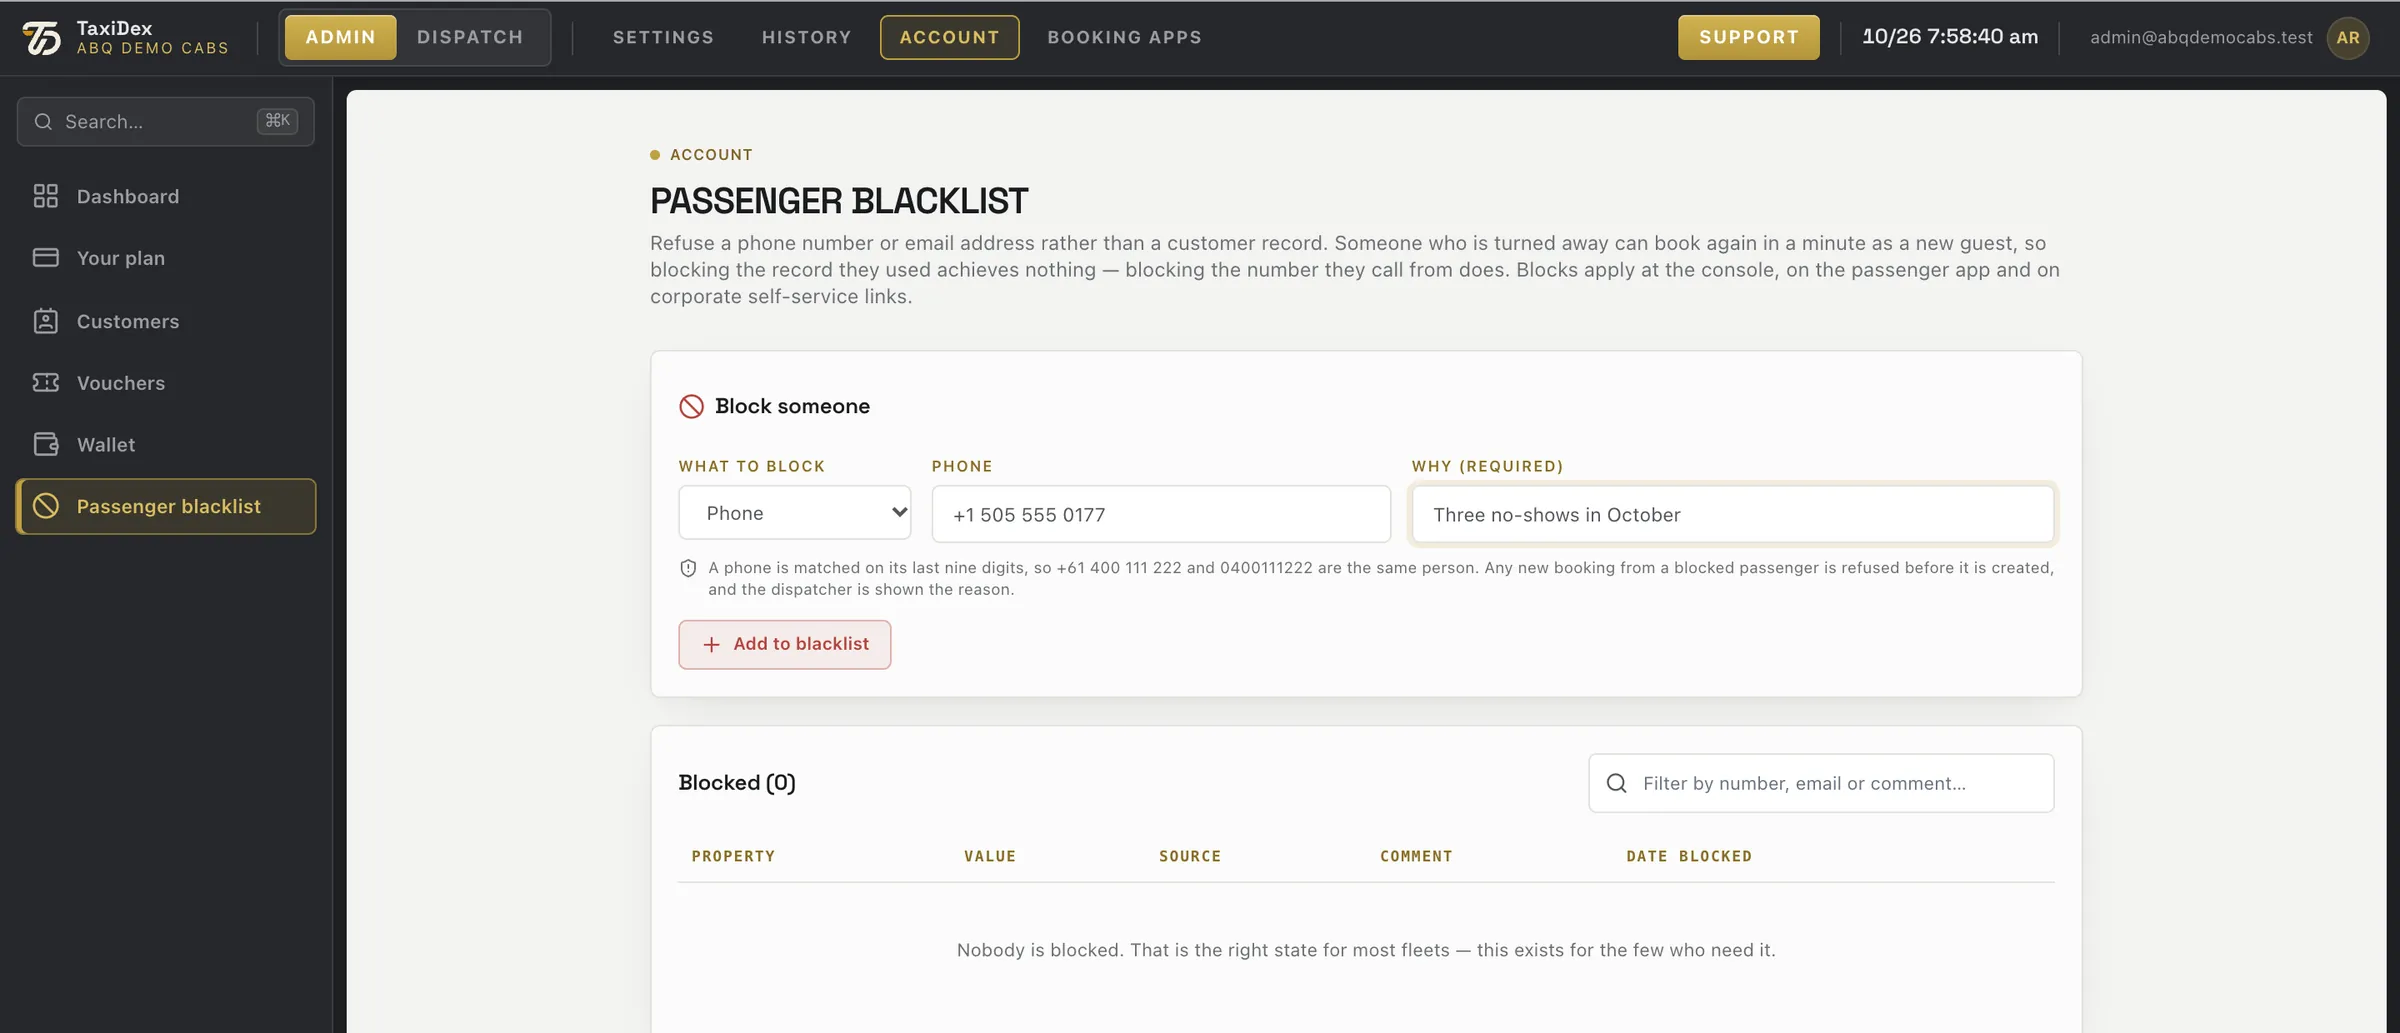
7.3 Passenger blacklist
The blacklist refuses a phone number, e-mail or address rather than a customer record, so someone who is turned away cannot simply book again as a new guest. Blocks apply in the console, the passenger app and corporate self-service links.
ACCOUNT ▸ Passenger blacklist, with an entry typed in (not added).
Click a number or a line to spotlight it
1What to block: phone · e-mail · address Block by phone, e-mail or address.
2The phone (or e-mail / address) The value to block. A phone is matched on its last nine digits, whatever the format.
3Why (required) Required, so everyone knows why.
4Add to blacklist Adds it to the list.
5Blocked list and filter Everyone blocked, with a filter.
How to
Block a passenger
Open ACCOUNT ▸ Passenger blacklist (or the rail icon in the console).
Choose Phone, Email or Address and type it.
Type the reason (required) and press Add to blacklist.
08
Chapter 8 · 6 screens · 2 how-tos
Booking apps
WhereADMIN ▸ BOOKING APPS
Ways passengers book without a dispatcher typing: your own booking website, a phone menu and a hotel reception tool.
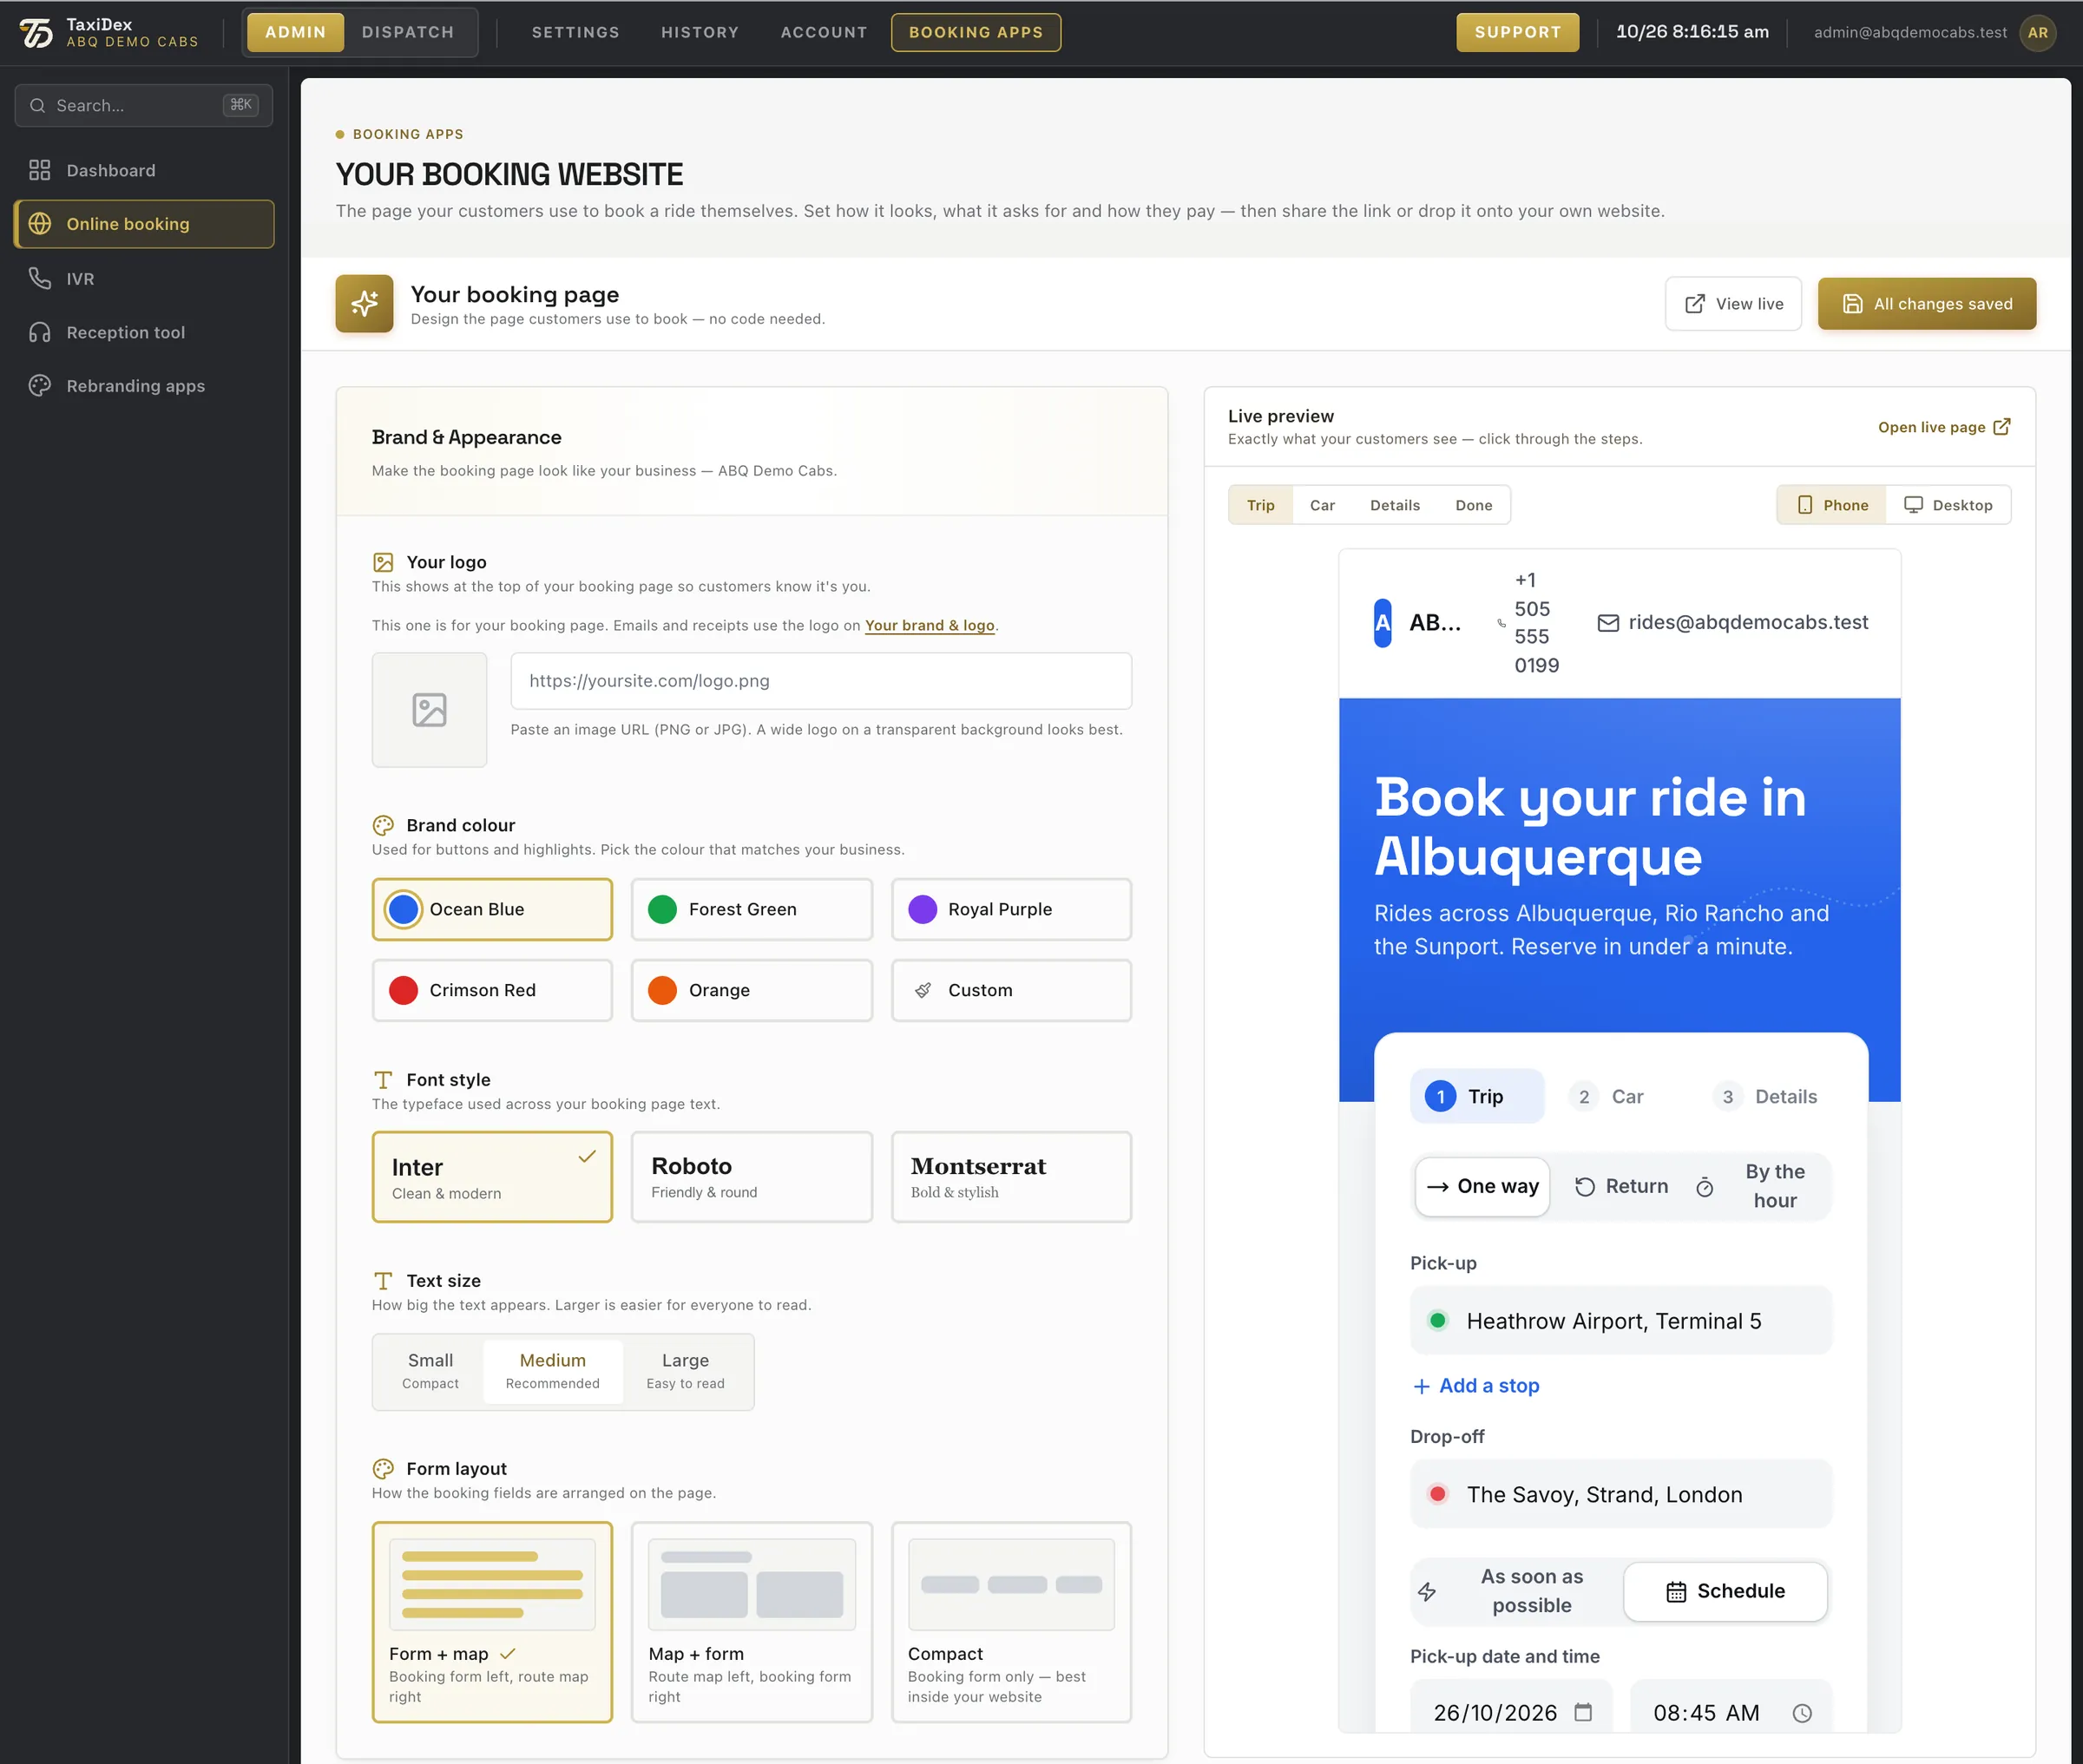
8.1 Your booking website
Online booking designs the page passengers use to book themselves: logo, colour, font, layout and the words on the page. The live preview on the right updates as you change things and prices come from your real tariffs. Share the page's link, or put it on your own website.
2View live (opens your booking page) Opens your booking page as a passenger sees it.
3Saves by itself — shows the save state Changes save by themselves; this shows when they have.
4Your logo Paste the address of your logo image.
5Brand colour Ocean Blue, Forest Green, Royal Purple, Crimson Red, Orange or your own.
6Font style Inter, Roboto or Montserrat.
7Text size Small, Medium or Large.
8Form layout Form + map, Map + form, or Compact (best inside your own website).
9Live preview of the booking form Updates as you change settings. Prices come from your real tariffs.
10Preview steps: Trip · Car · Details · Done Click through the passenger's steps.
11Phone · Desktop preview See it as on a phone or a computer.
12Open the live page Opens the live page in a new tab.
How to
Set up your booking page
Open BOOKING APPS ▸ Online booking.
Paste your logo address and pick a brand colour, font, text size and form layout.
Scroll down to Words & messaging and set the headline, button label, thank-you message and support contact.
Changes save by themselves. Press View live to see the page as a passenger does.
8.2 How a passenger books
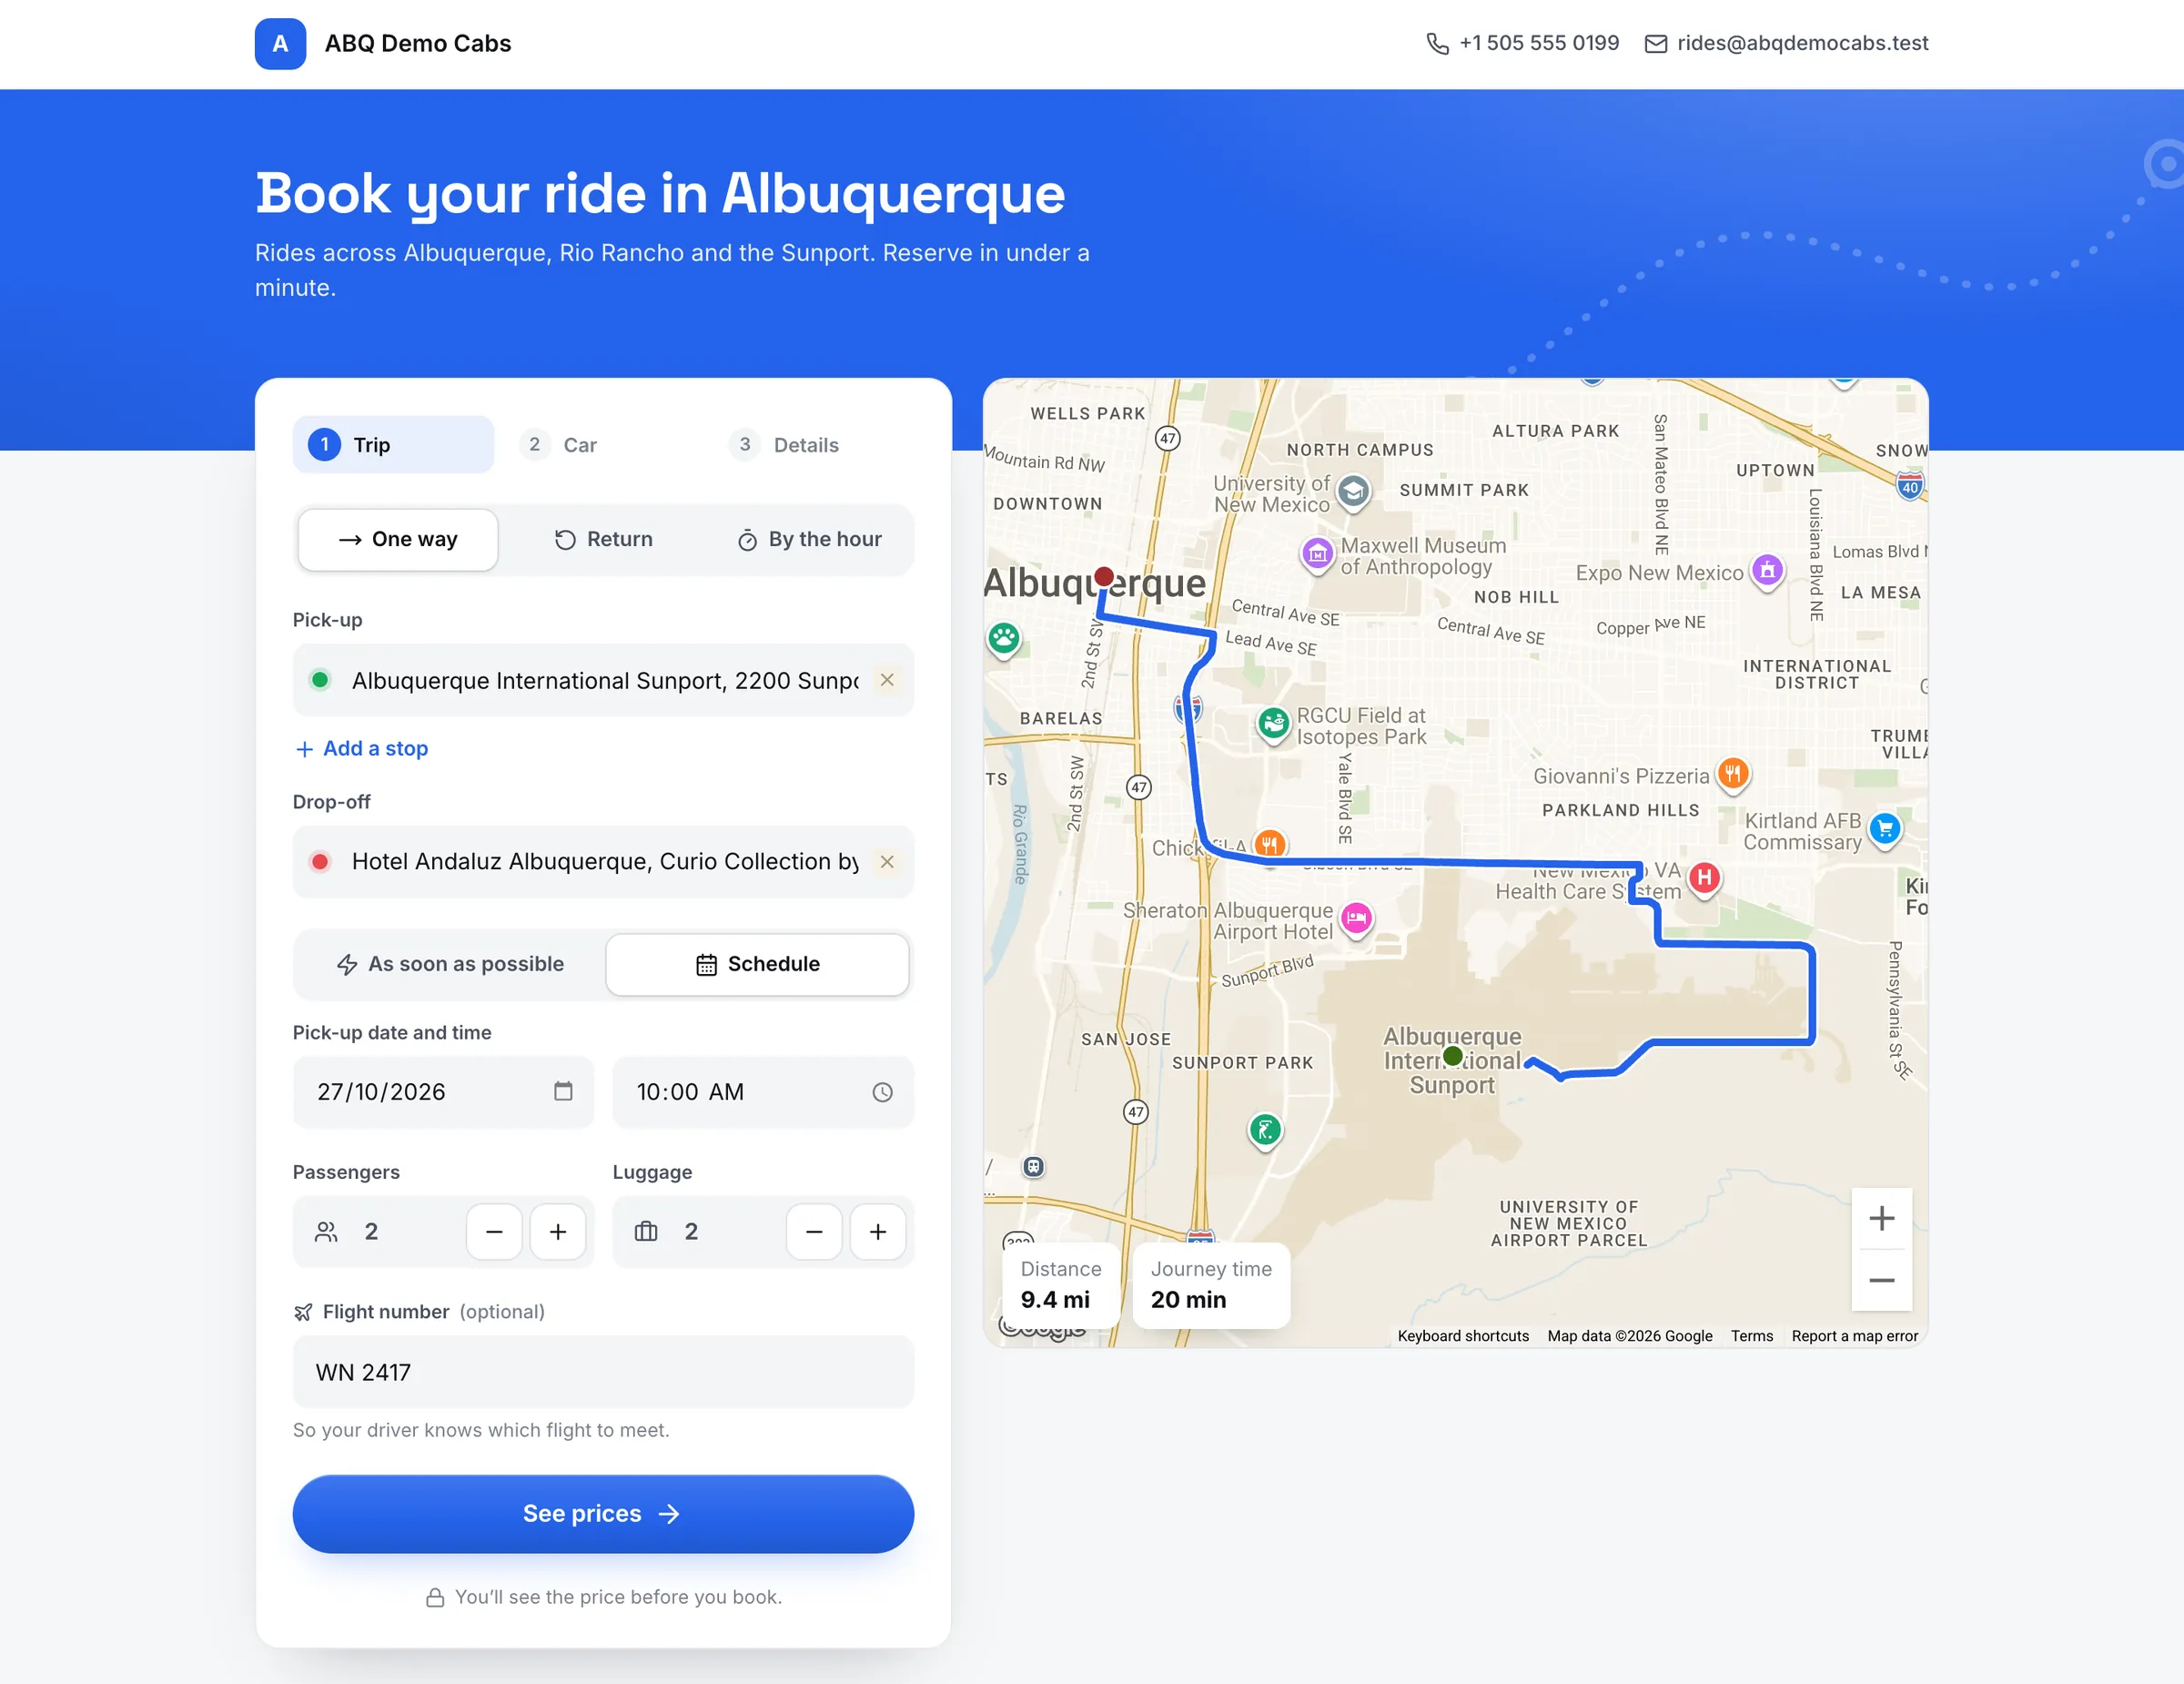
This is the passenger's side, run end to end as a test: from the Albuquerque Sunport to Hotel Andaluz downtown, for 27 October at 10:00 AM. The page priced the Sedan at $25.00, the Sunport → Downtown flat price, and the job arrived in the console as an unassigned job with source Web.
The booking page, step 1: Trip. Date boxes follow the computer's own date format.
Click a number or a line to spotlight it
1Three steps: Trip → Car → Details Trip, Car, Details: the passenger's three steps.
2One way · Return · By the hour A single trip, a return, or a car by the hour.
3Pick-up (address, airport, hotel or station) Type, then pick from the list: an address, airport, hotel or station.
4Add a stop Adds a stop on the way.
5Drop-off Where the trip ends.
6As soon as possible · Schedule Now, or a time later.
7Pick-up date · time When to be picked up.
8Passengers · Luggage How many people and bags.
9Flight number (airport pick-ups) Asked for pick-ups at the airport, so the driver can follow the flight.
10Route, distance and journey time The route, 9.4 mi and 20 min, drawn as soon as both addresses are in.
11See prices Goes to the prices.
How to
What the passenger does
Chooses One way, Return or By the hour, then types the pick-up and drop-off and picks each from the list. The route, distance and time appear on the map.
Chooses As soon as possible or Schedule, sets the date and time, passengers and luggage (and a flight number for airport pick-ups), then presses See prices.
Taps a car type and presses Continue with ….
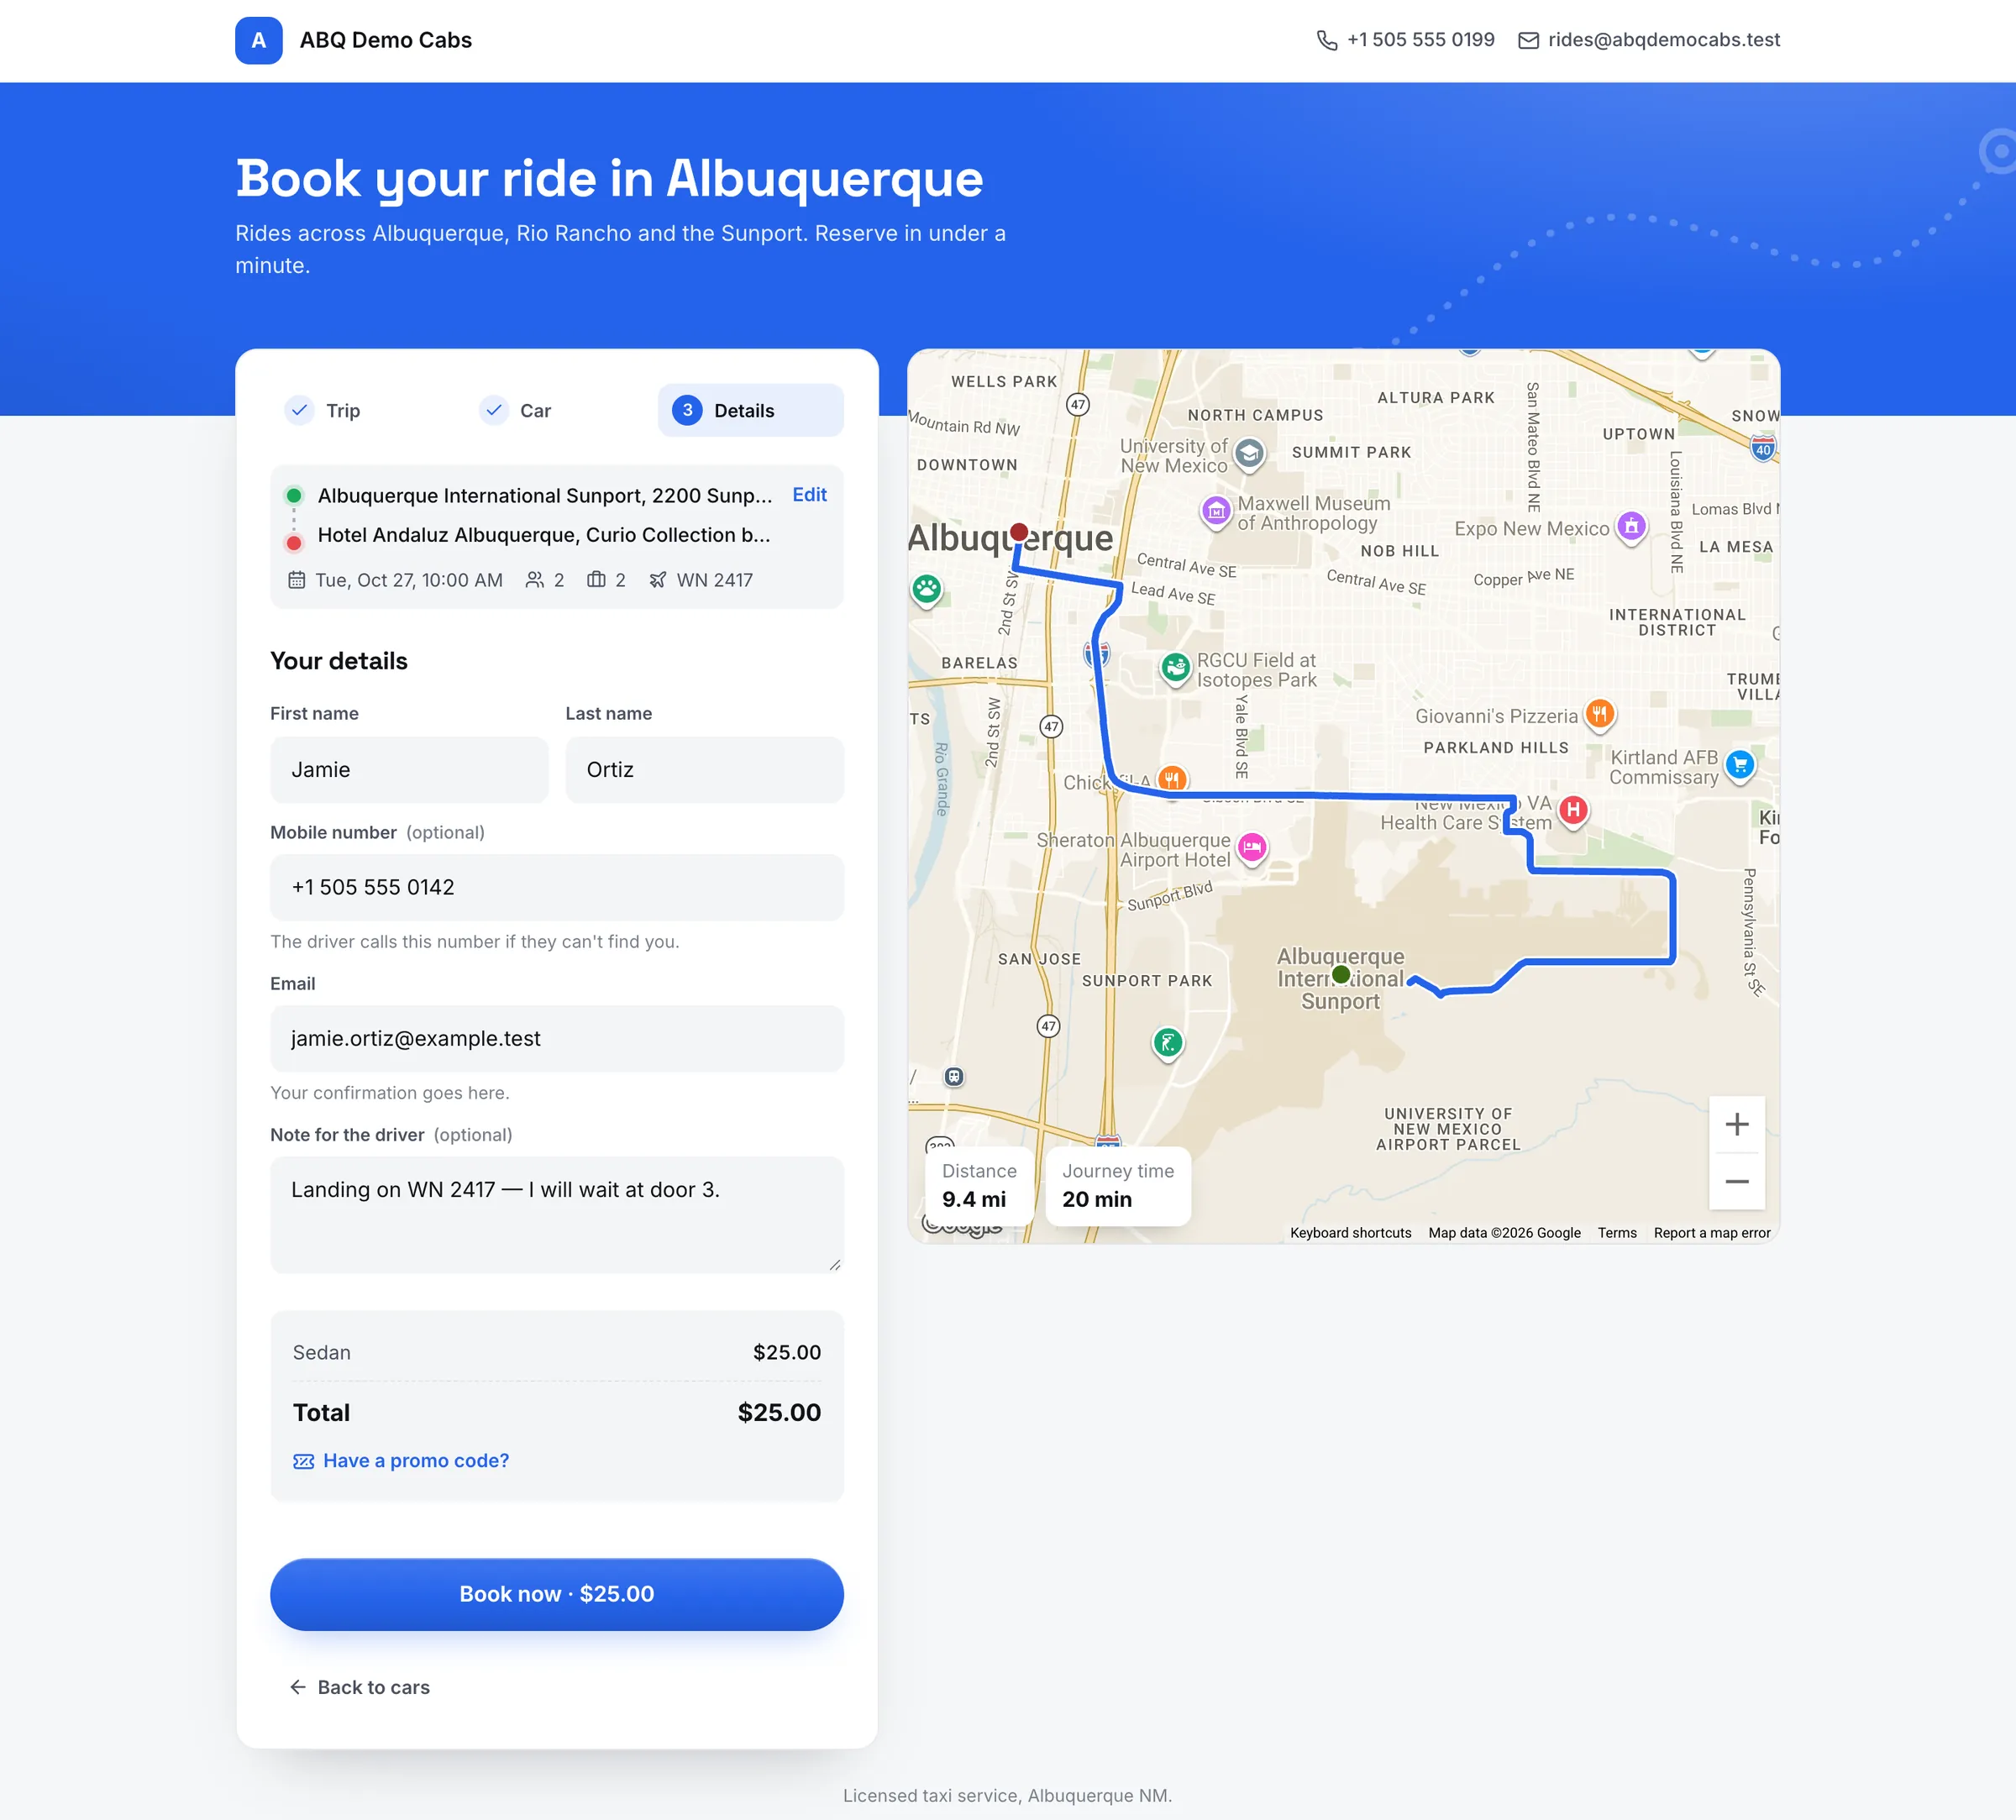
Types their name, e-mail, phone and a note for the driver, then presses Book now · $25.00.
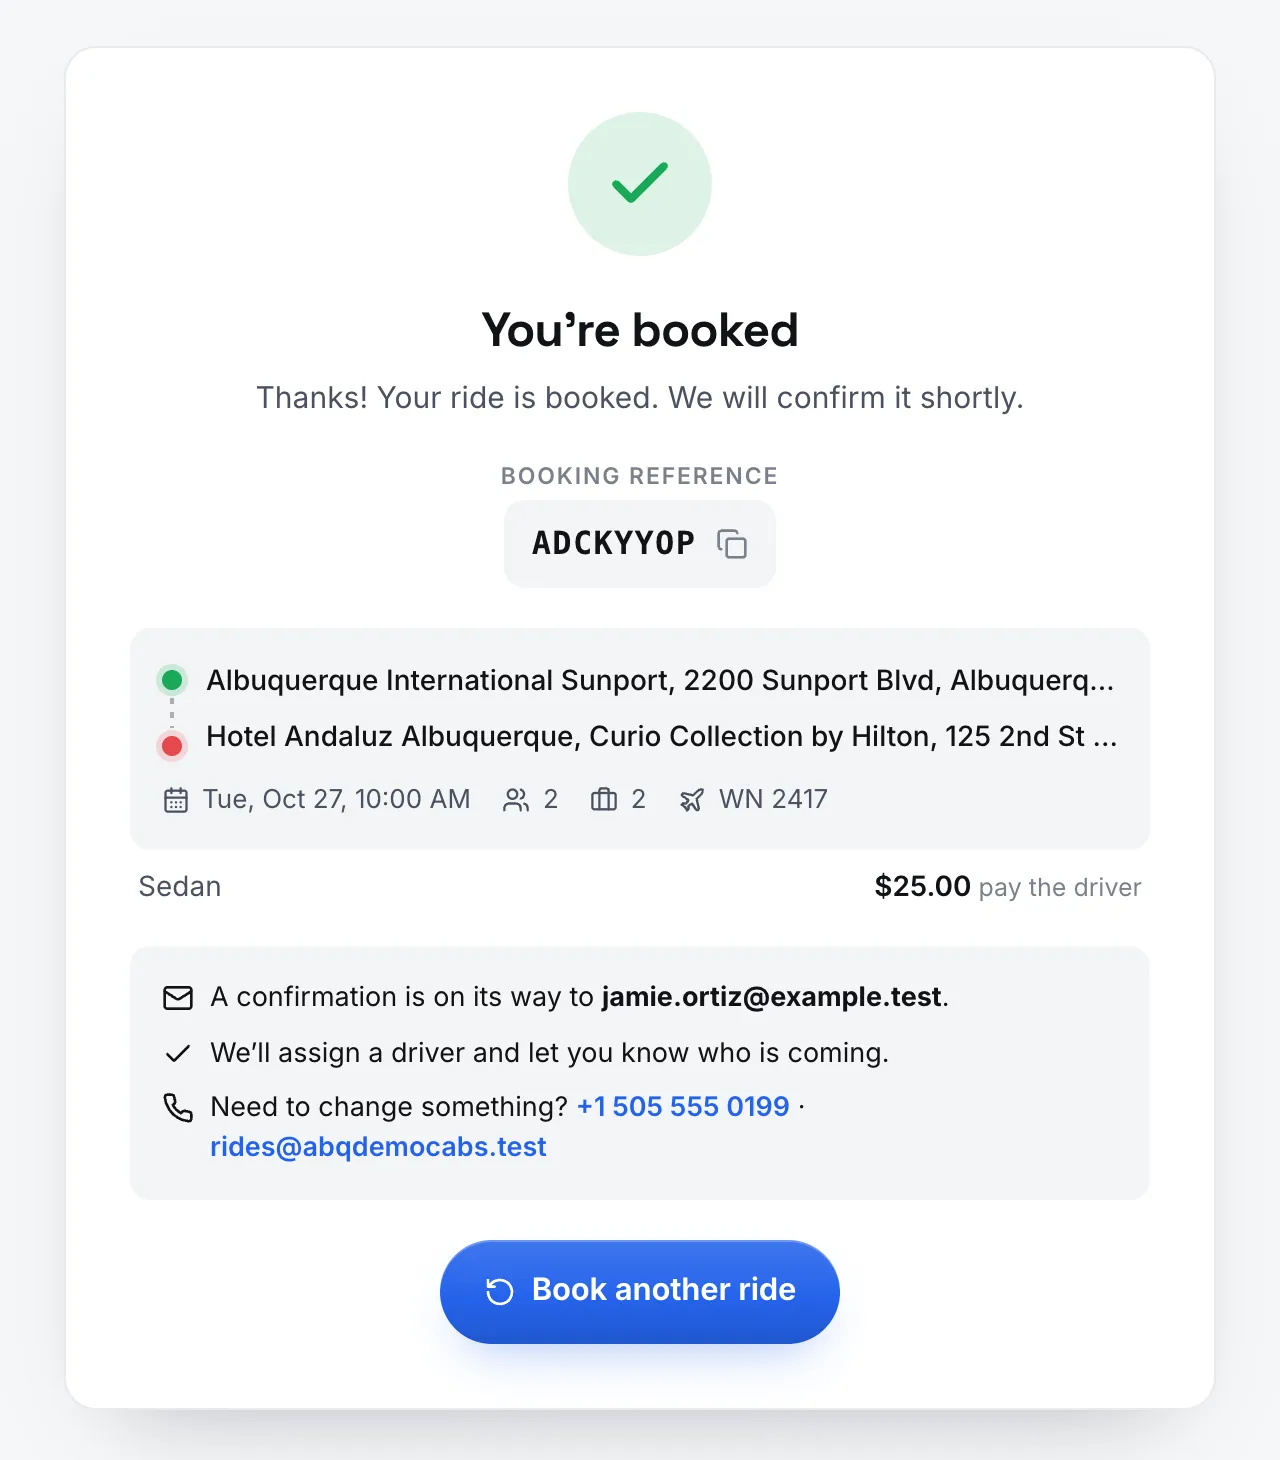
Gets a booking reference on screen and a confirmation e-mail. The job appears in your console under Unassigned.
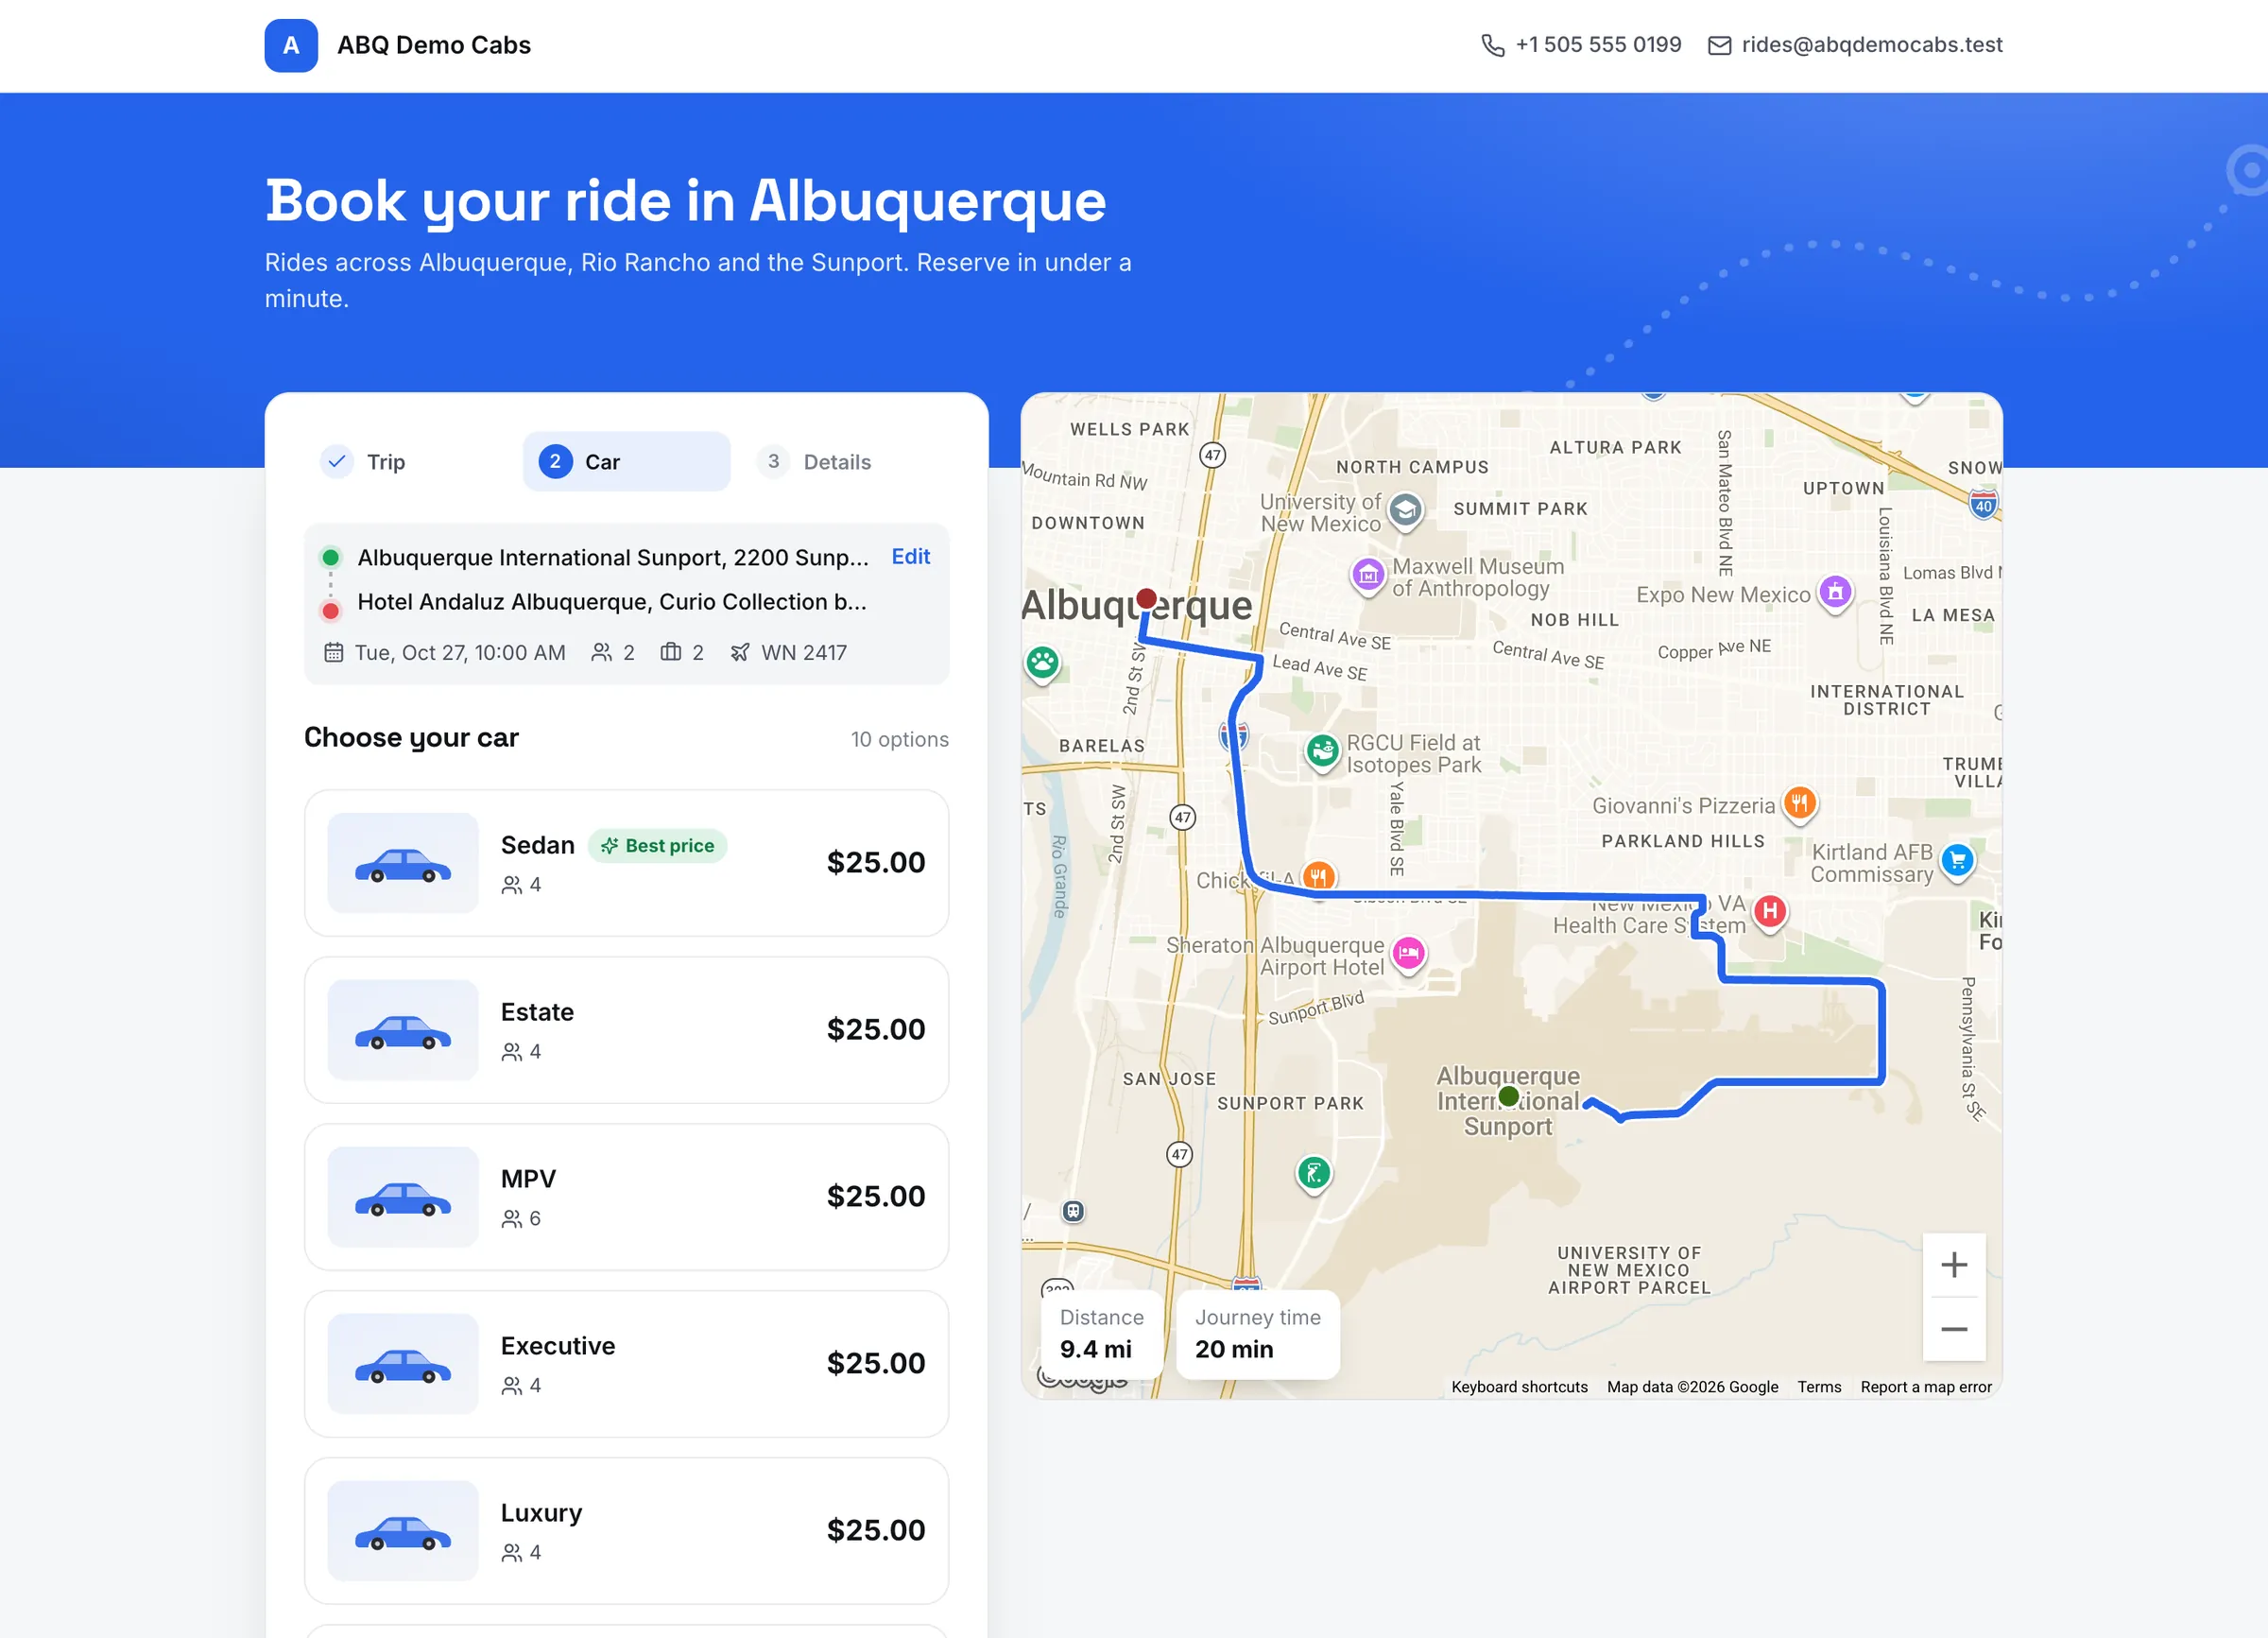
Step 2: Car.
Click a number or a line to spotlight it
1Step 2 · Car Step 2 of 3.
2Summary of the ride: route, time, passengers, bags, flight Everything entered so far: route, Tue Oct 27 10:00 AM, 2 passengers, 2 bags, flight WN 2417.
3Edit (go back and change) Go back to change the trip.
4Choose your car (number of options) How many options there are.
5Vehicle type and seats · best price The car type, its seats, and a Best price tag on the cheapest.
6Price for this ride The price for this ride with that car: $25.00, the Sunport → Downtown flat price.
7Tap a car to choose it Tap a car, then Continue at the bottom.
Step 3: Details.
Click a number or a line to spotlight it
1Step 3 · Details Step 3 of 3.
2First name · last name The passenger's name.
3Mobile number (the driver calls it if they cannot find you) Optional. The driver calls it if they cannot find the passenger.
4Email (the confirmation goes here) The confirmation goes here.
5Note for the driver Anything the driver should know.
6Price and total What the ride costs, and the total.
7Have a promo code? Enter a promo code if they have one.
8Book now · price (sends the booking) Sends the booking, showing the price on the button.
9Back to cars Back to the car choice.
Confirmation.
Click a number or a line to spotlight it
1You’re booked The booking went through.
2Booking reference · copy The reference to quote when calling the fleet. The icon copies it.
3Ride summary Route, date, time, passengers, bags and flight.
4Price — paid to the driver $25.00, paid to the driver.
5Confirmation e-mail to the passenger A confirmation e-mail goes to the passenger.
6Book another ride Starts a new booking.
The same booking, found in Jobs Overview.
Click a number or a line to spotlight it
1Search jobs: the booking reference Paste the reference to find the job.
2State: Unassigned — needs a driver Unassigned: it waits for a car like any other job.
3Car type and pick-up zone Sedan, picked up in the Sunport (Airport) zone.
4Pick-up time and date 10:00 on 2026-10-27.
5Total: $25.00 $25.00, the price the passenger saw.
6Passenger and phone Jamie Ortiz and the phone number entered.
7Source: Web Web: booked on your booking page.
8.3 IVR, Reception tool and Rebranding apps
IVR lets callers book by pressing keys on their phone. TaxiDex does not provide the phone line: you connect a number from your own Twilio account, and calls are refused until the Twilio account is connected under Integrations.
Reception tool is a cut-down booking screen for a hotel or venue front desk. Staff sign in against a business account and book for guests without seeing the rest of your operation. Switch it on and choose which business accounts may use it.
Rebranding apps opens Your brand & logo: the logo, colours, sender e-mail, support contact and custom domain used on e-mails, receipts and reports. The booking page has its own logo and colour, set under Online booking.